EN - 6 SE-DV54-1
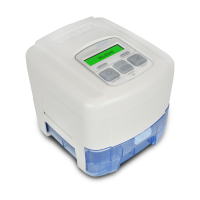
With Heated Humidification
CAUTION–The height of the SleepCube must be lower than the mask when using a humidier to prevent water from
getting into mask.
1. Ifyoursystemincludesahumidier,pleasefollowstepsinFigures1-7.
a. Remove the air supply tubing from the back of the device.
b. Locate the air supply port at the bottom of the device. Remove the port plug and insert it into the air supply
port in the back of the device.
c. Locate the heater power connector on the bottom of the device. Remove the connector cover and insert it into
thestorageopeninginthebottomofthehumidiercradle.
KEYPAD AND DISPLAY
Basic CPAP Controls
Name Symbol Function
ON/OFF
TheON/OFFbuttonstartsandstopstheowofairfromthedevice.
HEATER
IfyourSleepCubehasaheater/humidierattached,thesebuttonsadjusttheheatersetting.
Increase the setting for more humidity and decrease the setting for less humidity.
DELAY
The Delay button activates the comfort delay feature and only functions if this feature has been
enabled. To understand how to set the parameters of this feature, please refer to the Using the
Comfort Delay Feature found on page EN - 6.
NOTE– The left and right arrow keys on the control panel provide access to menus for specic settings. Ask your
homecare provider for more information.
OPERATION
1. Fully insert the power cord into the back of the device. Plug the other end of the power cord into the AC wall outlet.
2. Attach air supply tubing to air supply port in the back of the device.
3. Prepare the mask (supplied by your equipment provider) by referring to the mask’s instruction guide.
4. Connect the air supply tubing to the mask.
NOTE–The air supply tubing supplied with the device is specially designed to prevent kinking and allow you to receive
optimal airow. Use only the 22 mm diameter, smooth-bore, kink-resistant tubing supplied with this device or an air supply
tubing recommended by your equipment provider.
Start-up
Put on your mask and press the ON/OFF button on the keypad OR put on your CPAP mask and take a few breaths to turn
onairowautomatically.Thepressureinyourmaskwillrisetothesetpressureinabout10seconds.
NOTE–If the device does not automatically start after taking 2-3 breaths, this feature may have been disabled. If Auto ON/
OFF is disabled, you must manually press the ON/OFF button to start and stop the device.
The keypad display shows the actual mask pressure while the device is in use. Because this is the actual pressure, the
device pressure reading may vary slightly as you breathe.
IfyourDeVilbissSleepCubesystemincludesahumidier,itsheatercontrolsandstatusaredisplayed.
NOTE– If the display on your device is not similar to those listed above, refer to the section titled “Patient Messages” on
page EN-8.
Using the Comfort Delay Feature
YourSleepCubehasacomfortdelayfeaturetohelpmakeiteasierforyoutofallasleep.Theairowwillstartatalow
pressureandthengraduallyramp-uptotheprescribedsettingoverthelastfewminutesofthespecieddelaytime.
NOTE–When the delay comfort feature is activated, a message will ash on the display periodically, indicating the amount
of time remaining in the delay.
Youcanadjusttheamountoftimespentincomfortdelaybyusingtheadvanceddevicecontrols.TheDelayTimecanbe
adjustedfrom0to45minutesin5-minuteincrements.
NOTE–If you are unable to change the delay time, your provider has locked this setting.
Pressthedelaybuttontoactivatethecomfortdelayfeature.Theairowpressurewilldroptotheprescribedcomfortdelay
pressure.