12.8 Drilling/Boring
Fig.
69
12.9 Special Mitre
Fences
Fig.
70
12.10 Automatic
Safety
Return
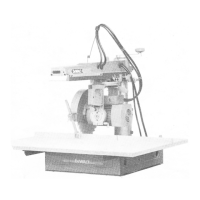
12.11 Legstands
Fig.
73
At
the
rear
end of the
motor
shaft,
there
is a
threaded
location
to
accept
the
optional Drill Chuck (Fig. 67),
enabling your machine
to be
used
as a
radial
drilling
unit.
The
capacity
of the
chuck
available
is
10mm
or
%".
It
is
particularly useful
in
preparing material
for
dowels (Fig.
68),
and for
drilling
a
series
of
identical holes (Fig. 69).
It
also enables many
drill
accessories
to be
used with your
Powershop,
such
as
drill
bits,
boring
bits,
grinding
wheels
and
arbors, sanding
and
polishing discs, flexible drive, etc.
Note:
For
complete
safety,
always remove
the
Sawblade
before
fitting
the
Drill Chuck.
Special adjustable mitre fences
are
available
as an
accessory
to
extend
and
speed-up
the
angle-cutting
facility
of the
Powershop (Fig. 70).
The
non-identical pair
of
fences
fit in
place
of the
standard wooden fence (Fig.
71)
and
allow
cuts
to be
made from 0-90°, including acute
angles left
or
right,
as
well
as the
more normal angles
in
excess
of
45°.
In
picture
framing,
for
example,
you
would
set
material
against
the
left-
hand
fence
for the
first
angle
and
then
the
next
piece
would
be
laid against
the
right
hand side
to cut
the
matching
45°
angle
and
guarantee
a
neat
90°
corner.
If the
project
requires various mitre angles,
use of
these
fences
avoids
having
to
make
a new cut in the
standard
fence
each
time,
since
the
sawblade always passes down
the
middle
between
the
pair
of
special fences.
This
accessory
(Fig.
72)
ensures that
the
blade returns
to
the
rest
position behind
the
fence after each cross-cut.
It
is
particularly
useful when
the
project involves repeated
passes
of the
blade.
The
return mechanism
is
mounted
via
the two
holes
in the top
right-hand side
of the
column, with
the
other
end of the
cable attached
to the
yoke assembly.
There
are two
different types
of
Legstand.
DW1251
Cat.
No.
DA850
fits
the
DW1251
(Fig.
73) and is
assembled
as
follows:
The
stand
comprises
12
strips
of
angle iron.
(i) The 4
legs
are the
long angle pieces with holes
at
one end
only.
The
other ends
of the
legs
accept
the
orange rubber feet.
(ii)
Of the
remaining
8
pieces,
two
pairs
fit
together
at
the top of the
legs
to
form
the top of the
Legstand
which
is the
same size
as the
base frame
of the
DW1251.
(iii)
The
remaining
two
pairs
fit to the
legs
at
about
one
third
up
from
the
feet.
(iv)
Do not
tighten
any of the
nuts
and
bolts
in the
Legstand assembly
until
all
have been properly
located
in the
relevant holes.
(v)
Once
you
have been able
to
tighten
the
stand
'
together,
the
Powershop
can be
secured
to the
top.
If
you
do not
have
an
assistant,
the
best
way is
probably
to lay the
Powershop down with
its
column
on
the
floor.
You can
then
lay the
Legstand down
and
bolt
it via the
holes provided.
The
complete
Powershop plus Legstand
can
then
be
carefully stood
upright.
Fig.
67
Fig.
68
Fig.
71
Fig.
72
24