5
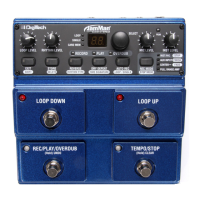
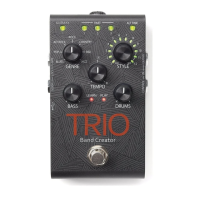
Connectors and User Interface
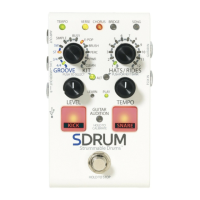
2. TEMPO Button
The TEMPO button provides the following functions:
• Tempo Indication – When a song part is empty and the metronome is on, or if a song part is not
empty, the TEMPO LED will flash at the rate of the current song tempo. The TEMPO LED will light red for
the first beat of the bar (during playback), dim green for the subsequent beats, then bright green for
the subsequent beats of the last bar. If the tempo of a song is changed, the subsequent beats will light
amber instead of green to indicate the change. Note that the TEMPO button can be pressed and held to
store the new tempo of the song.
• Metronome – With an empty part selected, press and hold the TEMPO button for ~2 seconds to turn
the metronome on or off. See 'Using the Metronome' on page 11 for more information.
• Tap Tempo – Tap the TEMPO button at the rate of the desired tempo to change the tempo of a song.
• Update Nominal Tempo – If the tempo of a song is altered using the TEMPO button or TEMPO knob,
it will not be automatically stored to the song. To store the updated tempo, press and hold the TEMPO
button for ~2 seconds. This will store the new tempo setting as the nominal (center detent TEMPO
knob) setting.
See 'Adjusting the Tempo' on page 21 for more information.
3. GROOVE/KIT Encoder
Turn then press this encoder to change the drum timing, feel, embellishment amount, and kit. The
following options are available:
• Timing – The first two settings select between 3/4 or 4/4 time signatures.
• Feel – The next two settings select between a straight (ST) or swing (SW) feel.
• Embellishment Amount – The next three LEDs select how simple or busy the drum part will be.
• Kit – The remaining LEDs select between the five available drum kits. See 'Selecting the Drum Kit' on
page 17 for more information.
4. ALT Button (Kick/Snare)
Press this button to select alternate voicings for the kick and snare:
• LED Off – Standard Voicing
• LED Green – Alternate Voicing
The alternate voicings are different for each drum kit. See 'Selecting Alternate Sounds for the Kick/Snare' on
page 18 for more information.
5. LEVEL Knob
This knob adjusts the output level of the drums. Adjust this knob to match the level of the drums to the
guitar.
6. LEARN LED
This LED indicates the following functionality:
• Slowly Flashing Red – Indicates an empty song part is selected.
• Rapidly Flashing Red – Indicates the SDRUM is armed for learning and will begin learning the drum
pattern once the KICK/SNARE pads are played, the guitar is scratched, or the FOOTSWITCH is pressed.
• Solid Red – Indicates the SDRUM is learning the drum pattern.