4
This section describes how to activate your re using either the manual controls or remote control.
MANUAL CONTROLS
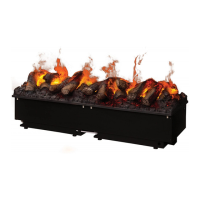
The manual controls are located beneath the fuel bed. (Fig 26)
CAS500R
Mains Switch - Controls the electricity supply to the appliance. (Fig 26A)
Note: This switch must be in the ‘ON’ ( I ) position for the appliance to operate
Button Panel - Controls the functioning of the appliance. (Fig 26B)
• is the on/standby button. Press it to turn on and off the ame effect. Turning it on will be indicated by a single
beep and the main LED lights activating. Be careful not to look directly into the LED’s as they can be very bright.
Although the main LED lights operate immediately, a further 45 seconds of warm up time is required before the
ame effect starts.
• is the Pairing button. This will pair your remote control to the receiver. See ‘Remote Control Operation’ for details.
• is the test mode button. This will be used by the manufacturer and the Service Engineer.
• is the reduce ame button. Press this to reduce the height/intensity of your ame. You will hear an audible beep
when you reach the minimum level.
• is the increase ame button. Press this to increase the height/intensity of your ame. You will hear an audible
beep when you reach the maximum level.
• is the reduce re crackling sound. Press this to reduce the volume of the crackling sound. The minimum volume
for this is off
• is the increase re crackling sound. Press this to increase the volume of the crackling sound.
Operating the Product
product is orientated so that the side of the product with the slots is left free and not connected to rst end of the
installation (Fig 18).
1. When the rst product is installed and securely xed, prepare the second product by unscrewing the joining screws
(Fig 19A) and screwing them into the opposite side of the metalwork (Fig 19B). Please note, these screws should
not be fully tightened and 5-10mm of thread should be left protruding from the edge of the product.
2. Fit the second product beside the rst product, ensuring the protruding screws of the second product engage with
slots of the rst product. (Fig 20)
3. Ensure the second product is at the correct height to match the rst product and ensure it is adequately level. This
can be done by adjusting the adjustable feet with a at head screwdriver. (Fig 8) The levelness of the product can
be veried by checking the on-board level (Fig 9)
4. Tighten the screws of the second product so that it joins tightly with the rst product.
Additional products can be tted to the second product by following steps 1-4 above.
Multiple Product Control
Each product has been supplied with its own link wire in order to form a hardwire link between multiple products. Please
follow the instructions below to link multiple products together.
1. Identify the ‘master’ product in the installation. It should the product on the left hand side of the installation.
2. Connect the Bluetooth receiver to this product (CAS500 - Fig 21A, CAS1000 – Fig 22A). This will be the only
Bluetooth receiver in the installation and will control the rest of the products in the installation. In an installation of
both CAS500 & CAS1000 products, a CAS500 receiver (Fig 11) should be connected to the ‘master’ product.
3. In installations where a CAS500 is the ‘master’ product, connect the CAS500 link wire to the connector in the plastic
top cover (Fig 21B). In installations where a CAS1000 is the ‘master’ product, connect the CAS1000 link wire to the
3.5mm jack which is housed in the plastic (Fig 22B).
4. Feed the wire through the hole in the metalwork and into the housing of the next product in the installation (Fig 23)
5. For a CAS500, plug the link wire into the 3.5mm jack housed in the plastic (Fig 24). For a CAS1000, plug the link
wire into the 3.5mm jack housed in the plastic on the left hand side module (Fig 25).
6. Repeat steps 3-5 above in order to connect subsequent products in the installation.
Once set up, any command sent to the rst product will be sent to all subsequent products. Flame height control and
sound level control of the master product is matched for all subsequent products. If individual ame height control is
required, this can be done by using the on board ame height controls on the product (Fig 26).
Additionally, the software of the product has been designed in such a way that when multiple products are connected
to a main switch, products can be manually switched off and when switched back on they will operate in the same state
as before they were switched off.