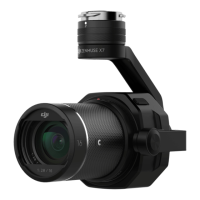
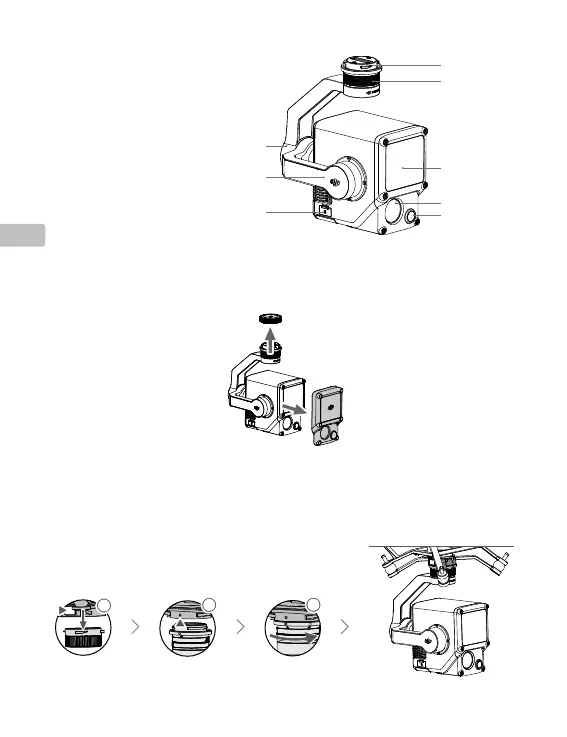
EasyManuals Logo

dji ZENMUSE L1 Quick Start Guide

dji ZENMUSE L1
128 pages
To Next Page IconTo Next Page
To Previous Page IconTo Previous Page
Page #58 background imageLoading...
Page #58 background image
56
ES
Descripción
1. Conector del estabilizador
2. Motor de paneo
3. LiDAR
4. Cámara de mapeo RGB
5. Sensor visual de
posicionamiento auxiliar
6. Ranura para tarjeta microSD
7. Motor de inclinación
8. Motor de rotación
1
3
6
7
8
4
5
2
2. Presione el botón de la aeronave que se usa para separar el estabilizador y la cámara. Gire la tapa del
estabilizador de la aeronave para quitarla.
3. Alinee el punto blanco del estabilizador con el punto rojo de la aeronave e inserte el estabilizador.
4. Gire el seguro del estabilizador a la posición de cierre alineando los puntos rojos.
Instalación
1. Retire la tapa del estabilizador y el protector del objetivo.
2
11
3

Other manuals for dji ZENMUSE L1

Questions and Answers:

Question and Answer IconNeed help?

Do you have a question about the dji ZENMUSE L1 and is the answer not in the manual?

dji ZENMUSE L1 Specifications

General IconGeneral
Product typeCamera module
CompatibilityMatrice 300 RTK
Product colorBlack
Brand compatibilityDJI
Operating temperature (T-T)-20 - 50 °C
Megapixel20 MP
Sensor typeCMOS
Maximum frame rate30 fps
Camera shutter speed1/8000 - 8 s
ISO sensitivity (max)12800
ISO sensitivity (min)100
Image formats supportedJPEG
Video formats supportedH.264, MOV, MP4
Maximum video resolution3840 x 2160 pixels
Field of view (FOV) angle95 °
Weight and Dimensions IconWeight and Dimensions
Depth169 mm
Width110 mm
Height152 mm
Weight930 g

Related product manuals