Do you have a question about the Dobot CR A Series and is the answer not in the manual?
Discusses responsibilities and limitations of Dobot regarding robot system safety.
Defines integrator responsibilities for safety laws, regulations, and hazard elimination.
States that safety info is not a warranty; robot may cause injury/damage.
Specifies industrial use, collaborative operation, and prohibited applications.
Explains various safety warning signs used in the document and on the product.
Provides essential safety instructions for operating the robot system for the first time.
Offers crucial precautions for ensuring operator safety during robot system operation.
Covers emergency procedures, including stop switch function and recovery.
Explains the function of the emergency stop switch for immediate robot motion halt.
Details the process of unlocking the emergency stop and resuming robot operation.
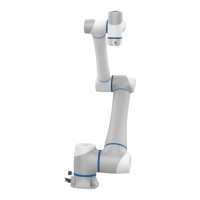
Presents an overview of the robot system, including arm, controller, and cables.
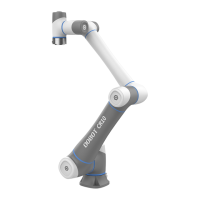
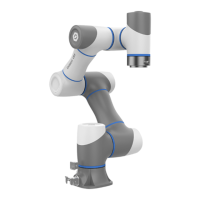
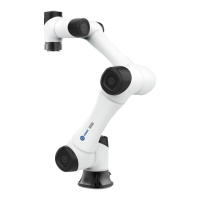
Describes the composition and structure of the CR A series robot arm.
Details the components of the robot arm, including joints, arms, and interfaces.
Explains the function and operation of buttons and indicator lights on the robot arm end.
Introduces the controller models CC262 and CC263 for the robot arm.
Outlines the PC and App requirements for operating the robot system.
Explains the different coordinate systems used for robot arm operation and programming.
Defines the joint coordinate system based on the robot arm's motion joints.
Describes the custom workpiece or workbench coordinate system definition.
Defines the tool coordinate system based on the tool center point (TCP) and end flange.
Explains the robot arm's home posture and how to calibrate it.
Discusses singularity points that can affect robot arm movement and control.
Details the conditions leading to shoulder singularity in the robot arm.
Explains the conditions causing elbow singularity in the robot arm.
Describes the conditions leading to wrist singularity in the robot arm.
Provides data on robot arm braking time and distance during emergency stops.
Details the dimensions and working space for the CR3A robot arm.
Provides detailed dimensions and working space diagrams for the CR3A robot arm.
Shows base mounting dimensions for the CR3A robot arm.
Details the end flange dimensions for the CR3A robot arm.
Explains how to interpret and use load curves for the CR3A robot arm.
Details the dimensions and working space for the CR5A robot arm.
Provides detailed dimensions and working space diagrams for the CR5A robot arm.
Shows base mounting dimensions for the CR5A robot arm.
Details the end flange dimensions for the CR5A robot arm.
Explains how to interpret and use load curves for the CR5A robot arm.
Details the dimensions and working space for the CR7A robot arm.
Provides detailed dimensions and working space diagrams for the CR7A robot arm.
Shows base mounting dimensions for the CR7A robot arm.
Details the end flange dimensions for the CR7A robot arm.
Explains how to interpret and use load curves for the CR7A robot arm.
Details the dimensions and working range for the CR10A robot arm.
Provides detailed dimensions and working range diagrams for the CR10A robot arm.
Shows base mounting dimensions for the CR10A robot arm.
Details the end flange dimensions for the CR10A robot arm.
Explains how to interpret and use load curves for the CR10A robot arm.
Details the dimensions and working space for the CR12A robot arm.
Provides detailed dimensions and working space diagrams for the CR12A robot arm.
Shows base mounting dimensions for the CR12A robot arm.
Details the end flange dimensions for the CR12A robot arm.
Explains how to interpret and use load curves for the CR12A robot arm.
Details the dimensions and working space for the CR16A robot arm.
Provides detailed dimensions and working space diagrams for the CR16A robot arm.
Shows base mounting dimensions for the CR16A robot arm.
Details the end flange dimensions for the CR16A robot arm.
Explains how to interpret and use load curves for the CR16A robot arm.
Details the dimensions and working space for the CR20A robot arm.
Provides detailed dimensions and working space diagrams for the CR20A robot arm.
Shows base mounting dimensions for the CR20A robot arm.
Details the end flange dimensions for the CR20A robot arm.
Provides dimensional specifications for the CC262 and CC263 robot controllers.
Shows the external dimensions of the CC262 controller.
Shows the external dimensions of the CC263 controller.
Presents an overview of the electrical interfaces on the controller front panel.
Describes the electrical interfaces on the front side of the controller.
Defines the pin assignments for connecting the SmartPendant or emergency stop switch.
Details the I/O interface panel with digital, analog, and safety I/O connections.
Explains how to power the I/O interface using internal or external power supplies.
Describes wiring for digital inputs (DI) and outputs (DO).
Details the wiring for analog inputs (AI) and outputs (AO).
Explains how to remotely control the controller power on/off.
Guides on connecting an encoder for displacement measurement.
Covers the use of the RS485 interface for Modbus RTU communication.
Details the safety I/O interfaces for emergency stop and protective stop functions.
Describes the heavy-duty and tool I/O interfaces on the robot arm.
Details the pinouts and definitions for the robot arm's heavy-duty interface.
Defines the pin distribution and definitions for the tool I/O aviation plug.
Specifies the recommended environmental conditions for installing the robot and controller.
Guides on checking the shipping list and contents during unpacking.
Details the procedures for installing the robot arm in various postures.
Explains how to position and fix the robot arm base for installation.
Guides on placing and installing the robot controller for optimal heat dissipation and wiring.
Describes the process of installing an optional protective cover for the controller.
Explains how to fix and position tools on the robot arm's end flange.
Provides step-by-step instructions for wiring the controller, robot arm, and power.
Outlines the procedure for powering on, connecting, and debugging the robot arm.
Lists safety procedures and warnings to be observed during robot maintenance.
Describes essential maintenance inspections and plans for long-term high performance.
Explains the warranty coverage, duration, and procedures for claims.
States Dobot's commitment to product improvement and disclaims responsibility for errors.
Lists technical specifications for CR3, CR5, and CR7A robot models.
Lists technical specifications for CR10A, CR12A, and CR16A robot models.
Presents detailed technical specifications for the CR20A robot model.
| Degrees of Freedom | 6 |
|---|---|
| Power Supply | 100-240 VAC, 50/60 Hz |
| Protection Level | IP54 |
| Type | Collaborative Robot |
| Safety Features | Collision detection, emergency stop |
| Communication Interfaces | Ethernet, USB, RS485, CAN |
| Programming | Scripting |
| Operating Temperature | 0°C to 45°C |
| Control Method | Teach Pendant, PC, Mobile App |