dormakaba 9000 Series MLR Installation Instructions
95071186 01-2021Exit Device
6
Field Troubleshooting Guide
. Field troubleshooting guide
dormakaba makes every effort to ensure all MLR units are adjusted properly and tested prior to shipping
with units attached to the respective chassis assembly they will be used with, along with the proper
power supply. This is a guide to assist in field trouble shooting should the need arise.
Remove input power prior to attempting to make any corrections or changes listed on the following pages.
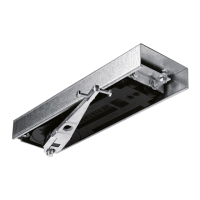
1. When energized the touch bar attempts to pull in and retract latches but pops back out or jumps.
a. Check rod adjustments if being used with a surface vertical rod or concealed vertical rod
device. If rods are too long the above will happen. Re-adjust rods and re-energize device
and check again. The touch bar should travel almost completely down and almost flush
with the rear filler and hold as long as energized.
Note: Pan head
screws (3) MUST
be used to mount
latches to door.
Round head screws
can cause the rods
to bind and not
move properly up
and down.
Top latch fully extended
and deadlatched.
2. When energized the touch bar pulls completely in, however latches are not retracted far enough to exit door.
a. Check rod adjustments if being used with a surface vertical rod or concealed vertical rod
device. If rods are too short the above will happen, rotate rod clockwise to lengthen.
Readjust rods and re-energize device and check again.
3. When energized the touch bar does nothing.
a. Verify all wire connections and that the power supply has power from main power source.
b. Verify proper power supply DORMA PS610RF/PS532RF is being used as well as 24VDC output.
c. Verify proper card is being presented to card reader (if being used).
d. Verify wire size and run distances are to required specifications. (See page 1 of instruction sheet)
4. When de-energized the touch bar stays down or rods do not drop and latches do not extend.
a. Check to ensure the touch bar is not bound in the filler or chassis cover area. Check to ensure rods
are not bound by mounting screws or cover screws. Ensure device has been de-energized. Ensure
top strike is aligned properly with latch to engage tripping lever and release latch bolt.
Top latch fully extended
and deadlatched. Rod
shown is too long. Adjust
upward by rotating counter
clockwise until flush with
bell crank.
Top latch fully extended
and deadlatched. Rod
fully extended and flush
with bell crank.
Rod fully extended
and flush with bell
crank. Retaining plate
installed flat against bell
crank with leg extending
through rod and mating
hole in bell crank.
Note: Flat head
screws MUST be
used to mount
chassis to door.
“Specified fastener’s should be used at all times during
installation. Improper fastener’s may cause product to fail
or void UL listings or warranty.”