17
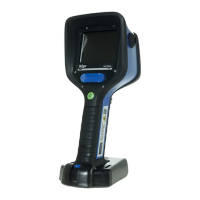
Activating the video function
● To activate the video function, press the button on the handle for
more than one second.
LED 1 is on, a video is taken.
● To end video recording press the button again.
LEDs
The LEDs on the image capture handle indicate the following:
During boot up, LED 2 flashes quickly. This indicates that the handle
functions correctly. During operation however, flashing LEDs indicate
errors. In this case please refer to “Image capture handle” on
page 22.
NOTICE
If the camera is in stand-by mode, the video function is deactivated.
The handle must be switched on to take videos.
LED 1: ON Picture or video is currently been taken.
OFF No acquisition in progress.
LED 2: ON Memory card is full/less than 10 MB remain
on the memory card. No further pictures or
videos can be recorded. Delete data from the
memory card to regain storage capacity.
OFF The system is ready for use.
After Use
Clean and check the thermal imaging camera after each use as
described in the following chapters.
Cleaning the camera
Avoid scratching the optical surfaces when cleaning the thermal
imaging camera.
● Wipe the thermal imaging camera with a damp, lint-free cloth. If
necessary, clean with warm soapy water.
● Dry with a soft, lint-free cloth. Allow the thermal imaging camera to
dry before putting it back into the carrying case.
● Periodically clean connector terminals, operating elements, and
battery latch with a soft, lint-free cloth.
CAUTION
Do not use solvents or paint thinners to clean the thermal imaging
camera. Otherwise, the camera housing may become degraded.
CAUTION
Never remove the cover. Removing the cover may cause possible
injuries by electrical shock. Only authorized personnel may service
the unit.
 Loading...