to adjust its settings.
Corner placement
This placement yields maximum boost of bass level but potentially uneven distribution of bass in the room (room-
modes), particularly if the room is square or shoe-box shaped.
From the listening position, check if the bass is even across the entire bass spectrum. If not, move the subwoofer
out of the corner. Try moving it along either wall.
Next to wall, away from corner
This position still provides considerable boost but less than the corner placement as above. Interaction with room
modes can also still be considerable but less so than with corner placement.
From the listening position, check if the bass is even across the entire bass spectrum. If not, move the subwoofer
away or towards your listening position until the most even response has been obtained.
Avoid placing the subwoofer exactly half-way or at a quarter of the wall’s length.
Free standing, away from wall and corner
This position will give least boost compared to wall or corner placement, but in general oers the best flexibility at
achieving most even bass distribution at the listening position.
Avoid placing the subwoofer exactly half-way or at a quarter or third’s length of either sidewall.
Particularly in smaller square or “shoe-box” shaped rooms the free standing position is recommended.
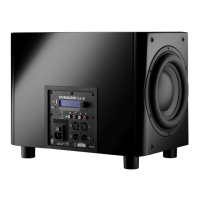
Sub 6 DSP Features
The Sub 6 incorporates signal processing that can compensate for the time delay and volume level dierences
between the subwoofer and main speakers resulting from their relative positions with respect to the listening
position. Once you have positioned your subwoofer, measure the distances as illustrated in the diagram. The
measured distances should then be specified at the appropriate locations in the subwoofer configuration menu.
The configuration menu is described in the following of this manual.
Note
The Sub 6 signal processing is able to compensate for a maximum of 5.35 m dierence between subwoofer
and main speaker distances to the listening position.
Sub 6 Feet
The Sub 6 is supplied with rubber feet and option for spikes. Spike feet are intended to be used on carpeted solid
floors. The spikes pierce the carpet to support the subwoofer on the floor below protecting the carpet from
damage and providing a stable foundation.
If floor spikes are to be used, screw a spike and lock-nut into each tapped hole leaving a length of spike
extending beyond the lock-nut so that when the subwoofer is upright the lock-nuts will “float” just above the
carpet.
Tighten three of the lock-nuts with the included spanner leaving one locknut finger-tight to aid adjustment once
the subwoofer is placed in its final position. Once the final position has been established adjust the length of the
loose spike so that the subwoofer is level and does not rock. Finally, tighten all loose lock-nuts.
Take care when installing floor spikes. They are sharp and can cause injury.
Installation 15