BRAKES - REAR MECHANICAL
Page K-9
Repair and Service Manual
Read all of Section B and this section before attempting any procedure. Pay particular attention to all Notes, Cautions and Warnings
Adjustment of free travel depends on manufac-
turing date.
The correct brake pedal free travel setting varies
depending on the date of manufacture. Older models
(latch arm without a 1/4" (6 mm) diameter hole in the
lower portion (Ref Fig. 8 on page K-8)) should be set to
2" – 2 1/4" (5 - 6.5 cm) free travel. Starting model year
2001 (with a 1/4" (6 mm) diameter hole in the lower end
of the latch arm), free travel should be set to 7/8" - 1 1/8"
(2.2 - 2.9 cm) (Ref Fig. 9 on page K-9).
The parking brake latching force may be checked as a
verification after setting brake pedal free travel. The pre-
ferred method of checking parking brake latching force is
to place a ‘bathroom’ scale on the service and parking
brake pedals. Using both feet, press the scale down
evenly against the parking brake pedal until it latches.
The parking brake should latch between 65 and 75 lbs.
(29 - 34 kg) indicated on the scale (Ref Fig. 20 on page
K-15).
Adjust brake pedal free travel as described in ‘MAINTE-
NANCE AND REPAIRS’ on page K-14 if required.
4. Inspect the brake cables.
Inspect for damage to the outer cable, fraying of the
inner cable or lack of free motion when the pedal is
applied and released. Inspect the brake cable sup-
ports to be sure the cables are properly secured. If
any of these conditions are found, replace both
cables and equalizer as a set.
5. Check the clevis pins.
Check clevis pins attaching the brake cables to the
brake lever. They must be loose when the brake
pedal has been released (Ref Fig. 19 on page K-15).
If the clevis pins are not loose, but brake pedal free
travel is correctly adjusted and the brake cables move
freely, the problem is likely in the wheel brake.
6. Inspect the brake cable equalizer linkage.
Inspect for signs of corrosion, damage, wear or
excessive misalignment (Ref Fig. 10 on page K-9).
Replace if corrosion, damage, or wear is found.
7. Inspect the compensator assembly.
Inspect for damage, corrosion or wear. Replace the
complete assembly if problems are found. In general,
no adjustment will be needed, as the spring assembly
is factory calibrated. With the parking brake disen-
gaged check that the compensator spring length is 3
15/16" (10 cm) (Ref Fig. 10 on page K-9). If an adjust-
ment is required, it should be made at the nuts at the
spring facing the front of the vehicle. Tighten the jam
nut firmly after adjusting.
8. Inspect parking brake pedal hinge.
Check for broken or rusted springs and correct reten-
tion of the hinge pin. Operate parking brake pedal to
confirm smooth operation of the hinge mechanism
(Ref Fig. 11 on page K-10).
9. Check the condition and operation of the parking
brake latching mechanism.
The parking brake should latch firmly and release as
soon as the accelerator pedal is depressed.
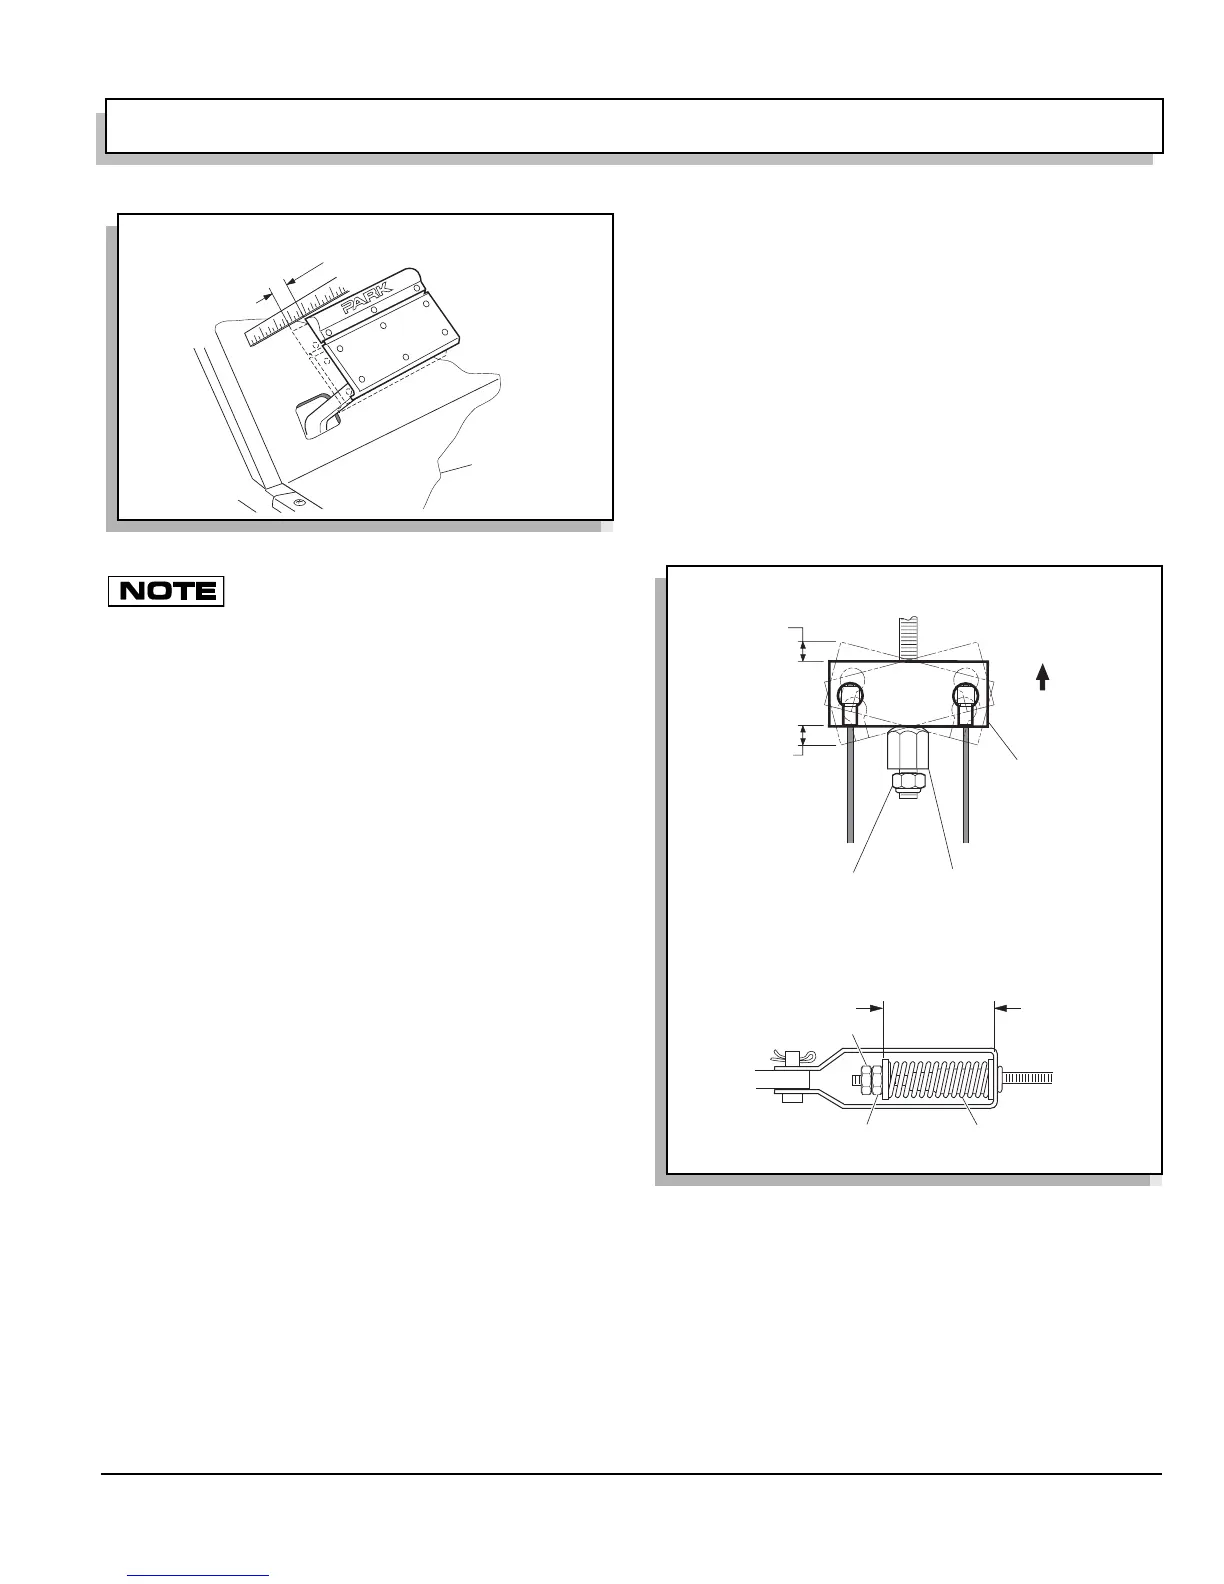
Fig. 9 Checking for Excessive Free Travel
Floor
Board
Measured Amount of Free Travel
Fig. 10 Equalizer and Compensator
Not To
Exceed
1/8"
(3 mm)
in
Either
Direction
View From Below
Front
Spherical Nut
Lock Nut
3 15/16"
(10 cm)
Spring
Adjusting Nut
Jam Nut
NOTE: This dimension is factory pre-set with the
parking brake disengaged and is not to be changed.
Normal
Position
 Loading...


