16
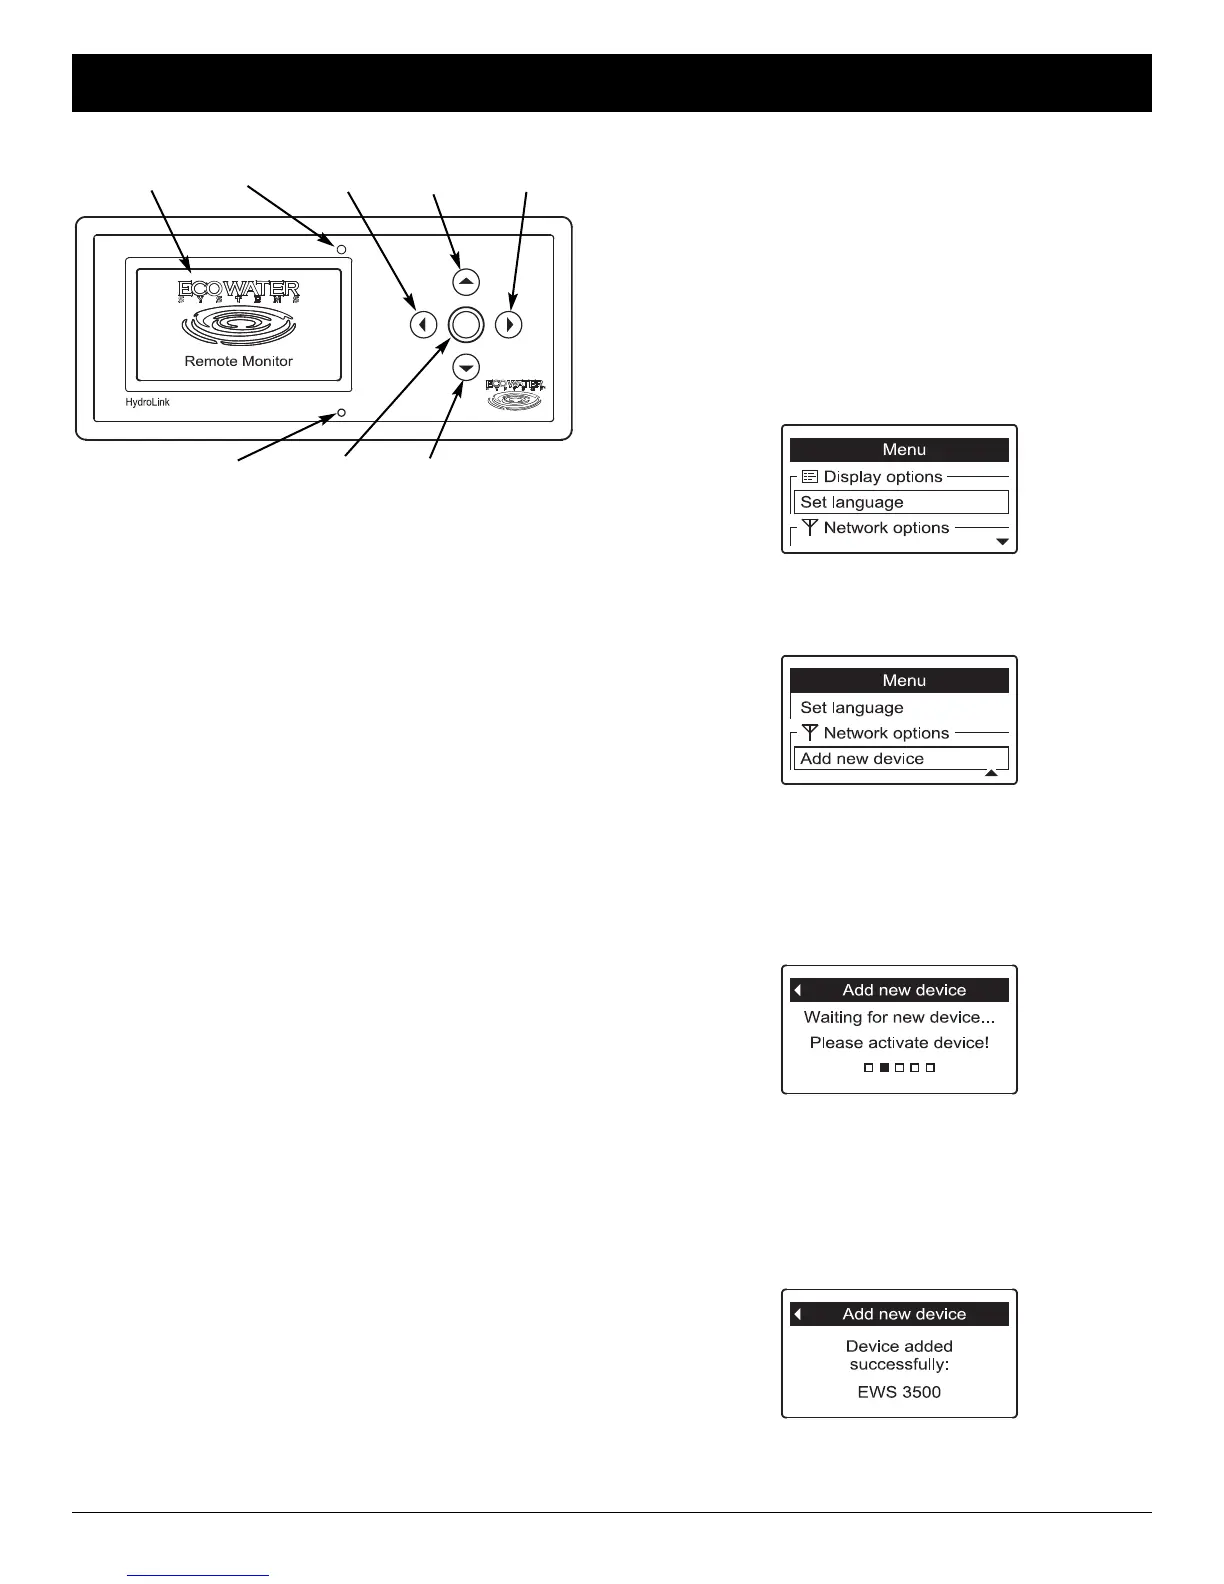
FIG. 42
Display
LEFT
Button
RIGHT
Button
UP
Button
DOWN
Button
Alert
LED
SELECT
Button
ADDING A DEVICE
To initiate communication between the remote and a
device such as a conditioner/refiner, it is necessary to
add the device to the remote by doing the following:
1. If no device has been added to the remote, the menu
shown in Figure 43 is displayed instead of status
screens. In this case, skip to step 2. Otherwise, if
status screens are shown, press the remote’s
SELECT (¡) button to display a Menu screen (See
Figure 43).
2. Press the DOWN (6) button to scroll through the
menu options until Add new device is highlighted in
a box (See Figure 44).
3. Press the SELECT (¡) button, and the screen shown
in Figure 45 appears. The remote waits two minutes
for the device to be activated (following the instruc-
tions in that device’s manual). For complete instruc-
tions on adding the conditioner/refiner, refer to
“Connecting to Remote” on Page 15 of this manual.
4. When the remote detects a signal from the device,
the display will change to show that it has been
added to the remote (See Figure 46). If another
message appears instead, indicating the device was
not added successfully, press the LEFT (3) button to
return to the screen in Figure 44. Repeat Step 3. If
this does not work, contact your dealer for service.
FIG. 43
FIG. 44
FIG. 45
FIG. 46
5. To exit this screen, press the LEFT (3) button or
wait 30 seconds for it to exit automatically.
REMOTE MENUS
Startup Menu
Before any devices have been added to the remote, the
following menu is displayed:
=Display options
=Set language (See Page 18)
=Network options
=Add new device (See Page 16)
Conditioner/Refiner Menu
After the conditioner/refiner has been added, the re -
mote will display a conditioner/refiner status screen as
one of the rolling status screens. Pressing the remote’s
SELECT (¡) button when the conditioner/ refiner status
screen is displayed shows the following menu:
=Remote Control
=Recharge (See Page 19)
=Recharge time (See Page 20)
=Display options
=Display data (See Page 20)
=Display order (See Page 21)
=Remote control data (See Page 22)
=Rename device (See Page 22)
=Set language (See Page 18)
=Network options
=Add new device (See Page 16)
=Delete current device (See Page 23)
=RF signal strength (See Page 18)
Drinking Water Status Menu
If no drinking water system has been added, the remote
will display a drinking water status screen as one of the
rolling status screens. Pressing the remote’s SELECT
(¡) button when the drinking water status screen is dis-
played shows the following menu:
=Display options
=Drinking water message (See Page 19)
=Set language (See Page 18)
=Network options
=Add new device (See Page 16)
ECOWATER
S Y S T E M S
Non-Wi-Fi Systems Only: Remote Operation
Photo
Cell



 To Next Page