Do you have a question about the EFD 2000XL and is the answer not in the manual?
Lists key features of the dispenser's microprocessor control, including time setting, decimal display, and memory.
Details technical specifications such as cabinet size, voltage, air consumption, and model-specific air pressure requirements.
Guides on unpacking the dispenser, verifying contents against a checklist, and reporting any discrepancies.
Specifies the necessary input air pressure range and notes on air filtration and regulation for proper operation.
Instructions to verify the dispenser's voltage setting matches the available power supply before operation.
Prompts users to activate the Ten Year No-fault Warranty through a mail-in card or phone call.
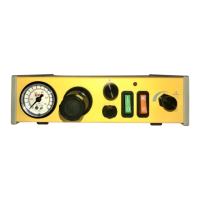
Explains the functions of the LCD display, including time range, pressure units, and vacuum display.
Describes the memory feature, allowing storage of up to eight different time settings for recall.
Details the differences between RUN and SETUP modes, including access to cell settings and function availability.
Explains the TEACH mode for programming time and the STEADY mode for continuous dispensing with pedal press.
Instructions on using the TIME SET buttons to adjust dispense time values, including digit scrolling.
How to toggle the display between time and pressure readings and change pressure units (PSI/BAR).
Identifies the STOP button's function to immediately halt the dispensing process.
Explains the meaning of the STEADY, RUN, SETUP, and CYCLE indicator lamps on the dispenser's front panel.
Information on the universal mounting bracket and its options for installation or bench-top use.
Steps for connecting power and changing the input voltage using the selector cartridge.
How to connect the foot pedal or use an external signal to start a dispense cycle.
Instructions for connecting the air supply hose, including pressure requirements for different models.
Guides on turning the dispenser on and its initial operational state upon startup.
Describes how to connect the 10cc adapter assembly for air output.
How to adjust the decimal point on the display to show thousandths or hundredths of a second.
Instructions to set the pressure display between PSI and BAR units.
Notes on vacuum control operation during testing and refers to detailed instructions.
Explains how to use the toggle switch to view vacuum pressure readings on the display.
Procedures for setting the air pressure regulator for testing, including specific fluid and gauge considerations.
Steps to attach the test barrel, remove the tip cap, and affix the appropriate tapered tip.
How to engage STEADY mode and fill the dispensing tip with test material using the foot pedal.
Transitioning to TIME mode and preparing the display for accurate testing.
Method to program dispense time by manually controlling dispense duration with the foot pedal.
How to set a precise dispense time using the TIME SET buttons and verify it.
Clarifies that the foot pedal only requires a brief press to initiate a full dispense cycle.
Explains the direct relationship between dispensing pressure and the volume of the deposit.
Notes that the size of the dispensing tip also influences the deposit volume.
Provides critical reminders about operational modes, button functions, and air supply quality.
Addresses dispensing challenges with thick fluids and introduces the SmoothFlow™ piston for improved control.
Highlights benefits of the white SmoothFlow™ piston for low viscosity fluids, including fume and backflow prevention.
Recommends the ULTRA System™ with a blue LV Barrier™ for very low viscosity fluids like cyanoacrylates.
Steps to prepare the barrel with an LV Barrier and tip for effective vacuum control dispensing.
Procedures for setting the initial air pressure and dispense time for vacuum control tests.
How to use the foot pedal in STEADY mode to fill the dispensing tip with fluid.
Guides on using the vacuum control knob to prevent dripping and achieve precise fluid control.
Instructions on using the display and toggle switch to read vacuum pressure.
Final steps for testing deposit size by placing the tip and actuating the pedal.
Key reminders about handling barrels, safety clips, and filter traps when dispensing thin fluids.
Detailed instructions for dispensing thin fluids without a piston, focusing on vacuum adjustment.
Advises on optimum barrel fill levels to ensure proper dispensing and prevent issues.
Methods for loading pourable fluids into barrels, including piston insertion.
Instructions for loading thin fluids like solvents or cyanoacrylates using the LV Barrier™.
Techniques for loading thick or non-leveling fluids, including using a spatula or caulking gun.
Describes specialized EFD equipment for efficient and clean barrel loading.
Suggests using specific fittings to transfer fluids from medical syringes to barrels.
Lists part numbers for accessories used for organizing and connecting dispensing barrels.
Explains the dispenser's capability to store multiple time settings for quick recall.
Procedures for checking the contents of memory cells before saving new settings.
Step-by-step guide on how to store a new time setting into a selected memory cell.
Instructions on how to select and apply a previously saved time setting from memory.
Details how to start a dispense cycle using a 5-24 VDC voltage signal.
Explains initiating the dispenser through external switch or relay closures.
Describes the signal output upon completion of a dispense cycle for external control.
Provides a diagram and list of pin functions for the 9-pin interface connector.
A comprehensive list of dispenser components with their corresponding part numbers.
Explains the symbols and color coding used in the schematic diagram for clarity.
Troubleshooting steps for power issues, including checking fuses and voltage.
Solutions for when the auxiliary output is not operating, involving voltage and fuse checks.
Addresses common causes of inconsistent deposits like clogging, air pressure, or air bubbles.
Guidance on checking the STEADY mode setting as a common solution for timer issues.
Methods to prevent or resolve material suck-back, including piston use and specific procedures.
Recommendations for using pistons to improve dispensing accuracy, cleanliness, and safety.
Advice on using new barrels and tips, and proper disposal practices for hygiene.
Guidelines on the optimal fill level for barrels based on fluid type.
Suggestions for using stands to organize the workspace and improve ergonomics.
Tips on positioning the workpiece or barrel for easier access during dispensing.
Emphasizes maintaining a specific tip angle for consistent fluid flow and deposit quality.
Lists part numbers for barrel adapter assemblies with varying hose lengths and barrel capacities.
Details EFD precision tips, including their specifications, color coding, and packaging.
Part numbers for white SmoothFlow™ pistons suitable for different barrel sizes and fluid types.
Part numbers for blue LV Barrier™ components designed for very low viscosity fluids.
Lists part numbers and colors for smooth-flow tapered tips.
Information on accessories like filter regulators, barrel stands, and dispenser stands.