2
A Guided Tour of the Optos Metering Pumps
Front Panel
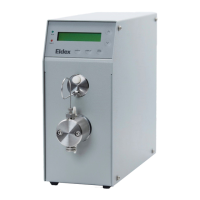
As you look at the front panel of your Optos Metering Pump (Figure 1.1), you will see:
Component Details
Local Interface:
1. Liquid Crystal Display (LCD). Displays flow rate, pressure (with optional pulse damper), other
allowed functions.
2. Up/Down Keys. UP and DOWN arrow keys set flow rates, change pump settings.
3. Permanent Functions Keys. DISPLAY, ΔMENU, and RUN/STOP keys are control keys permanently
defined for direct control of major instrument functions.
4. Status LEDs. Indicate pump running or fault.
Pulse Damper: optional pulse damper for minimized fluid delivery pulsation.
5. Outlet Port: Connection to downstream device.
6. Inlet Port: Connection from pump outlet.
Liquid End Assembly:
7. Outlet Valve: Provides tubing connection for pump output.
8. Cylinder: Contains pumping chamber and piston wash ports.
9. Inlet Valve: Provides tubing connection to fluid source. Inlet valve has an additional groove on
the hexagonal portion of the valve.
Rear Panel
As you look at the rear panel of your Optos Metering Pump (Figure 1.2), you will see:
Component Details
1. RS232: RJ11 connector for RS232 communication.
2. I/O: Input/output connections for remote analog control, pressure out, error out, remote start, stop.
3. Power Entry: Provides power connection with modular cord.
4. Fuse: Housing for pump fuses.
5. On/Off: Turns the power to the pump on and off.