17
ENGLISH
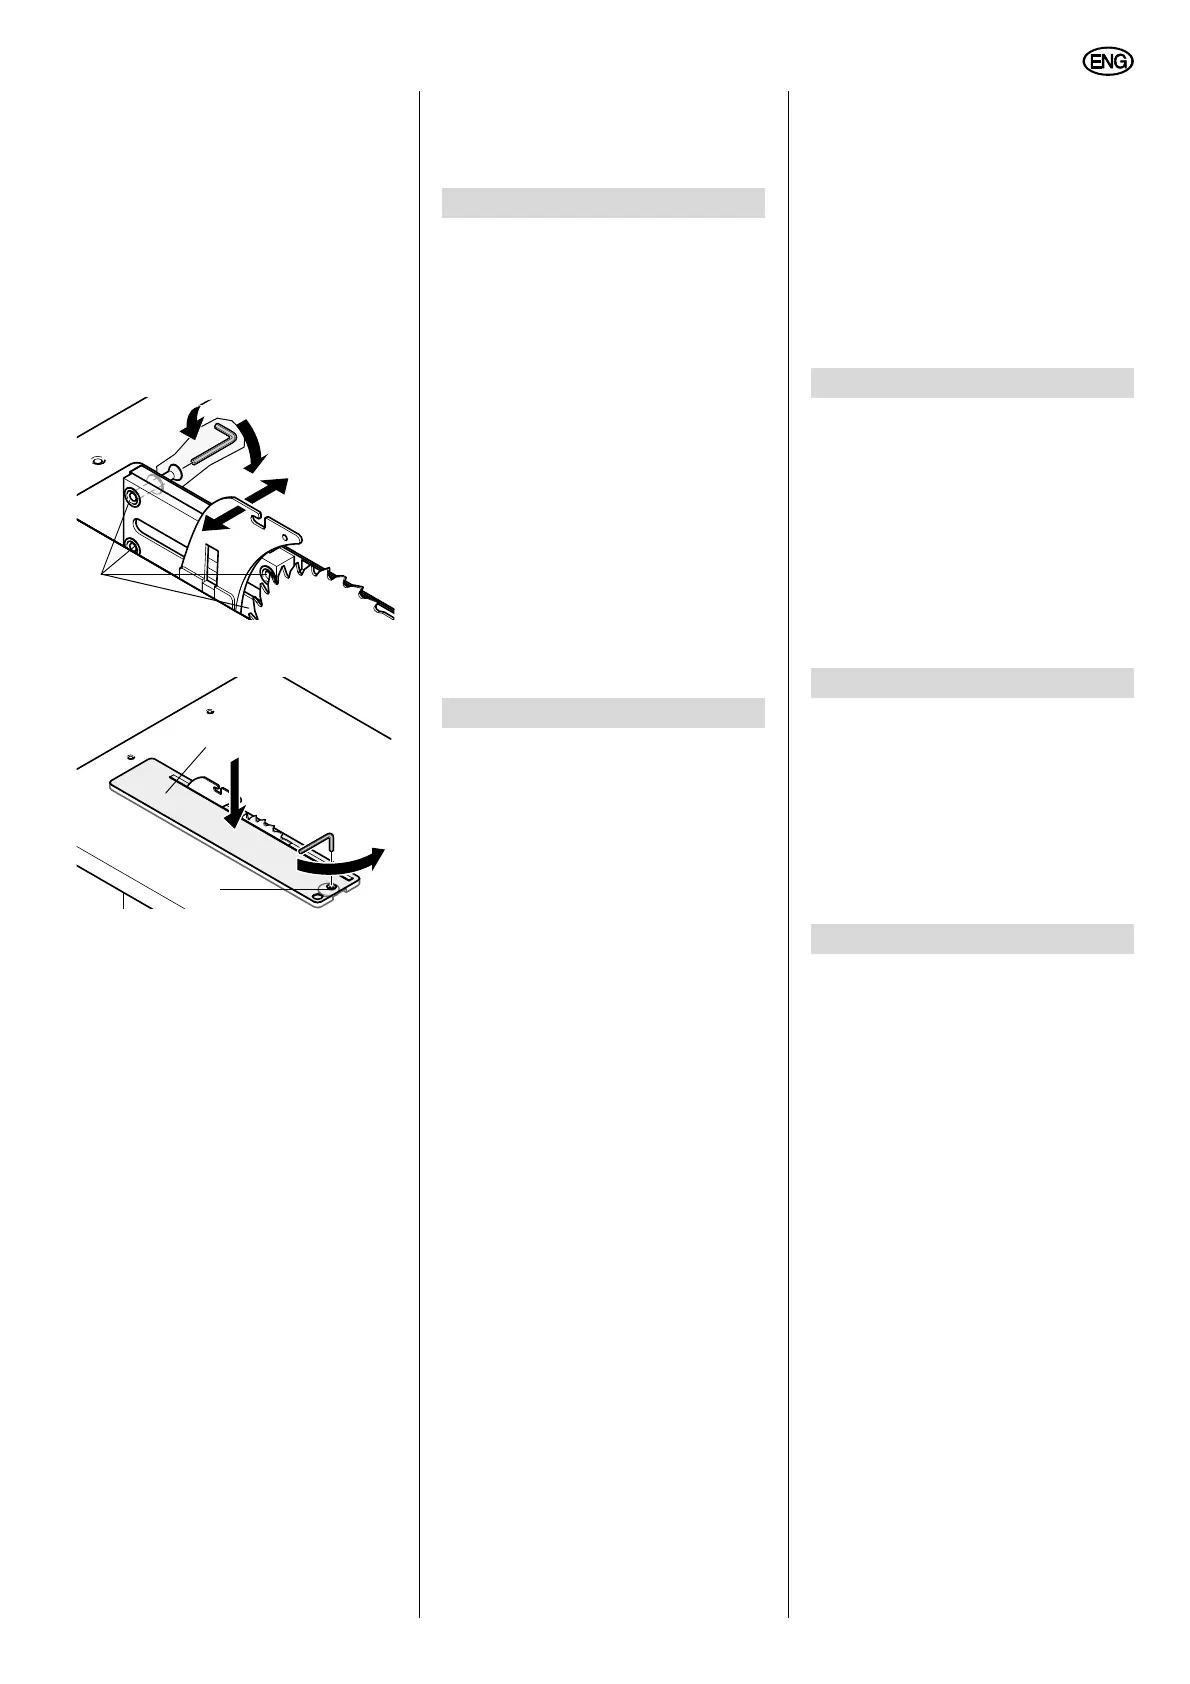
Lateral alignment:
riving knife and saw blade must be per-
fectly in line.
• turning the four hexagon socket
head cap screws (54) on the motor
carrier unit below the saw table
clockwise
= riving knife is moved to the right.
• turning the four hexagon socket
head cap screws (54) on the motor
carrier unit below the saw table
counter-clockwise
= riving knife is moved to the left.
4. Fit table insert extrusion (55) flush
into the saw table.
5. Turn the countersunk screw (56)
counter-clockwise against the stop.
9.2 Saw storage
Danger!
Store saw so that
− it can not be started by unauthori-
zed persons, and
− nobody can get injured.
Caution!
Do not store saw unprotected
outdoors or in damp environment.
9.3 Maintenance
Before switching on
Visual check if distance saw blade – riv-
ing knife is 3...8 mm.
Visual check of power cable and power
cable plug for damage; if necessary
have damaged parts replaced by a qual-
ified electrician.
Monthly (if used daily)
remove saw dust and chips with vacuum
or brush; apply light coat of oil to guide
elements:
− threaded rod and guide rods of
blade rise and fall mechanismn:
− swivel segments.
Every 300 hours of operation
Check all screwed joints, retighten if
necessary.
• Before cutting a workpiece to size
make trial cuts on pieces of scrap.
• Always place a workpiece on the
saw table in such way that it can not
tilt or rock (e.g. always place a
curved board on the table with the
convex side up).
• When working long stock use suita-
ble supports, such as table rear or
side extensions (optional accesso-
ries).
• To simplify repetitive cut-off work
use a stock stop (optional acces-
sory).
• Keep surfaces of rotating table and
saw base clean – in particular,
remove resin residue with a suitable
cleaning and maintenance spray
(optional accessory).
For special tasks the following accesso-
ries are available at your specialized
dealer – see back cover for illustrations:
A Mitre Fence
For installation on the left-hand side
of the saw table. With the mitre
fence mitre cuts from 90° to 45° are
possible.
B Rip Fence
Attaches to the front of the saw
table. The fence extrusion can be
used with either the high or low
guide edge.
C Table Rear Extension
Attaches to the rear of the saw
table. Provides sufficient support
when sawing long stock.
D Table Side Extension
For installation on the right-hand
side of the saw table. With foldable
legs.
E Wheel Set
Facilitates relocation in the shop.
F Roller/Ball Transfer Stand
For accurate guiding of long stock.
Can be used with either swivel
bearing or roller bearing attach-
ment.
G Sliding Carriage
For convenient guiding of long
stock.
H Cleaning Spray
For removing resin residue and pro-
tection of metal surfaces.
I Suction Adapter
To connect a shop vacuum to the
dust collection attachment.
J Saw Blade KV 56 ∅315
For rip and cross cuts in grown tim-
ber and particle board.
K Saw Blade KV 80 ∅315
For rip and cross cuts in grown tim-
ber, particle board and panels.
L Saw Blade UW 48 ∅315
For rip and cross cuts in panels;
plastic, aluminium and copper
extrusion, high-grade veneered
sheets.
Danger!
Repairs to electric tools must
be carried out by qualified electrici-
ans only!
Electric tools in need of repair can be
sent to the service centre of your coun-
try. Refer to the spare parts list for the
address.
Please attach a description of the fault to
the electric tool.
The saw's packaging can be 100 %
recycled.
Worn out electric tools and accessories
contain considerable amounts of valua-
ble raw and plastic materials, which can
be recycled.
These instructions are printed on chlo-
rine-free bleached paper.
Danger!
Before carrying out any fault
service or maintenance work always:
1. switch machine OFF;
2. unplug power cable;
3. wait for saw blade to come to
standstill.
Check that all safety devices are
operational again after each fault
service.
Motor does not run
Undervoltage relay tripped by power fail-
ure:
− switch on again.
No mains voltage:
− check cables, plug, outlet and mains
fuse.
Motor overheated, e.g. by a blunt saw
blade or chip build-up in the chip case:
− eliminate cause for overheating,
wait for a few minutes, then start
saw again.
54
55
56
10. Tips and Tricks
11. Available Accessories
12. Repairs
13. Environmetal Protection
14. Trouble Shooting