Quick Start Guide Flatpack2 PS System, 4U, SP2-based 356825.103, 2v0 -2011-09
8
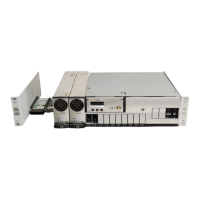
The commissioning of Flatpack2 PS System consists of following stages:
I. Perform a pre-start check before the PS system is switched ON
II. Switch ON the system with disconnected load; adjust output voltage
III. Adjust the nominal output voltage with connected batteries and load
Pre-Start Check Power is OFF!
Check off in the Commissioning Procedure, that you find in the pullout section of this folder.
If you have just finished the system installation successfully and filled in the Installation
Check List, jump over the Pre-Start Check and continue with stage II.
Before you switch ON the Flatpack2 PS system, verify the following:
1. System installation is completed
o Ensure a correctly performed system installation, with correct polarity on all
connections, has been carried out (Installation Check List filled in)
o All cabling and copper bars are securely terminated and supported
o All components, terminal blocks, MCBs/ fuses, etc. are clearly labeled
2. Battery and load fuses are disconnected
o Verify that all battery and load MCBs/ fuses are switched OFF or removed
3. AC input cable(s) and AC Earth wire (PE) are terminated
o Make sure that the AC input cable(s) are connected to correctly configured AC terminals
o Verify that the AC input cable(s) and external AC fuses are sized and rated as specified
o Check that AC Earth (PE) is terminated, and electrically connected to chassis
4. Site specific parameters and settings are known
o Read the system specific drawings and documentation
5. AC supply and all MCBs, fuses are switched OFF
o Make sure that all external AC fuses and internal MCBs/ fuses are switched OFF
Commissioning Steps, Startup
Check off in the Commissioning Procedure, that you find in the pullout section of this folder.
After the ”Pre-start Check” is performed, you can begin with stage II. During the stage, you
will switch ON the Flatpack2 PSS — while the batteries and load are disconnected then
measure the output voltage, and adjust it if required. Carry out the following:
Startup and No-Load Adjustments Power is ON!
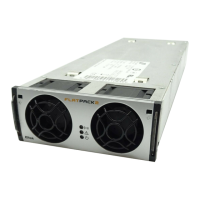
1. Disconnect all rectifier modules, without removing them (keep original location)
o Read how to install modules, on page 3 in this guide. Also, read about the correct
rectifier position on page 19, and then,
o If Flatpack2 rectifier modules are installed, unlock the handles and pull the
modules partially out (fan housing visible), but do NOT physically remove them
from the power shelves
o If Flatpack2 rectifier modules are not yet mounted, release their handles and insert
them partially into the correct position in the shelves
2. Switch ON the system
o Switch ON the AC input supply (external AC fuses) to the PS cabinet
3. Measure and verify that the AC input voltage is correct
o Measure the AC input voltage at the cabinet’s mains connection box
o Verify the AC voltage is within range
I
II
Commissioning
Device
Hazard
!
Device
Hazard
!