EM Test esd NX30
Instruction Manual V 1.00.7 16 / 33
6 OPERATION
This section of the manual provides a guide through the numerous operating possibilities of the esd NX30.
The operation, hierarchically arranged, is therefore easy to remember. The display shows unmistakable information about
the parameters that have been set and the operating status of the simulator.
For safety reason, the instrument refuses to accept any invalid entries.
It is recommended to carry out the examples directly on the instrument (not forgetting to connect the earth cable!).
6.1 Switching on
Ensure the interlock terminators are plugged into the rear of the base station, if equipped, or otherwise the interlock loop is
complete.
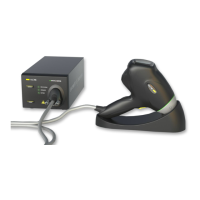
Plug the pistol HV connector into the base station and tighten the screws.
Press the POWER button
Press the TEST ON button. The INTERLOCK LED will extinguish and the red HIGH VOLTAGE LED blinks while the pistol
runs it’s self-test and calibration routine.
The instrument is ready for use immediately after self-test and calibration procedures have been completed. High voltage
generation is activated by pressing and holding the trigger button. The active high voltage state is indicated on the base
station by a blinking LED.
Should a parameter need changing the operator has only to press on the relevant field in order to call up the appropriate
menu.
Successful air discharges are detected. A differentiation is made between this and the set value by the display "kV" flashing
green. If no valid discharge occurred, the display shows a "0" value and the kV symbol will flash red. The Threshold function
(see section "Threshold") permits various settings for the sensitivity of the breakdown voltage detector.
The effective discharge voltage depends on various factors such as the distance to the discharge point, speed of approach,
nature of the EUT, etc.
In the case of a contact discharge this measurement is not carried out since only a discharge current can occur.
The instrument switches itself off automatically after 15 minutes of non-use.
6.2 Battery monitoring (esd NX30 only)
The battery charge state is monitored continuously. An insufficiently charged or an empty battery is shown on the display.
Recharge the battery soon when this symbol is displayed. Correct operation and valid pulse parameters are still as-
sured.
The battery is more or less empty; its capacity is insufficient to maintain all the instrument’s functions. An appropri-
ate warning message is shown on the screen and all the instrument’s functions are inhibited.
A full battery will provide sufficient power for several days of normal test usage. The actual operating time depends, of
course, to a large extent on the conditions prevailing at the time.
The following figures have been obtained by way of reference:
• Battery freshly charged
• Contact-discharge with 30 kV
• More than 30’000 discharges can be generated
6.3 Operation and settings
The operation of the instrument and all settings are carried out by way of the touch-panel starting from the menu "TEST".
Generally, the following applies:
• Frames symbolize push buttons. Touching these sensitive areas causes a reaction, usually branching into another
menu.
• Values and indications that are not in frames are for information only. Pressing the trigger button always takes you
up one menu level higher.
• A virtual keypad appears in parameter setting menus.
• R / C value shown on main screen for convenient direct reading.