1592026601 XWi70K STD FULL EN r1.6 2022.07.29.docx XWi70K 4/15
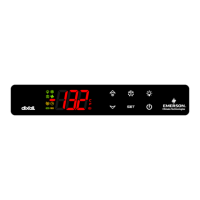
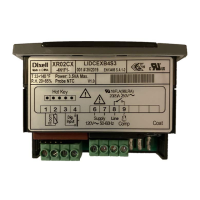
12.6 USE OF LEDS
Each LED function is described in the following table.
The compressor is running
- Programming menu
- Anti-short cycle delay enabled
- ALARM signal
- In “Pr2” indicates that the parameter is also present in “Pr1”
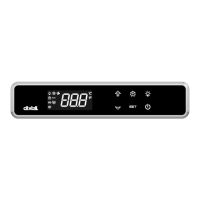
13 CONTROLLER INTERFACE
13.1 HOW TO SET THE CURRENT TIME AND DAY (ONLY WITH RTC)
When the instrument is switched on, it could be necessary to program the real-time clock. This operation
requires to enter the rtC menu (depending on the visibility level) and set the following parameters: HUr
(hours), Min (minutes), dAy (day of the week), dYM (day of the month) Mon (month) and YAr (year).
13.2 HOW TO SEE THE MIN TEMPERATURE
1. Press and release the DOWN key.
2. The “Lo” message will be displayed followed by the minimum temperature recorded.
3. By pressing the DOWN key or waiting for 5 sec the normal display will be restored.
13.3 HOW TO SEE THE MAX TEMPERATURE
1. Press and release the UP key.
2. The “Hi” message will be displayed followed by the maximum temperature recorded.
3. By pressing the UP key or waiting for 5 sec the normal display will be restored.
13.4 HOW TO RESET THE MAX AND MIN TEMPERATURE RECORDED
To reset the stored temperature, when max or min temperature is displayed, press SET key until “rSt”
label starts blinking.
Note: after the installation remember to RESET the temperature stored.
13.5 HOW TO SEE AND MODIFY THE SET POINT
1. Push and immediately release the SET key: the display will show the Set point value;
2. To change the SEt value, push the UP or DOWN arrows within 10 sec.
3. To save the new set point value push the SET key again or wait for 10 sec.
13.6 TO START A MANUAL DEFROST
Push the DEF key for more than 2 sec and a manual defrost will start.
13.7 ON/OFF FUNCTION (STAND BY)
By pushing the ON/OFF key, the instrument shows “OFF” for 5 sec. and the ON/OFF LED
is switched ON.
During the OFF status, all the relays are switched OFF and the regulations are stopped; if a
monitoring system is connected, it does not record the instrument data and alarms.
When the instrument is in stand by the keyboard displays “oFF”.
N.B. During the OFF status the Light and AUX buttons are active.
13.8 HOW TO SEE THE PROBE VALUES
1. Enter “Pr1” programming menu.
2. Parameters “dP1”, “dP2”, “dP3” and “dP4” display the value of probes P1, P2, P3 and P4.
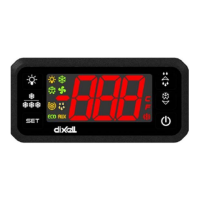
14 PROGRAMMING MODE
14.1 KEYBOARD LOCK
1. Keep both UP and DOWN buttons pressed for 3 sec.
2. The “PoF” message will be displayed and the keyboard is locked. At this point
it is only possible the viewing of the set point or the MAX o Min temperature
stored and to switch ON and OFF the light, the auxiliary output and the
instrument.
TO UNLOCK THE KEYBOARD
Keep both UP and DOWN buttons pressed for 3 sec.
NOTE: if keyboard lock is enabled (see par. brd), then keyboard control function is disabled.
14.2 PARAMETER MENUS
The configuration parameters are divided in groups (named menu). After entering the programming
mode, the first label corresponding to the first available group (menu) will appear on the display
depending on the visibility level. Every parameter belonging to a specific menu has its own visibility rules
for placement in PR1 (user accessible parameters) or PR2 (hidden parameters). Any menu can have
parameters placed both in PR1 and/or PR2.
14.3 HOW TO ENTER PARAMETER PROGRAMMING MENU “PR1”
To enter a parameter list under “Pr1” level (user accessible parameters), under a specific menu, operate
as follows:
1. Enter the Programming mode by pressing the SET+DOWN key for 3
seconds.
2. The display will show the first menu available under “Pr1” level
14.4 HOW TO ENTER PARAMETER PROGRAMMING MENU “PR2”
In the PR2 level there are all the parameters of the instrument.
14.4.1 ENTERING THE PARAMETER PROGRAMMING MENU “PR2”
1. Enter the Programming mode by pressing both SET+DOWN buttons for 3 sec: the label of the first
menu available in Pr1 will be displayed (for example: rEG)
2. Release the SET+DOWN buttons and then push them again for 7 sec: during this time both
compressor and fan icon will blink. After 7 sec the “Pr2” label will be displayed immediately, and,
after releasing the SET+DOWN buttons, the first parameter menu available will be displayed (for
example: rEG)
NOW THE PARAMETER MENU “PR2” IS AVAILABLE FOR ANY MODIFICATION
If no parameter is present in the “Pr1” level, after the first 3 sec the “noP” message will be displayed.
Keep SET+DOWN buttons pushed till the “Pr2” message will be displayed.
14.4.2 HOW TO MOVE A PARAMETER FROM “PR2” MENU TO “PR1” MENU AND VICE-
VERSA
Each parameter present in the PR2 level can be moved or put into PR1 level (user level) by pressing
SET+DOWN buttons. When in PR2 menu, if a parameter is present also in the First Level (Pr1), the
decimal point will be lit.
14.4.3 HOW TO CHANGE A PARAMETER VALUE
1. Enter the programming mode (both in PR1 or PR2 level)
2. Select the required menu with UP or DOWN
3. Press the SET button to enter the parameter list belonging to the selected menu
4. The first available parameter label (depending on the visibility level) will be displayed. The
compressor icon will blink to indicate the position in the selected menu
5. Select the required parameter by using UP or DOWN buttons.
6. Press the SET key to display the current value (compressor and fan icon starts blinking to indicate
this condition)
7. Use UP or DOWN to change its value.
8. Press SET to store the new value and move to the following parameter (belonging to the same menu)
To exit: Press SET+UP or wait for 30 sec without pressing any button.
NOTE:
- The new programming is stored even when the procedure ends by waiting the time-out
- The LIGHT button is used as BACK function when into PROGRAMMING MODE: press it to exit
from a parameter list and return to the upper menu or to discard a parameter value modification
and return to the same parameter label (without changing the previous parameter value)
15 PARAMETER LIST
The configuration parameters are divided in groups (named menu) to speed up the browsing operations.
Here below the list of all Menu with their meaning:
Regulation menu: to set regulation band
Variable Speed Drive menu: to set the VS functional parameters
Modbus Variable Speed Fan menu: to set Modbus VSF functional parameters
Display menu: to set the visualization rules
Defrost menu: to set the defrost operational mode
Fan menu: to set the evaporator and condenser fan control mode
Auxiliary menu: to set the auxiliary output mode
Alarm menu: to set the alarm thresholds
Output menu: to set the function linked to any configurable output
Input menu: to set the function linked to any configurable input
Energy saving menu: to set the energy saving mode
Real Time Clock menu: to set the internal clock
Serial communication menu: to set serial port speed and baudrate
User Interface: to set keyboard related functions
Info menu: to read probe values and FW information
Setpoint: (LS to US) temperature regulation setpoint.
SET DOWN UP DOWN UP
...
LIGHT
LIGHT LIGHT
DOWN SET SET SET SET
UP
SET DOWN UP DOWN UP
...
LIGHT
LIGHT LIGHT
DOWN SET SET SET SET
...
UP
... ... ... ... ... ... ... ... ... ...

 Loading...