EasyManua.ls Logo

ErGear EGDS2 - User Manual

ErGear EGDS2
20 pages
Print Icon
To Next Page IconTo Next Page
Loading...
Desk Monitor Arm
Instuction Manual
Technical Support:
(US/CA) 1-800-651-9525 Mon–Fri, 8am–8pm (CST)
(UK) 44-808-196-3875 Mon–Fri, 2pm–10pm (UTC)
Other Info: support@ergear.com
Website: https://ergear.com
EGDS2
Rev00(A)
Question and Answer IconNeed help?

Do you have a question about the ErGear EGDS2 and is the answer not in the manual?

Summary

Important Safety Information

Monitor Weight Restrictions

Specifies the weight range (4.4-26.4 lbs) for monitor compatibility.

VESA Pattern Compatibility

Details VESA pattern requirements (75x75mm to 100x100mm).

Product Features

Mounting Options

Illustrates C-Clamp and Grommet mounting types and compatibility.

Tension Adjustment Precautions

Monitor Attachment Required

Do not adjust tension without the monitor attached, verify weight.

Gas Spring Arm Safety Warning

Warns about gas spring pressure and potential injury.

Parts and Tools Overview

Tools Needed (Not Included)

Lists required tools like electric drill and drill bit.

Supplied Parts - Base & Clamp Mount

Lists base, USB cable, plates, bolts, and C-clamp components.

Supplied Parts - Grommet Mount

Lists grommet bolt and associated hardware.

Supplied Parts and Hardware (Cont.)

Arm & Monitor Plate Components

Lists arm extenders, arms, monitor plates, washers, and bolts.

Monitor Attachment Hardware

Lists bolts, washers, and spacers for monitor attachment.

Step 1: USB Cable Connection

Option A: No USB Cable

Instructions for not connecting the USB cable.

Option B: Route USB Cable

Route USB cables under the base using bolts and plate.

Step 2: Desk Mounting Surface

Option A: Clamp Mounting

Details inserting bolts through C-clamp brace and into the base.

Step 2: Clamp Mounting Procedure

Securing the C-Clamp

Guides positioning and securing the C-clamp to the desk.

Step 2: Grommet Mounting

Option B: Grommet Installation

Instructions for drilling a hole and installing the grommet bolt.

Securing Grommet Mount

Details securing the grommet bolt with locking plate and butterfly nut.

Step 3: Attach the Arm Sections

Arm Assembly and Tensioning

Connect arm extenders and arms, tighten set screws.

Step 4: Attach Monitor Plates

Securing Monitor Plates to Arms

Slide plates into arm ends and fasten with bolts and washers.

Step 5: Attach Monitors to Arms

Option A: Flat Back Monitor Attachment

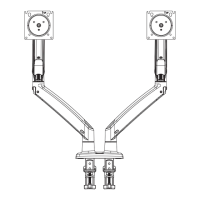
Attach flat-back monitors using bolts and washers with spacing.

Monitor Attachment Details

Instructions for hanging monitor and tightening bolts for different VESA patterns.

Step 5: Curved Back Monitor Attachment

Option B: Curved Back Monitor

Attach curved-back monitors using bolts, washers, and spacers.

Curved Monitor Installation

Instructions for hanging curved monitors and tightening bolts with spacers.

Step 6: Adjust Gas Spring Tension

Gas Spring Tension Adjustment

Adjust tension clockwise to reduce or counter-clockwise to increase.

Step 7: Rotation Restriction

Optimal Monitor Positioning

Do not position monitor behind base for stability.

Step 8: Adjust Monitor Tilt Angle

Monitor Tilt Adjustment

Loosen bolt, tilt monitor, re-tighten bolt to set desired tilt.

Step 9: Swivel Adjustment

Swivel Tension Control

Turn set screw clockwise to increase or counter-clockwise to reduce swivel tension.

Step 10: Rotation Adjustment

Landscape to Portrait Rotation

Rotate monitor from landscape to portrait mode.

Step 11: Route Cables along Arm

Cable Management on Arm

Route and secure cables along the arm sections.

Overview

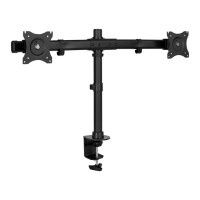
The ErGear Desk Monitor Arm (model EGDS2, Rev00(A)) is a versatile mounting solution designed to enhance your workspace by providing flexible positioning for your monitors. This instruction manual outlines the assembly, installation, and adjustment procedures for the monitor arm, ensuring a secure and ergonomic setup.

Function Description

The ErGear Desk Monitor Arm serves as a robust and adjustable support system for one or two computer monitors. Its primary function is to elevate monitors off the desk surface, freeing up valuable desk space and allowing for optimal screen positioning. The arm utilizes a gas spring mechanism, which enables smooth and effortless height adjustment, making it easy to switch between sitting and standing positions or to simply fine-tune your viewing angle. The design incorporates multiple pivot points and rotation capabilities, providing comprehensive flexibility to suit various user preferences and tasks.

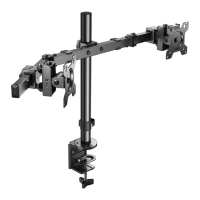
The monitor arm is designed to be securely attached to a desk, offering two main mounting options: C-clamp mounting for desk edges and grommet mounting for desks with existing holes or where a new hole can be drilled. Both methods ensure a stable foundation for your monitors. Once installed, the arm allows for a wide range of motion, including tilt, swivel, and rotation, to achieve an ergonomic viewing experience.

Usage Features

The ErGear Desk Monitor Arm is packed with features that contribute to its ease of use and adaptability in a modern workspace:

  • Extensive Adjustability: The arm offers significant flexibility in monitor positioning.
    • Rotation: Monitors can be rotated 360 degrees, allowing for quick transitions between landscape and portrait orientations. This is particularly useful for tasks that benefit from vertical screen space, such as coding, document editing, or graphic design.
    • Swivel: The monitor plates can swivel 360 degrees, and the arm joints themselves offer 180-degree swivel, providing a broad range of horizontal movement. This allows you to share your screen with colleagues or adjust the viewing angle from different positions around your desk.
    • Tilt: Monitors can be tilted from +85 degrees to -30 degrees. This wide tilt range helps in reducing glare and finding the most comfortable viewing angle, minimizing strain on your neck and eyes.
    • Height Adjustment: The gas spring mechanism facilitates smooth and continuous height adjustment, allowing monitors to be positioned up to 21 inches (533mm) above the desk surface. This feature is crucial for achieving an ergonomic setup, whether you prefer to sit or stand while working.
  • Dual Mounting Options: The arm provides two secure ways to attach to your desk:
    • C-Clamp Mounting: This option is suitable for desk edges with a thickness between 0.4 and 3.5 inches (10-90mm). It involves a C-clamp brace and C-clamp that are tightened onto the desk edge, providing a strong grip without requiring any drilling.
    • Grommet Mounting: For desks with a pre-existing grommet hole or if you prefer a more permanent installation, the grommet mounting option can be used. This method supports desk thicknesses between 0.4 and 3.5 inches (10-90mm) and requires a hole diameter between 3/8 and 1 1/16 inches (10-27mm). It involves a grommet bolt, locking plate, and butterfly nut to secure the arm through the desk.
  • Integrated Cable Management: The arm features a thoughtful cable management system to keep your workspace tidy and organized. Cables can be routed along the arm sections and secured, preventing clutter and reducing the risk of accidental disconnections. This contributes to a cleaner aesthetic and a safer environment.
  • USB Cable Integration (Optional): The base of the monitor arm includes an option to route USB cables, allowing for convenient access to USB ports directly from the mount. This can be particularly useful for connecting peripherals or charging devices without reaching for your computer's ports.
  • Easy Monitor Attachment: The monitor plates are designed for straightforward attachment to VESA-compatible monitors. The process involves sliding the monitor plates into the arm slots and securing them with bolts and washers. For flat-back monitors, bolts are threaded directly into the VESA holes. For curved-back monitors, spacers are used to ensure a secure fit.
  • Tension Adjustment: The gas spring tension can be adjusted to counterbalance the weight of your monitors. This ensures that the arm holds the monitors securely at any desired height and allows for smooth movement. The adjustment is made using an Allen key and is crucial for optimal performance.

Maintenance Features

Maintaining the ErGear Desk Monitor Arm is straightforward, primarily focusing on adjustments to ensure continued smooth operation and stability:

  • Gas Spring Tension Adjustment: This is a key maintenance feature. Over time, or with changes in monitor weight, the gas spring tension may need to be adjusted. The manual provides clear instructions on how to increase or decrease tension using the supplied Allen key. This adjustment is critical to ensure the arm can hold the monitor at any height without drifting up or down. It is emphasized that this adjustment should only be performed after the monitor is securely attached.
  • Swivel Tension Adjustment: The swiveling tension of the arm joints can be adjusted to suit user preference. If the arm swivels too freely or is too stiff, a small Allen key can be used to tighten or loosen the adjustment set screw. This ensures that the arm moves with the desired resistance.
  • Tilt Angle Adjustment: The tilt mechanism can be adjusted to secure the monitor at a specific tilt angle. If the monitor tends to tilt on its own or if you wish to change the tilt, the bolt can be slightly loosened, the monitor tilted to the desired position, and then re-tightened.
  • Regular Inspection: While not explicitly detailed as a "maintenance feature," the "Important Safety Information" section implies a need for regular checks. Users are advised to verify that all parts are included and undamaged before assembly. This suggests that periodic visual inspection of the mount and its connections for any signs of wear or loosening bolts would be a good practice to ensure long-term safety and stability.
  • Cleaning: As with any desk accessory, the monitor arm can be wiped clean with a soft, damp cloth to remove dust and smudges, maintaining its appearance. Avoid abrasive cleaners that could damage the finish.

The ErGear Desk Monitor Arm is designed for durability and ease of use, with its maintenance primarily revolving around simple adjustments to keep it functioning optimally. The clear instructions provided in the manual guide users through these adjustments, ensuring a long and effective lifespan for the product.

ErGear EGDS2 Specifications

General IconGeneral
VESA Compatibility75x75mm, 100x100mm
Height AdjustmentYes
ColorBlack
TypeMonitor Stand
MaterialSteel

Related product manuals