The ESi ES3247 is a 3-channel programmer designed to control central heating and hot water systems. It allows users to set 'On' and 'Off' time periods for up to three channels (Central Heating Zone 1, Central Heating Zone 2, and Hot Water), up to three times a day, at user-chosen times.
Function Description:
The ES3247 programmer automatically switches your Central Heating and Hot Water ON and OFF. It maintains timekeeping through power interruptions via a non-replaceable battery designed to last for the lifetime of the programmer. The clock automatically adjusts for BST/GMT time changes (forward 1 hour on the last Sunday of March at 1:00 am and back 1 hour on the last Sunday of October at 2:00 am). The clock is factory pre-set to UK time and date, but can be altered.
During installation, the installer configures the programming options via a 4-position DIP switch on the back of the unit. These options include:
- Programming Cycle: 24-hour, 5/2-day, or 7-day selectable.
- 24-hour option: Runs the same program every day.
- 5/2-day option: Allows different ON/OFF times at weekends.
- 7-day option: Allows different ON/OFF times for each day of the week.
- Programme On/offs per day: 2 on/off or 3 on/off periods selectable.
- Heating System: Pumped (PU) or Gravity (Gr) selectable.
- Pumped System (PU): Allows independent control of Central Heating and Hot Water.
- Gravity System (Gr): Does not allow Central Heating without Hot Water but can provide Hot Water without Central Heating. It also does not allow CH2 without CH1 and HW, and CH2 without CH1 and HW.
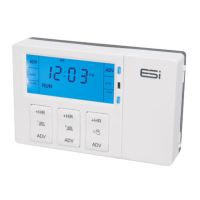
The programmer features a large, easy-to-read display for programming. Buttons normally visible on the front facia only temporarily affect the set program (e.g., Advance, Boost). All buttons that can permanently change the program are located behind a flip-over facia, preventing accidental changes.
Operating Modes:
The unit offers several operating modes for each channel (CH1, CH2, HW):
- ON: Central Heating and Hot Water are ON continuously.
- AUTO: Central Heating and Hot Water will be switched ON and OFF according to the set programs.
- ALL DAY: Central Heating and Hot Water will switch ON at the first ON time and switch OFF at the last OFF time.
- OFF: Central Heating and Hot Water will be permanently OFF.
Usage Features:
- Factory-set Programme: The unit comes with a pre-set program. A reset button allows users to return to this factory program, though time and date must be re-set after a reset.
- Changing the Programme: Users can set specific ON/OFF times for Central Heating (Zone 1 and Zone 2) and Hot Water in 10-minute segments. The programming day runs from 03:00 am to 02:50 am the next day.
- Copy Function: In 7-day and 5/2-day programmer options, a COPY button allows users to copy the current day's (or day group's) program to the next day (or day group). Copying from Sunday to Monday or Saturday-Sunday to Monday-Friday is not possible. The COPY and DAY buttons have no effect in 24-hour mode.
- Linking Central Heating & Hot Water Times: If configured (indicated by 'L' as the last letter of the configuration, e.g., 2PUL), the Hot Water and CH2 channels will run from the Central Heating 1 program. Changes to CH1's program will affect all linked channels. This linking can be toggled by holding down the COPY button while pressing RESET.
- Advance Function (ADV): Available in AUTO or ALL DAY modes, this function allows a one-off override to move to the next ON/OFF program event. Pressing ADV on a channel button (CH1, CH2, or HW) will turn it ON if it's OFF, or OFF if it's ON. It stays in this state until ADV is pressed again or a programmed ON/OFF period begins. The word "ADV" appears on the LCD.
- +HR Boost Function: Available in AUTO, ALL DAY, or OFF modes, this function provides up to 3 hours of extra Central Heating or Hot Water. One press adds 1 hour, two presses add 2 hours, and three presses add 3 hours. Pressing it again switches off the function. The status (+1HR, +2HR, or +3HR) appears on the display. If a boost overlaps a programmed START/ON time in AUTO or ALL DAY mode, the boost will disengage.
- Setting Time & Date: The time and date can be adjusted using the SET, +/-, and NEXT buttons.
- Backlight: The backlight is pre-set to be permanently OFF. When OFF, it turns ON for 15 seconds when a +/- button (under the facia cover) is pressed. It can be set to permanently ON via the SET menu (L IR setting). Using Advance or +HR Boost buttons to activate the backlight is not recommended as it may engage their respective functions and turn on the boiler.
Important Technical Specifications:
- Power Supply: 230V AC, 50Hz
- Operating Temperature: 0°C to 35°C
- Switch Rating: 230V AC, 6(2)A SPDT
- Battery Type: Lithium Cell CR2032 (non-replaceable, lifetime battery)
- Enclosure Protection: IP30
- Plastics: Thermoplastic, flame retardant
- Insulation Class: Double
- Wiring: For fixed wiring only
- Back Plate: Industry standard
- Dimensions: 140mm x 87mm x 37mm
- Clock: 12 hour am/pm, 1 minute resolution
- Clock Accuracy: +/- 1 sec/day
- Programme Selection: Auto, On all day, On constant, Off
- Programme Override: +1, 2 or 3Hr, Advance
- Compliance: EN60730-1, EN60730-2.7, EMC Directive 2004/108/EC, LVD Directive 2006/95/EC
- Switching Capacity: Not suitable for devices greater than 6Amp rated (e.g., immersion timers).
Maintenance Features:
- Power Interruption: In case of mains supply failure, the screen goes blank, but the back-up battery ensures the programmer continues to keep time and retain the stored program. If the rear DIP switch configuration has been altered during the interruption, the screen will show the new configuration, and the appropriate factory default program will be installed.
- Resetting the Unit: Pressing the reset button with a non-metallic pointed tool restores the built-in program and resets the time to 12:00 pm and the date to 01/01/2000. After a reset, the unit defaults to OFF operating mode, which must be reselected. Excessive force on the reset button can cause it to stick, requiring a qualified installer to release it.
- Installation Safety: Installation must be carried out by a suitably qualified person in accordance with IEE Wiring Regulations (BS7671) and Part "P" of Building Regulations. Mains supply must be isolated before installation. Fixed wiring connections require a fuse rated not more than 6 amps and a Class 'A' switch with a minimum 3mm contact separation in all poles. Recommended cable sizes are 1.0mm² or 1.5mm². No earth connection is required for the product itself as it is double insulated, but earth continuity throughout the system must be ensured. If fitted to a metal surface, the metal must be earthed. A surface mounting box should not be used.
- Annual Maintenance: Arrange for an annual maintenance and inspection schedule for the entire heating and hot water system by a competent person.
Configuration Display:
The first screen displayed when setting time, date, or changing program times indicates the unit's configuration (e.g., 2PU, 3PU, 2Gr, 3Gr). This also shows how the Monday to Sunday indicators are displayed, verifying the 24-hour, 5/2-day, or 7-day programming option.