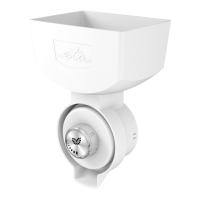
Description (Fig. 17)
Q0 – Body of the grinder Q4 – Grinding stone (assembled) – rotating
Q1 – Cover Q5 – Regulating disc
Q2 – Grinding stone - fixed Q6 – Hopper
Q3 – Distance ring Q7 – Key
Q8 – Cleaning brush
Assembly
Assemble the grinder Q and connect it to the head of the drive unit according to Fig. 17 and
7. Do not tighten the regulating disc in order to make the connection of the grinder easier.
Proceed in the opposite order to disassemble and remove the grinder from the head of the
drive unit.
Grinding and Adjusting the Grinder:
To achieve fine consistency, we recommend grinding materials in two passes. ONLY
well-dried wheat can be ground in one pass.
Setting the Coarseness of Grinding:
In relation to the required level of grinding or used material, set the distance of the grinding
stones using the regulating disc Q5 so that you can achieve the required coarseness of
grinding. Turning the disc clockwise (i.e. to the right) increases the fineness of grinding,
turning the disc counter clockwise (i.e. to the left) increases the coarseness of grinding.
To release the regulating disc easily Q5, use the release key Q7.
Specification: The following terms are used for manipulation with the regulating disc Q5:
- arresting position,
- turn,
- click.
All the terms express the same activity which is changing the setting of the regulating disc
by one position. The change is accompanied by corresponding sound.
1) Initial Position:
Tighten the grinding stones together by turning the regulating disc Q5 clockwise (i.e. to the
right) on the assembled and cleaned grinder. Use three fingers for tightening. Never tighten
the stones with the force of your firmly closed hand!
2) First pass:
This setting means releasing the regulating disc Q5 which creates a gap between the
grinding stones for FIRST COARSE GRINDING. Once complete turn by 360° corresponds
with 24 positions, i.e. 1.5 mm. Turn the regulating disc Q5 by e.g. 24 arresting positions
(clicks) back to loosen the grinding stones, creating a gap that will
determine the coarseness
of grinding. The number of turns depends on the type of material to be ground. The range
should move from 6 to 30 turns. Remember what position the grinding stones are in order to
adjust them for the following pass.
Note: If you set the range for more than 15 positions, the individual turns will no longer
“click” as the stones do not create any resistance at that point.
We recommend first setting 15 turns, pour about 50 g of material into the hopper and turn
the appliance on. The grinder will fill up with the material which will create pressure
between
stones again. Stop the appliance and continue adjusting to a higher value of turns.
Place
a stainless bowl, or another suitable vessel, under the grinder to collect the milled flour.
GB
94
 Loading...