Do you have a question about the evapolar evaSMART and is the answer not in the manual?
Lists essential safety precautions for operating the device, covering placement, water usage, and electrical safety.
Step-by-step instructions for connecting the device to power and initial power-on procedure.
Important advice for maintaining the air cooler, including placement, temperature limits, and cleaning notes.
Step-by-step instructions for removing the old cartridge and installing a new one.
A guide to identifying common problems and their corresponding solutions for the air cooler.
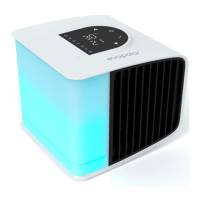
The evaSMART Personal Air Cooler is a compact and intelligent device designed to create a personal microclimate, offering cooling, humidification, and air purification within a 3-4 m² (30-45 ft²) area. It effectively filters large dust particles from the air, enhancing the quality of your personal space. The device is primarily intended for indoor use in well-ventilated rooms, where it achieves optimal performance. Its operation is versatile, allowing control via a mobile application, Smart Home integrations, or directly through the device's menu.
First Start and Setup: Setting up the evaSMART is designed to be quick and straightforward. Upon unpacking, the device is almost ready for use. The initial steps involve sliding up the water reservoir, opening its lid, and filling it with clean, untainted tap water. If the water source is questionable, distilled water is recommended. After filling, the reservoir is placed back onto the base, ensuring it is properly installed. The device is then connected to a power source using the provided cable. Pressing the Power button on the top panel will switch on the device, indicated by the button lighting up and a short vibration.
Daily Operation: Once powered on, the temperature of the outgoing air will begin to decrease within minutes. The airflow can be adjusted using the arrows on the device's upper panel or through the mobile application. During the first use, a technical smell may be noticed, which is normal and will dissipate after several hours. As the cartridge fills, the evaporative pads will rapidly saturate with water, which is also normal and essential for proper device function.
Water Reservoir and Refilling: The device requires water to operate effectively. The transparent reservoir, located on the left side, allows for instant assessment of the water level. A full reservoir typically provides 6 to 8 hours of uninterrupted cooling, depending on room air quality. To extend this time, the reservoir can be refilled. After the initial fill, the evaporative cartridge absorbs up to 400 ml of water. Even after the reservoir is empty, the device will continue cooling for a few hours. The default mode includes a notification system where the reservoir illuminates red when water runs out. These notifications can be turned off via the mobile application. If the water runs out completely, the device will continue to function as a regular fan. The reservoir can be refilled while the device is working without affecting its operation.
Temperature Parameters: The evaSMART Air Cooler utilizes natural evaporative cooling, meaning its cooling power can vary with different climates. The product guide provides charts summarizing approximate cooling power in various aerial conditions, presented in both Centigrade and Fahrenheit.
Usage Modes and Power Requirements: The device is designed for use in locations that meet specific humidity and temperature prerequisites. Its minimal power requirements (voltage 5 V, current 2 A and up) allow it to run even from a portable power bank. However, Evapolar is not responsible for device function outdoors due to highly variable conditions.
Tuning and Customization: Users can customize various settings, including the color and brightness of the lighting, temperature measurement units (Centigrade or Fahrenheit), and water level indications. These adjustments can be made through the device's menu or the mobile application.
Mobile Application and Smart Home Integration: For an enhanced management experience, users can install the Evapolar Mobile App, which connects to the device via Wi-Fi. The app provides access to a full range of features, including humidifier and sleeping modes, along with detailed instructions for usage. The evaSMART also integrates with popular Smart Home platforms such as Google Home, Amazon Alexa, Samsung Smart Things, and Apple Home Kit, allowing for full voice control.
Control Panel and Menu: The device features a user-friendly control panel. The start screen displays the temperature of incoming and outgoing air, along with a power button. Control elements include an "Up" button (also serving as a "Previous" button), a "Brightness" control, a "Fan speed" button, a "Colour mode/Colour playlist" button, and a "Down" button (also serving as a "Next" button).
Moving and Transportation: Before any transportation, the device must be disconnected from the power source. It's crucial to note that in addition to the water in the transparent reservoir, some water is stored in an internal tank for the evaporative cartridge. To prepare for transportation, it is highly recommended to empty the reservoir and run the device at maximum fan speed for at least one hour to dry out the internal reservoir. Transporting the device without drying the internal reservoir is at the user's own risk, as water leakage is not covered by warranty. To avoid leakage, the device should be positioned horizontally and moved slowly. For immediate water removal, disconnect the device, remove the reservoir by sliding it up, and drain the water. After draining, put the reservoir back, connect the device to power, run it at maximum fan speed for at least an hour to dry the internal reservoir, and then disconnect it again. For shorter distances, ensure the device with a wet cartridge is not isolated in a box or bag without airflow.
Device Maintenance and Cleaning: The frequency of cleaning depends on how often the device is used.
Reservoir Cleaning: The cleaning period for the reservoir depends on the dust level in the usage area. Before cleaning, disconnect the device from the power source. Wipe the device grills with a soft cloth. Wash or wipe the reservoir. After cleaning, reassemble the device; it will then be ready for use or storage.
Storage During Long Periods of Non-Usage: For long-term storage, clean the device as described above, ensure it is completely dry, and place it in an appropriately-sized package (the original package is recommended). Store the device in a dry space at temperatures between 18°C and 25°C (64°F and 77°F).
Replacing the Cartridge: The evaporative cartridge is designed specifically for this product and should be changed every 3-6 months, depending on air and water conditions, to maximize the device's effect. Poor water quality can reduce the cartridge's longevity. A new cartridge can be stored for up to 3 years without losing its evaporation potential.
| Water Tank Capacity | 1.3 gallons (5 L) |
|---|---|
| Dimensions | 8.7 x 8.7 x 9.1 in (220 x 220 x 230 mm) |
| Cooling Area | Up to 10 sq. ft |
| Evaporative Cartridge Life | 6 months |
| Coverage Area | Up to 10 sq. ft |