Do you have a question about the Everbilt DP370C and is the answer not in the manual?
Instructions for wiring the pressure switch to the pump for automatic operation and setting pressure.
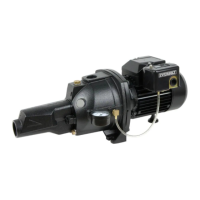
This document is a Use and Care Guide for an Everbilt Convertible Jet Pump, models DP370C and DP550C. It provides comprehensive instructions for installation, operation, maintenance, and troubleshooting of the pump, designed for both shallow and deep well applications.
The Everbilt Convertible Jet Pump is designed to pump water from wells. It is a versatile unit capable of operating in both shallow well (water level less than 25 ft. deep) and deep well (water level between 25 ft. and 70 ft. deep) configurations. The pump is equipped with a pre-set pressure switch (30 psi "on"/ 50 psi "off") that automatically turns the pump on and off based on the system pressure, ensuring consistent water supply. For deeper wells exceeding 70 ft., a deep well submersible pump is recommended instead. The pump is designed to work with a diaphragm pressure tank (sold separately) to optimize performance and provide more usable water compared to conventional tank types. The pressure tank's pre-charge should be set to 28 PSI for optimal operation with the pump's 30/50 PSI pressure switch.
The pump is designed for ease of installation and use, with detailed instructions provided for both shallow and deep well setups. For shallow well installations, a single pipe connects the pump to the well water. Key components for shallow well setup include a foot valve, priming tee, PVC adaptors, pressure relief valve, PVC pipe (Schedule 80 or flexible), couplings, drain valve, well seal, tank tee, plug, pressure gauge, and male adaptors. The guide emphasizes the importance of airtight connections to prevent leaks, which can impair pump operation. Thread tape and PVC primer/cement are recommended for all connections.
For deep well installations, the process involves two pipes (1-1/4 in. and 1 in.) between the pump and the ejector. The ejector kit, which includes a venturi tube and nozzle, is crucial for deep well applications and must be installed correctly. The guide details how to remove the pre-assembled shallow well nozzle and venturi and install the appropriate deep well components. It also covers connecting the foot valve to the ejector, sliding the pipe assembly into the well, and attaching the well seal. The pump's electrical connection is dual voltage (115V/230V) and comes pre-wired at 230V. Users must adjust a switch inside the terminal cover for 115V operation, a task that should be performed by a qualified electrician. The pump should be connected to a GFCI outlet protected by a 10 amp (230V) or 20 amp (115V) fuse or circuit breaker.
Priming the pump is a critical step for both shallow and deep well installations. This involves filling the pipes and the pump with water until it overflows and no air bubbles are present. The guide also covers connecting the pressure gauge and pressure regulator, which is a normally-closed valve that helps regulate pump pressure and provide back pressure for the ejector. Proper adjustment of the pressure regulator is essential to achieve maximum water flow without pressure dropping to zero.
The guide highlights several important safety and maintenance considerations to ensure the longevity and safe operation of the pump. Users are warned against pumping flammable or explosive liquids and operating the pump in the presence of such vapors, as this can lead to explosions or fires. Disconnecting power to the pump before any servicing is a critical safety measure. The motor housing is designed to operate at high temperatures, and users are advised not to touch it during operation or disassemble it.
Regular inspection of the pump and system components is recommended. The motor includes a thermal protector that will trip if the motor overheats, resetting itself once the motor cools down. This means the pump can start unexpectedly if plugged in after a thermal trip. Protecting the electrical cord from sharp objects, hot surfaces, oil, and chemicals, and avoiding kinks, is also crucial.
Troubleshooting tips are provided for common issues such as pump humming, failure to pump water or low flow, the pump not stopping or building pressure, and frequent starting/stopping. For a humming pump, the motor shaft may be stuck or the wrong voltage selected. Solutions include turning the motor shaft with a flat head screwdriver, cleaning the impeller and diffuser, or adjusting the voltage setting. If the pump does not prime or has low flow, it could be due to air in the piping, a low water level in the well, a plugged or leaking foot valve, or a blocked impeller/nozzle. Corrective actions involve re-priming, lowering the suction pipe, replacing the foot valve, or cleaning components. If the pump fails to stop or build pressure, a blocked impeller/nozzle or a leak in the house piping could be the cause, requiring cleaning or leak repair. Frequent starting and stopping often indicates incorrect pressure in the pre-charged tank, a malfunctioning pressure switch, or a ruptured diaphragm/bladder in the tank, necessitating adjustments or replacements.
The manual emphasizes that all electrical work should be performed by a licensed electrician to prevent electric shock, burns, or death. It also warns against installing a shut-off valve between the pump and the tank, as this can cause excessive friction loss and damage to the pressure switch or pump. If a shut-off valve is necessary, only a fully open gate valve should be used. Proper drainage of the pump and piping below the freeze line is advised to prevent damage during cold weather. The motor housing should not be disassembled as it contains no repairable internal parts and can pose electrical hazards.
| Model | DP370C |
|---|---|
| Discharge Size | 1-1/2 in |
| Discharge Pipe Size | 1-1/2 in |
| Voltage | 115 V |
| Outlet Size | 1-1/2 in |
| Material | Thermoplastic |
| Max Lift | 25 ft |