ASSEMBLY
WARNING: To reduce risk of injury, disconnect the tool
from the power source before installing, repositioning or
removing accessories.
WARNING: Only connect the plug to the power source
just before starting the saw.
SETTING UP THE SAW
Fig. 1 Assembling the blade
Fig. 2 Removing the blade
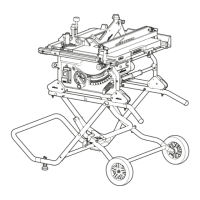
Fig. 3 Assembling the wheeled undercarriage
Fig. 4 Adjusting the blade guard position***
Fig. 5 Using dust extraction*
DUST SUPPRESSION**
Fig. 6 120V Models (United States)
• Connect saw to power supply.
• If the indicator light shows green (b), carry out the following
steps.
• Press the Test button (a) and the green indicator will
disappear.
• Press the Reset button (c) and the green indicator will be
visible. The RCD is now ready for use.
Note: If the RCD trips during use, simply press RESET.
Note: It is recommended that the machine should always be
supplied, via a RCD, with a rated residual current of 30MA or
less.
Note: If the indicator light shows red, a problem may exist, if
unable to reset after tripping, the RCD will need to be replaced
immediately.
Fig. 7 Dust suppression for R12DCT and R14DCT models
Note: All R14DCT models are fitted with a manual AND
electrical valve eliminating the need to manually turn water
off and on when using the machine. When the manual valve
is moved to the ON position, (fig. 7.3) slight depression of the
trigger (fig. 7.4) causes the electrical valve to open allowing
water to flow to the blade before the motor is started with full
depression of the trigger, it will remain open until the trigger
is released. The manual valve can also be used to control the
amount of water that is allowed to flow to the blade.
Fig. 8 Manual override of electrical valve
Note: For R14DCT models, if the electrical valve is damaged
and automatic water flow is not working, a manual override
can be performed. Use a screwdriver to remove the front
panel of the electrical valve to reveal the interal pipe. A screw
is stored (Fig.8a) which can be removed and screwed into the
opening (Fig.8b) to pierce the internal piping. This will allow
water to flow through when the valve is in the ON position.
Please contact Evolution Power Tools to request a repair for
your tool.
PRE-CUTTING CHECKS
• Ensure that the power supply matches the requirements
specified on the machines rating plate.
• If an extension cable is required it must be of a suitable
type for the work environment. If used outdoors it
should be waterproof and so labelled.
• The manufacturers instructions should be followed
when using an extension cable.
• Route any extension cable so that it does not pose a
trip (or any other) hazard to the operator, colleagues or any
bystanders.
CUTTING
Fig.9 Cutting operation
WARNING: Ensure the workpiece is supported for stable
cutting. Allow the blade to reach maximum speed before starting
the cut. Cut smoothly and allow the blade to do the work without
forcing the blade.
WARNING: For R14DCT models, there is a LED light located
near the rear handle to indicate cutting pressure:
• Solid green light: Cutting pressure is correct.
• Solid red light: Too much pressure is being applied, operator
should ease off until the LED light shows green, the blade speed
will reduce if the saw is overworked.
• Flashing red light: Increased pressure will stall the blade. User
will be required to remove the blade from the workpiece and re-
engage the trigger for the tool to reset.
WARNING: Do not attempt to cut curved or zig-zag lines.
Never use the side of the blade as a cutting surface. Never use to
perform inclination cutting.
*Excludes R14DCT models.
**R12DCT and R14DCT models only.
***R300DCT, R12DCT and R14DCT models only.