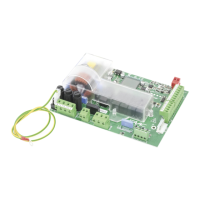
E844 3PH 11 532315 - Rev.B
2
RP/DEC
MOTOR
LAMP
MAINS
2EASY
OPEN SX OPEN DX
LIMIT SW
F-+
OPEN B
OPEN A
SAFE CL
CL -H
OP-H
SAFE OP
STOP
GND
GND
OUT 1
OUT 2
TEST OUT
+24V
N
L1
U
V
W
L2
L3
M
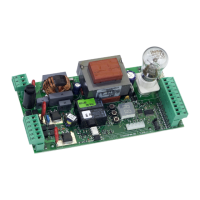
3
LAMP
N
GND
+24V
FCC
FCA
230V~
60W max
1500 W max
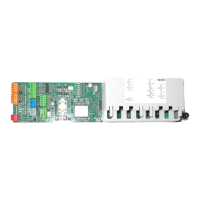
1
2
3
4
5
6
7
8
9
10
11
12
13
400V~ 3PH + N
INPUT
F
-
+
Translation of the original instructions
ENGLISH
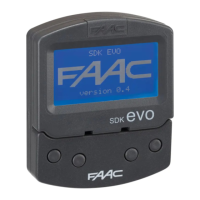
6. SETUP
RISKS
PERSONAL PROTECTIVE EQUIPMENT
!
During operation, there is a risk of fingers and
hands being trapped between the rack, pinion and
gearmotor.
Carry out the steps, referring to the relative sections
for details.
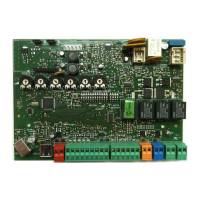
1. Turn power on to the board and use the diagnostics
to check the status of the connections.
2. Check the direction of rotation of the motor:
- release the gearmotor, move the gate manually to
its half-travel position and then re-lock it
- activate the open command OP-H temporarily
and make sure that the gate moves in the open-
ing direction
- if the gate moves in the closing direction, tempo-
rarily disconnect the power supply and invert two
phases of the motor (on connector CN3)
3. Release the gearmotor, move the gate manually to
its closed position and then re-lock it (make sure
that the FCC led switches off in this position and
that 00) appears on the display.
4. Set the type of gearmotor connected: function dF
in programming.
5. Only for 844 R 3PH: program the pre-limit switch
decelerations in function rP in programming. The
pre-limit switch deceleration reduces the inertia of
the gate, allowing the impact forces to fall within
the limits indicated in the standard.
6. Carry out the learning procedure for any BUS 2easy
devices: function bU in programming.
7. Set the functions So (safety in opening) and Sc
(safety in closing) according to the type of devices
connected.
8. Carry out the learning procedure for the work times
(SETUP): function tL in programming.
i
In order for the SETUP procedure to be carried out,
the CLOSED limit switch must be engaged by the gate.
9. If the board is installed on gearmotor 844 R 3PH,
regulate the obstacle detection sensitivity: func-
tion EC in programming.
10. Complete the programming according to the
required operating characteristics.
11. Make sure that the automation system is working
properly with all the devices installed.
6.1 PROGRAMMING
■ Accessing the programming menu
- Press and hold button F: the first function dF ap-
pears on the display. The function is displayed as
long as the F button remains pressed.
- Release button F: the display shows the value of
the function.
■ Modifying the settings
- When the display indicates the value of the func-
tion, press the + or - button to modify it.
- Press button F to go to the next function. The
function is displayed as long as button F remains
pressed.
i
The changes are saved when you exit from program-
ming mode.
■ Exiting programming mode
- Scroll through the menu until you reach the St
function and release the button. The display reverts
to the automation status view. Alternatively,
press buttons F and - simultaneously at any time
during programming.