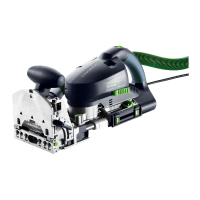
19
Troubleshooting
Problem Possible causes Remedy
Machine stops operating. Flap
[1-18]
is open.
The supply of adhesive stops if
the flap is opened during opera-
tion. However, the feed mecha-
nism continues to operate.
Close the flap
[1-18]
.
Error message (appears on the
display
[1-20]
): edge band not
yet inserted.
Remove the edge band.
The machine switches off. The machine is in cooling mode
< 50 °C
Press the start button
[1-1]
to
switch on the machine again.
Display lights up red. The machine switches to cool-
ing mode after an idling time of
15 minutes.
Press the start button
[1-1]
to
switch on the machine again.
Inlet switches off before the
edge band is inserted.
The time window of 20 seconds
has been exceeded.
Press the start button
[1-1]
to
start the drive again.
Inlet does not switch off even
though the edge band has
passed through the machine.
Light barrier
[3-4]
is dirty. Clean the light barrier
[3-4]
carefully.
The display shows the prompt to
remove the edging although no
edging is inserted.
Edge band does not adhere. Surface dirt/nozzle holes are
blocked.
Initiate the purging process to
remove any dirt
(chapter Purg-
ing of adhesive cartridges)
.
If the contamination is more
severe, raise the central plate
completely and pierce the lower
nozzle holes during operation.
Adhesive too liquid/viscous. Incorrect temperature setting. Adjust the temperature for the
relevant adhesive cartridges
using the menu buttons
[1-19]
.
Insufficient adhesive applied to
thin edge bands (approx. 0.5 -
0.8 mm depending on material)
at the start of glueing
Lack of edge band pressure on
the adhesive nozzle.
At the start of gluing, place an
additional piece of edge band
(approx. 20 cm) with the same
edge height behind the main
edge band. This additional piece
is guided into the edge inlet
after the edge band.