Installing Drawer
CAUTION!
§ Do not use casters on units with drawers. Personal injury or
damage to unit could result.
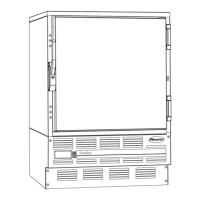
1. Remove drawer packed as an accessory (Fig. 4).
2. Install the two rollers to the threaded holes on each side of the
inside of the cabinet.
3. Hang one drawer slide on the each side of the cabinet by
holding the slide parallel to the bottom of the cabinet, tipping the
slide at a 45 degree angle, and pushing the slide over the two
rollers.
4. Once the drawer slides are installed, slide the two rear rollers of
the drawer into the slots on the top of the lower channel of the
slides. Tip up the front of the drawer and slide the back until the
front drawer roller lines up to slot. Drop the front drawer roller
into the channel and push the drawer all the way in the cabinet.
5. Test operation of the drawer by sliding the drawer all the way
out, then back in.
Fig. 4
Third-party Probe - Optional
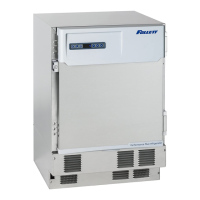
1. Locate the three sided knockout (Fig. 5.1) on the evaporator
cover on the inside of the refrigerator, just left of the fan.
2. Push the knockout with a screw driver until it folds down.
3. Locate the yellow foam circle on the rear of the box (Fig. 5.2).
4. Using a screw driver, puncture a hole through the foam to make
an access hole for the third-party temperature probe.
5. Fish the temperature probe through the foam circle in the back
of the unit, then through the knockout on the evaporator cover.
6. Position the third party probe in the desired location in the
refrigerator cabinet.
Fig. 5
1
2
Reversing the Door Swing – Optional (units below
Serial #H94599)
Tools needed:
§ #2 Phillips head screwdriver
§ Flat-head screwdriver
§ Awl
§ Gloves
§ Safety glasses
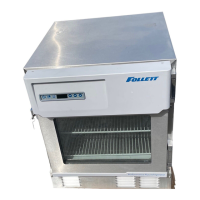
1. Remove kick panel* (Fig. 6). Disconnect the door sensor switch
wires and grey control wire.
* If the unit has a keypad lock, the door must be open to remove the kick panel.
2. Remove wire and strain relief from kick plate (Fig. 6).
Fig. 6
6 REF4P, REF5P and REF5BBP-T Undercounter Refrigerators