P a g e | 30
Blade Changing
WARNING – Rigger Gloves must be worn whilst changing the blades
WARNING – It is essential that only genuine parts are used guaranteeing the correct
grade of Blade, bolt, washer and nut
1. Turn off chipper and remove the ignition keys
2. Disconnect battery leads
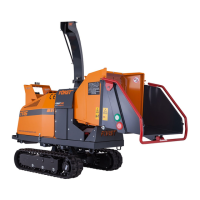
3. Remove the two bolts holding the chipping chamber lid closed (pic 1)
4. Carefully open the chipping chamber lid from the chute side and let it come to
rest on the hinge stops
5. Turn flywheel to blade change position (pic 2)
6. Insert locking timber (pic 2)
7. Clean all debris from around the blade bolt and nut with a metal pick
8. With a 24mm socket undo the two blade bolt nuts and remove both bolts/nuts
and washers steadying the blade with the other hand making sure it doesn’t
fall – WARNING these blades are sharp, rigger gloves must be worn
9. Carefully remove the blade from the flywheel
10. Clean blade seat on the flywheel thoroughly before fitting new or re-
sharpened blades WARNING – the blades must not have any debris
underneath them when tightened, the smallest amount of debris behind the
blade could result in the blade coming loose causing damage to the machine
11. Re-fit blades, with new bolts, washers and nuts in the order shown in (pic 3)
12. Shims may be required to keep the gap between the blade and the anvil on
the inner edge (closest to the flywheel shaft) at 3mm – see page 28, Figure 15
13. A calibrated torque wrench must be used to tighten the blade bolts to a torque
setting of 310NM
14. Remove locking timber, rotate flywheel to next blade position and repeat 6-13
15. Close chipping chamber lid and re-fit bolts tightening to 86NM
16. Re-fit battery leads
WARNING – Failure to keep blades sharp will overload the engine and bearings
which could result in machine breakdown.
Blades must not be used beyond the wear mark (pic 4) failure to comply with this
could result in damaging the machine, injury or loss of life