5
FD-4 Ownerís Manual Supplement
CLK
SYNC OUT DRIVE
SCSI
AUTO A.PUNCH
SETUP
44.1kHz
CLK
SYNC OUT DRIVE
SCSI
AUTO A.PUNCH
SETUP
44.1kHz
CLK
SYNC OUT DRIVE
SCSI
AUTO A.PUNCH
SETUP
?
SURE
44.1kHz
CLK
SYNC OUT DRIVE
SCSI
AUTO A.PUNCH
REMAIN
SETUP
MB
44.1kHz
CLK
SYNC OUT DRIVE
SCSI
AUTO A.PUNCH
ABS
44.1kHz
CLK
SYNC OUT DRIVE
SCSI
AUTO A.PUNCH
REMAIN
SETUP
MB
44.1kHz
SETUP
DRIVE
AUTO A.PUNCH
SYNC OUT
CLK
SCSI
44.1kHz
COMPLETED !
CLK
SYNC OUT DRIVE
SCSI
AUTO A.PUNCH
SETUP
44.1kHz
Saving data
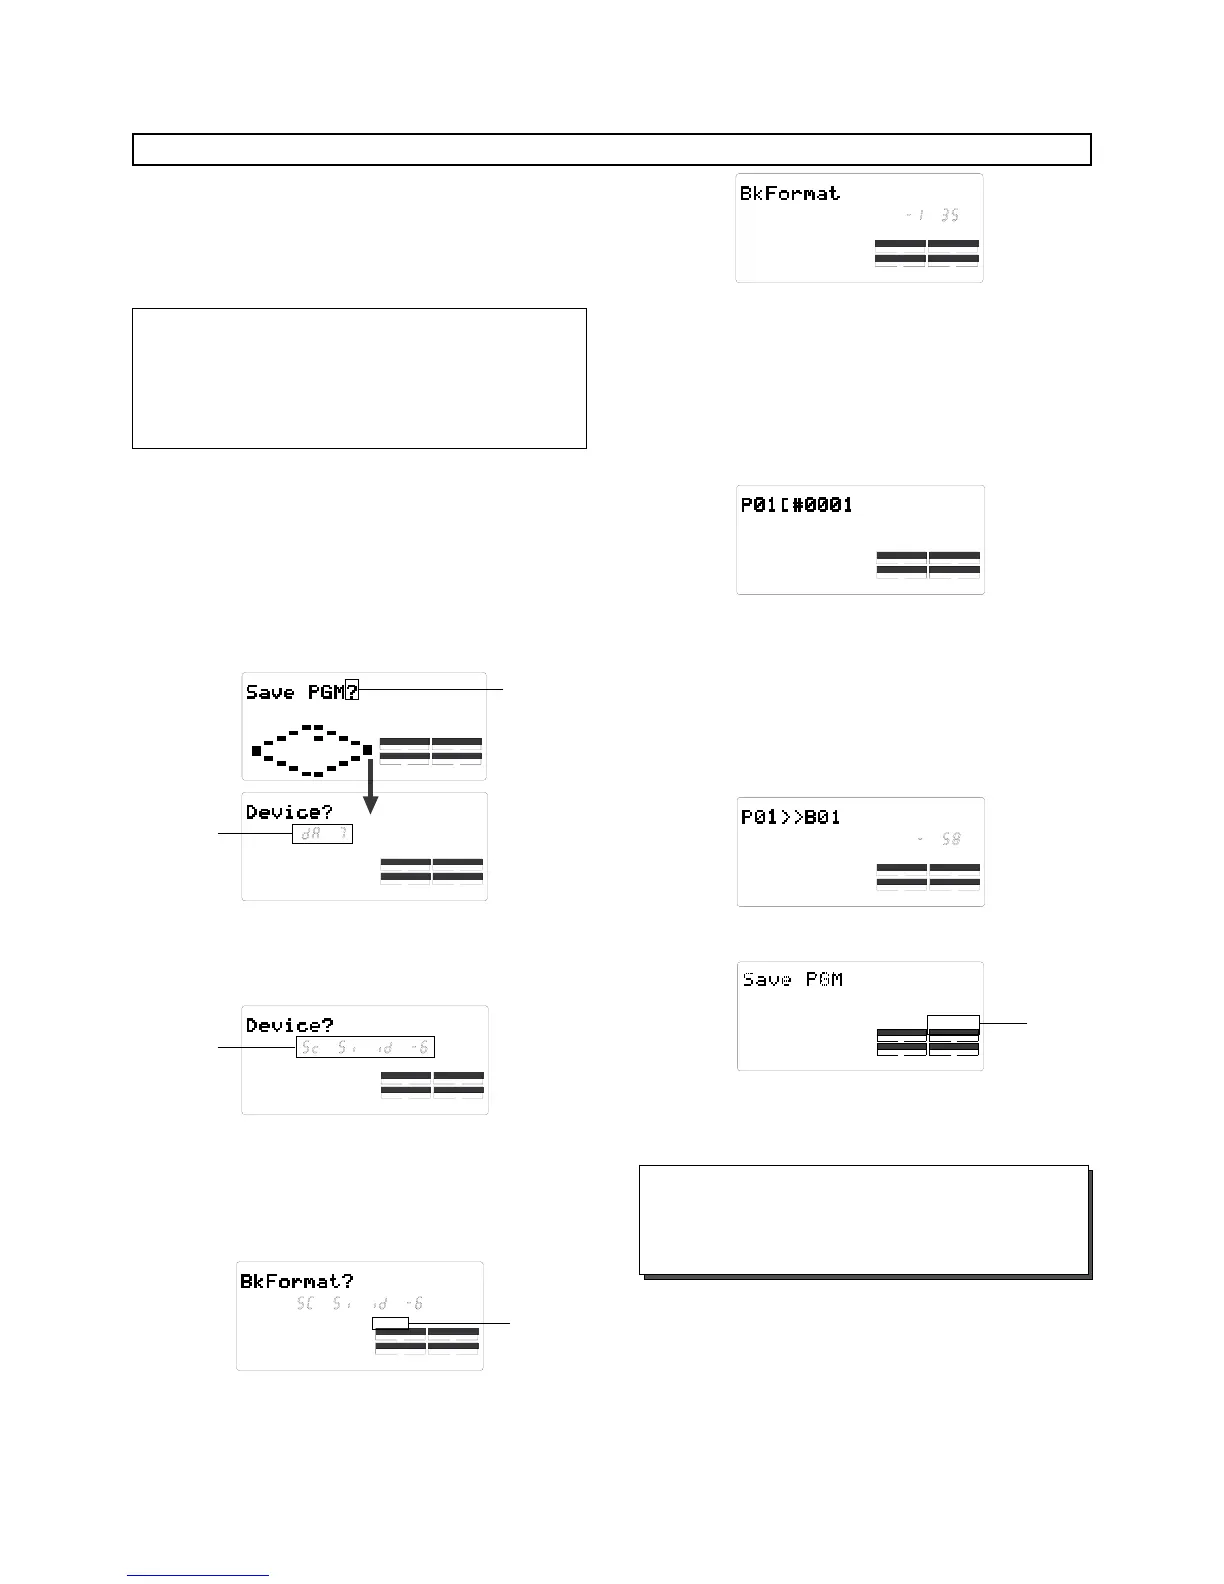
You can back up data using the ìSave PGM ?î menu in
SETUP mode. The following procedures assume that a
recorded disk has been inserted in the current SCSI drive,
Program 1 (P01) has been selected, and an unformatted
disk will be used as the backup disk.
*
< [Save PGM?] menu>
* Output signal options: [dAT], [SCSi id-6]
* Program options: P01 - P99 (an individual Program)
* Track options
DAT: track 1 - 4, track 1 - 6
SCSI disk: All tracks will be automatically selected.
Insert an unformatted disk into the backup drive.
Press the SETUP key to enter SETUP mode, then
use the JOG dial to select [Save PGM ?] menu.
Press the EXECUTE/YES key.
[Save Device ?] appears and the selected output signal
option flashes. ([dAT] flashes.)
1.
2.
3.
Flashing
Flashing
Turn the JOG dial to select a flashing [SCSi id-6]
to select the connected SCSI device as a save
destination.
4.
Press the EXECUTE/YES key.
The FD-4 recognizes that a disk in the backup drive is
unformatted, and displays [Unformat?], then proceeds to
the [Bk Format ?] menu (backup disk format) in SETUP
mode, then displays the following.
5.
Flashing
Flashing
Press and hold down the RECORD button, and
press the EXECUTE/YES key.
The FD-4 displays the following and starts formatting the
disk. The unformatted disk area size will count down as
the format operation progresses.
6.
When the formatting operation is completed, [COM-
PLETED!] lights up, [SCSi id-6] flashes, then the FD-4
displays the following.
This example shows that the data to be saved is Program 1
on the current drive. If the current drive has multiple Pro-
grams, use the JOG dial to select the desired Program. (If
only one program exists, [P01] is the choice you can make.)
Use the JOG dial to select the desired Program
and press the EXECUTE/YES key.
The save operation starts and the following indication ap-
pears.
This example shows that Program 1 [P01] data is being saved
as Backup data 1 [B01]. As the save operation progresses,
the REMAIN value (e.g.: -58MB) counts down.
7.
When the save operation is completed, [COMPLETED!]
lights up and the following indication appears.
Press the EXIT/NO key to exit SETUP mode.
The FD-4 displays ABS 0 of the Program on the current
drive.
8.
Lights up
The backup data will use the number of the saved
Program. (e.g., if you save P01 [#0001] data, the
backup data will be named as B01 [#0001]. You
cannot edit the title of the backup data.
Note:
The above procedures assume that the saved data size is
smaller than the available backup disk space. Because of
this, only one disk is required to back up the data. To save
data larger than a single backup disk capacity, refer to the
<Memo> which explains about saving data using mul-
tiple backup disk in detail in the next page.



 To Next Page