to short the two magnetic poles and divert
the magnetic field.
5.2 Check the drain plug for metal particles
every 100,000 miles (160 000 km). Clean
away the collected material deposited on
each pole. Magnets will rapidly lose their
effectiveness as collected material
bridges the gap between the two poles.
5.3 Each time the oil is changed, replace any
magnetic drain plug that does not meet
the minimum pickup capacity.
NOTE: Meritor recommends plugs with ele-
ments having a minimum pickup capacity of
1.5 pounds (0.7 kg) of low-carbon steel.
5.4 After cleaning, install the drain plug(s)
and tighten to 35 lbf·ft (47 N·m).
6. Fill the axle with recommended lubricant. See
Table 4 for drive axle lubricant capacities.
NOTE: Some Meritor axles have a small
tapped and plugged hole near and below the
housing lubricant fill hole. This smaller hole
is for a lubricant temperature indicator only,
and should not be used as a fill or level
hole.
6.1 With the vehicle on a level surface, fill the
axle through the oil fill hole. Lubricant
should be level with the bottom of the oil
fill hole. To check fluid level, see
Fig. 2.
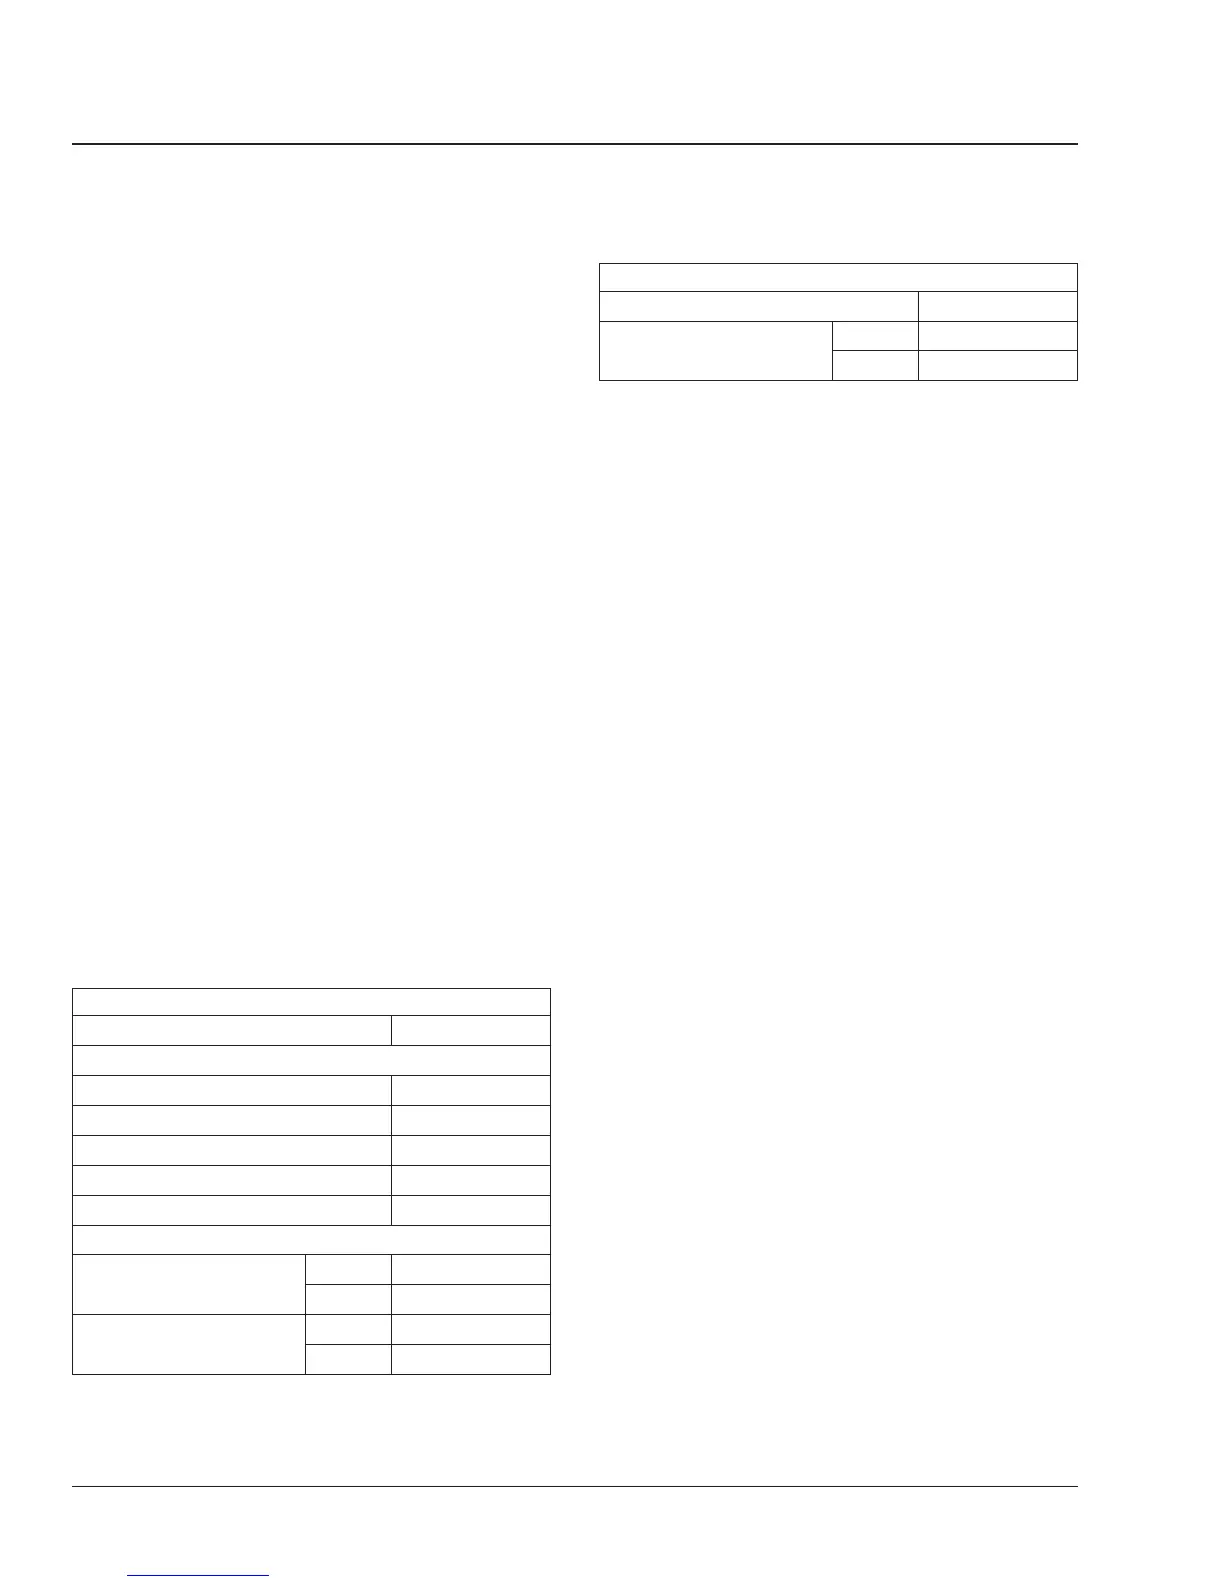
Meritor Drive Axle Lubricant Capacities
Axle Model Capacity:
*
pt (L)
Single Drive, Single Reduction
†
RS–21–160 39.5 (18.7)
RS–23–160 39.5 (18.7)
RS–23–161 37.2 (17.6)
RS–23–185 47.3 (22.4)
RS–25–160 37.2 (17.6)
Tandem Drive, Single Reduction
RT–40–145, RT–40–145A,
RT–40–145P
Forward 30.2 (14.3)
Rear 25.8 (12.2)
RT–44–145, RT–44–145P
Forward 29.3 (13.9)
Rear 25.1 (11.9)
Meritor Drive Axle Lubricant Capacities
Axle Model Capacity:
*
pt (L)
RT–46–160, RT–46–160P
Forward 39.1 (18.5)
Rear 34.4 (16.3)
*
Quantities listed are approximate. Fill axle until lubricant is level with bot-
tom of fill hole with vehicle on level ground.
†
See "Traction Equalizer Additives" in the text.
Table 4, Meritor Drive Axle Lubricant Capacities
6.2 Install and tighten the fill plug 35 lbf·ft (47
N·m).
7. Whenever the interaxle differential housing has
been drained, add an additional 2 pints (0.9 L) of
the recommended lubricant directly into the inter-
axle differential housing.
8. Remove the chocks, then drive the vehicle, un-
loaded, for 1 or 2 miles (2 or 3 km) at speeds
not to exceed 25 mph (40 km/h), to thoroughly
circulate lubricant throughout the carrier and
housing assemblies.
Dana® Spicer®
IMPORTANT: The use of friction modifiers is not
approved in Dana drive axles.
1. Park the vehicle on a level surface, shut down
the engine, and set the parking brake. Chock the
tires.
2. Clean the fill plug and the area around it. In the
axle housing rear cover, remove the plug from
the oil fill hole (or standpipe, if installed in the oil
fill hole). See
Fig. 4.
3. Place a drain pan under the rear axle drain plug.
See
Fig. 4. Drain the oil at normal operating
temperature, 150 to 200°F (65 to 93°C). At this
temperature, the oil will run more freely and en-
sure that the axle is flushed.
NOTE: Some tandem drive axles are equipped
with a cylindrical magnetic strainer, located
below the lube pump on the front of the power
divider cover. All rear axles are fitted with mag-
netic drain and fill plugs.
4. At each axle oil change, remove and clean the
magnetic strainer, if equipped. See
Fig. 5.
4.1 Remove the magnetic strainer from the
power divider cover.
Rear Axle35
Cascadia Maintenance Manual, August 201535/4