2.2
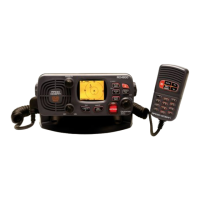
Receiving and Transmitting
q Push [
POWER
] to turn power ON.
w Set the audio and squelch levels.
➥ Rotate [
SQL
] fully counterclockwise in advance.
➥ Rotate [
VOL
] to adjust the audio output level.
➥ Rotate [
SQL
] clockwise until the noise disappears.
e To change the channel group, push [
CH/WX
]( )
while pushing [
HI/LO
]. (p. 6)
r Rotate [
CHANNEL
] or push [
YY
]
/
[
ZZ
] on the microphone to
select the desired channel.
• When receiving a signal, “BUSY” appears and audio is emitted
from the speaker.
• Further adjustment of [
VOL
] may be necessary.
• Use the optional Voice scrambler function for privacy. (p. 9)
t Push [
LO/DX
] to turn the receive Attenuator function ON
or OFF, if necessary.
•“LOCAL” appears when the receive Attenuator is in use.
y Push [
HI/LO
] to select the output power, if necessary.
•“25W” or “1W” appears when high or low power is selected, re-
spectively.
• Choose low power for short range communications, choose high
power for longer distance communications.
• Some channels are for selecting low power only.
u Push and hold [
PTT
] to transmit, then speak into
∗
(Mi-
crophone).
•“TX” appears.
• Channel 70 cannot be used for transmission other than DSC.
Note: Simplex channels, 3, 21, 23, 61, 64, 81, 82 and 83
CANNOT be lawfully used by the general public in U.S.A.
waters.
i Release [
PTT
] to receive.
Important: To maximize the readability of your transmitted
signal, pause a few sec. after pushing [
PTT
], hold the micro-
phone 2 to 4 inches (5 to 10 cm) from your mouth and speak
into
∗
(Microphone) at a normal voice level.
 Loading...