Careand cleaning of the range.
Be sure the controls are turned to OFFand the surface units are cool before attempting to remove them.
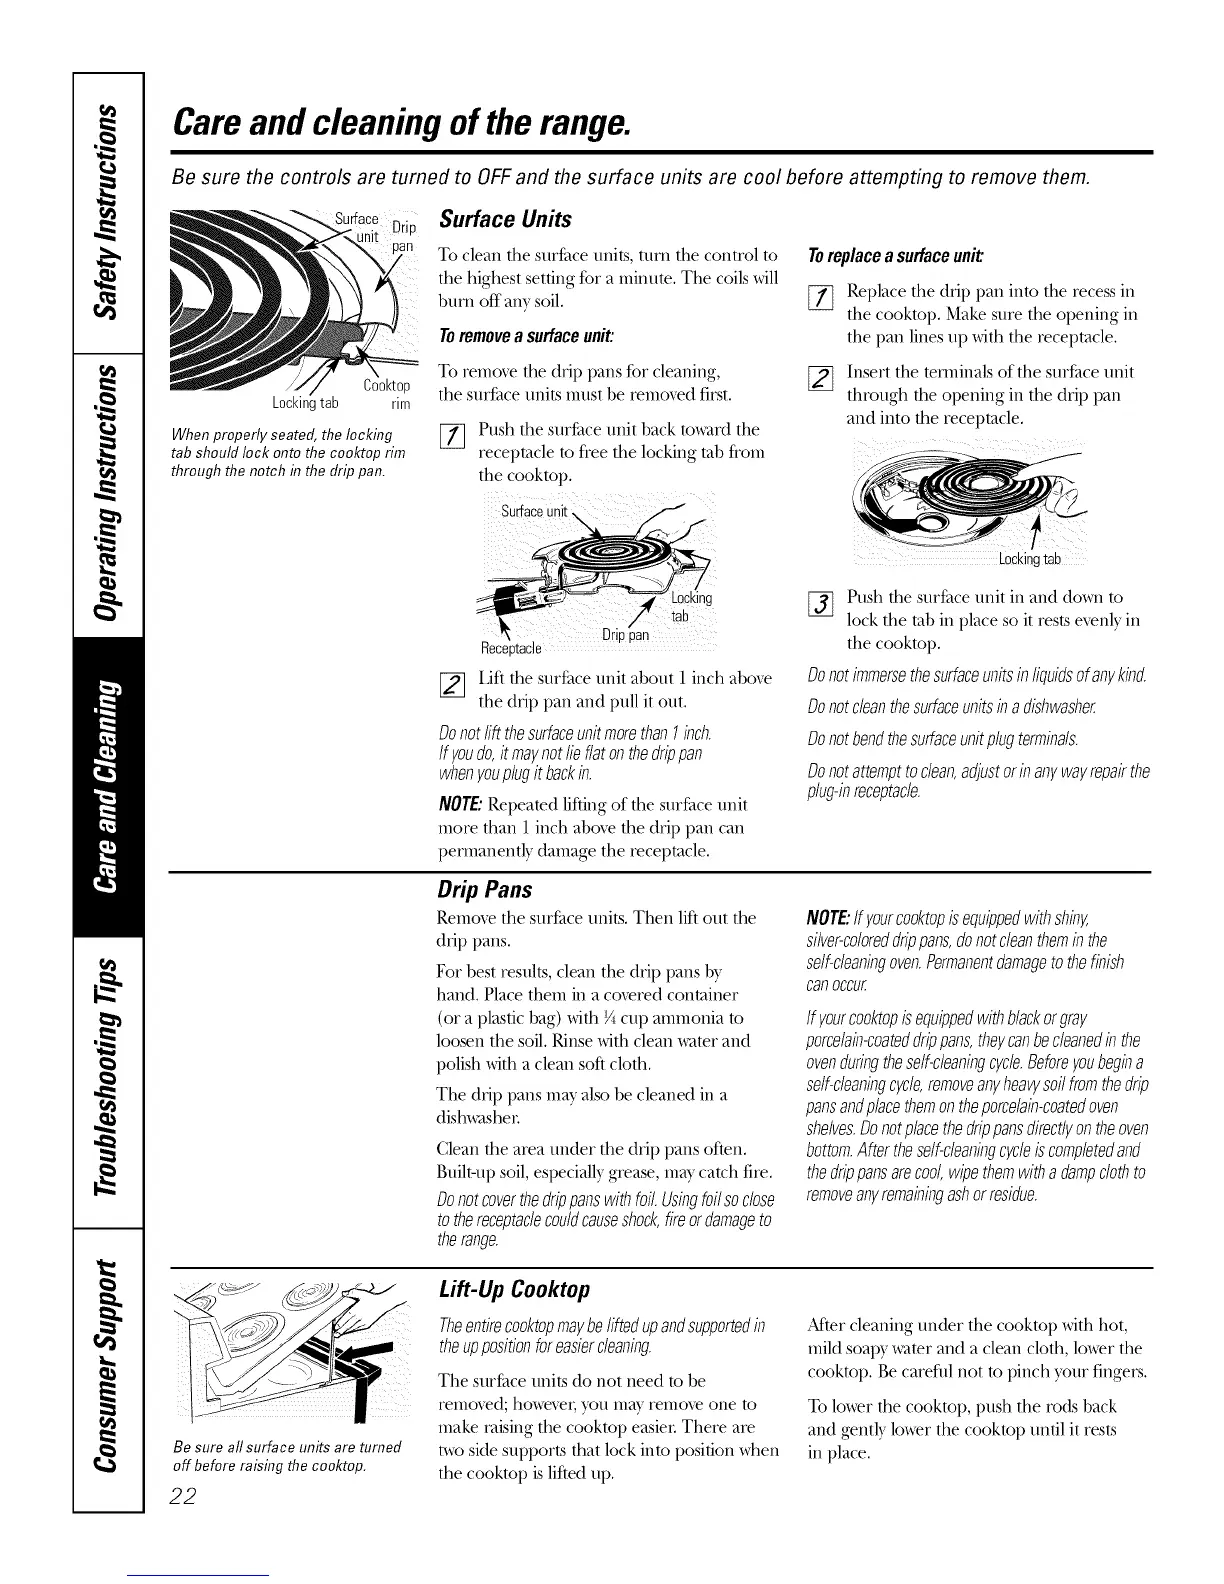
'Drip
Cooktop
tab rim
Surface Units
To clean the st/rface units, tt/rn the control to
the highest setting for a minute, The coils will
burn off any soil.
Toremoveasurfaceunit:
To remove the diip pans for cleaning,
the surface units must be removed first,
When properly seated, the locking []
tab should lock onto the cooktop rim
through the notch in the drip pan.
Push the surface unit back toward the
receptacle to flee the locking tab flora
the cooktop.
Surfaceu
Toreplaceasurfaceunit
[_ Replace the drip pan into the recess in
the cooktop. Make sure the opening in
the pan lines up with the receptacle.
[]
Insert the temfinals of the surface unit
through the opening in the drip park
and into the receptacle.
Lockingtab
_ocking
rae
Driu3an
Receotacle
_] Lift the surface unit about 1 inch above
the drip pan and pull it out.
Donotlift thesurfaceunitmorethanI inch.
Ifyoudo,it maynotlieflatonthedrippan
whenyouplugit backin.
NOTE."Repeated lifting of the surface unit
more than 1 inch aboxe the di'ip pan can
permanently damage the receptacle.
[_ Push the surface unit in and down to
lock the tab in place so it restsevenly in
the cooktop.
Donotimmersethesurfaceunitsinliquidsofanykind.
Donotcleanthesurfaceunitsinadishwashe_
Donotbendthesurfaceunitplugterminals.
Donotattempttoclean,adjustorinanywayrepairthe
plug-inreceptacle.
Drip Pans
Remox_the surface units. Then lift ()titthe
drip pans.
For best results, clean the drip pans by
hand. Place them in a coxered container
(or a plastic bag) with V,cup ammonia m
loosen the soil. Rinse with clean wamr and
polish with a clean soft cloth.
The drip pans may alsobe cleaned in a
dishwasher
Clean the area under the di'ip pans often.
Built-upsoil, especially grease, mW catch fire.
Donotcoverthedrippanswithfoil.Usingfoilsoclose
tothereceptaclecouldcauseshock,fireordamageto
therange.
NOTE'.Ifyourco&topisequippedwithshiny,
silver-coloreddrippans,donotcleantheminthe
self-cleaningoven.Permanentdamagetothefinish
can OCCUF.
If yourcooktopisequippedwithblackorgray
porcelain-coateddrippans,theycanbecleanedinthe
ovenduringtheself-cleaningcycle.Beforeyoubegina
self-cleaningcycle,removeanyheavysoilfromthedrip
pansandplacethemontheporcelain-coatedoven
shelves.Donotplacethedrippansdirectlyontheoven
bottom.Aftertheself-cleaningcycleiscompletedand
thedrippansarecoot,wipethemwitha dampclothto
removeanyremainingashorresidue.
Be sure all surface units are turned
off before raising the cooktop.
22
Lift-Up Cooktop
Theentirecooktopmaybeliftedupandsupportedin
theuppositionforeasiercleaning.
The surface units do not need to be
remoxed; howexei; you may remoxe one to
make raising the cooktop easier There are
two side supports that lock into position when
the cooktop is lifted tip.
After cleaning under the cooktop with hot,
mild soap}.'water and a clean cloth, lower the
cooktop. Be carefid not to pinch your fingers.
To lower the cooktop, push the rods back
and gently lower the cooktop until it rests
in place.