Care and Cleaning
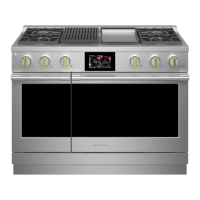
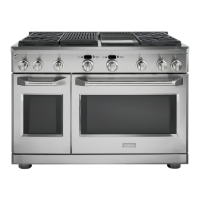
Professional All-Gas Range
Oven lights
32
A CAUTION: Beforereplacinga bulb,
disconnectelectricalpower to theoven atthe
mainfuse or circuit breaker panel.
Eachoven is equippedwith halogenlight columns
located on the side walls of the oven.The_ights
come on when the door isopenedor when the
ovenisin a cooking cycle.
Eachlight assemblyconsistsof a removable light
coverwith two lockingclipsanda lightcompartment
with threehalogenbulbs.
Besureto letthe light cover and bulb cool
completely.Foryour safety, do not touch a
hot bulb with bare hands or a dampcloth.
TO remove:
1. Removethe racksfrom the oven.Seethe
Ful!extensionoven rackssection.
2. Usinga 7/16" nutdriver,removethe four nuts
holdin,it[he rack supportsto the ovej[ntlwallj_
3. Removethe glasslightcover by puIIingitsbuck
edgeout and rolling it toward you. Do not
removeanyscrews.
l; [tl
4, Usingglovesor a drycloth,remove the
burned-out light bulb by pullin! it straight out.
To replace:
Usea new 120-volt Halogen
bulb,with G8pins,not to
exceed25 watts.
Replacementbulbsmay bepurchasedby calling
800.626.2002.OrderPart NumberWB25T1006&
NOTE:Higherwattagebulbs willdamageyour oven.
Usingglovesor a dry cloth, removethe bulb
from its packaging.Do nottouch the bulb with
bare fingers. Oilfrom bare fingersmay cause hot
spotson the glasssurface and leadto premature
failureof the bulb,Ifyou do touch the gloss,cleon
itwith alcohol priorto installation.
1. Pushthe bulb straight into the receptacle
allthe way.
2. Replacethe light cover, by placing its
front edge underthe front two tabs in the light
compartment. Rollthe backedge into place,
making surethat it isfirmly seated.
NOTE:If the lockingclipsfell from the glasslens
cover,holdthem on the cover,inthe correct
position,while replacingthe coveron the light
compartment.
Place front
edge of
lens cover
under front
two tabs
Pressthe lightcoverintoplace
The light cover must be in place when using
the oven.
3. Reinstallthe racksupport. Besure to orient the
support so that thetop tabs for the nutsare
closestto the top ofthe oven. Lightlysecure
with the four nuts removedearlier,but do not
over-tightenor the enamel could be chipped.
[ i
4. Replacethe racks,Seethe Fullextensionoven
rackssection.
5. Reconnect electrical power to the oven,

 Loading...