– 20 –
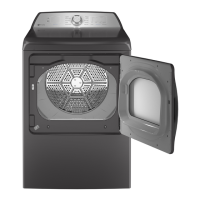
Front Panel
The front panel is fastened to the cabinet at the
inside front by 2 screws and at the bottom by 3 tabs
protruding from the base of the cabinet.
To remove the front panel:
1. Remove the top panel. (See Top Panel.)
2. Remove 2 screws from the front inside edge of
the front panel.
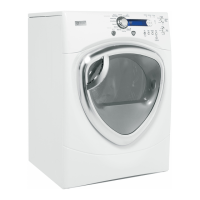
To remove the drum slide assembly:
1. Remove the top and front panels. (See
Top Panel
and Front Panel.)
2. Remove the light bulb.
3. Grasp the top of the drum slide assembly and
pull down and inward to release the assembly
from the 2 tabs located at the top of the front
panel.
Support Slides
Guide Slide
Guide Slide
Drum Slide Assembly
The drum slide assembly is located on the back
side of the front panel and utilizes 4 drum slides.
Two white outer slides are used as guides, and 2
dark color center (top) slides are used to support the
weight of the drum. When replacing the slides, the
dark-colored support slides must be used to replace
the top support slides. Guide slides may also be
replaced with support slides.
Caution: Do not replace the center (top) support
slides with the white guide slides. Damage to the
dryer will result.
Tab
Tab
3. Tilt the top edge of the front panel out and
disconnect wiring to the door switch, light, and
sensor rods.
4. Press on the John Guest connector collar and
release the water line.
5. Lift the front panel off the bottom 3 tabs.
Disconnect
John Guest
Connector
Collar
 Loading...