G-COMBO INSTRUCTION MANUAL PAGE 19
3-4-9 Following a route
Often a trip from one place to another involves several course
changes requiring a series of route points (waypoints) which
you navigate to, one after another. The sequence of waypoints
leading to the ultimate destination is called a route. You
can save up to 100 routes and a route may consist of 100
waypoints.
Start Route Option
1 Press PAGE and select the Chart window.
2 Press MENU and select Start Route.
3 Move cursor keys to select a route to start navigating.
4 Select Forward or Reverse to decide which direction you
want to navigate.
Route Window Option
1 Press PAGE and select the routes window
2 In the route window, move the cursor to highlight a route
you want to start navigating to.
3 Press MENU and select start
4 Select Forward or Reverse to decide which direction you
want to navigate.
Create Route Option
1 Press PAGE and select the Chart window and
press MENU.
2 Select New route.
3 Name the route and present position.
4 Move cursor to a waypoint and press ENT.
5 Move cursor to position of next waypoint and press ENT.
6 Repeat step 5 to enter more waypoints.
7 Once last waypoint has been entered press MENU and
select END. To start route see 3-4-9.
Skipping a waypoint while following a route
1 Press PAGE and select the chart window.
2 Press MENU and select Skip.
3 Repeat above step if necessary.
Cancelling a route
1 Press PAGE and select the Chart window.
2 Press MENU and select Cancel route.
3-4-10 Goto Key
This key is very useful when you want to start navigating to a
destination point. When the key is pressed, it starts navigating
to the cursor.
Going to a point
1 Move the cursor to an open position.
2 Press GOTO
3-4-11 Distance and bearing calculator
The unit can show the bearing and the length of leg and the
total distance of legs.
Setting Legs
1 In the chart window, press MENU and select Distance.
Information is displayed in pop up window, showing
bearing/leg distance/total distance. This window will appear
in the bottom left hand side.
2 Move the cursor to the start point which is the start point of
the first leg and press ENT.
3 Move the cursor to a point which is the end of the first leg.
4 Repeat 2-3 steps for more legs.
5 Press ESC to exit.
Deleting the last leg
1 Press MENU and select Remove.
2 Repeat above step if you want to remove more legs.
Saving as a route
1. Once you set all the legs, press MENU and select Save.
2 Enter a route name by pressing or to select a letter
then press for next letter.
3 Press ESC to save the new route.
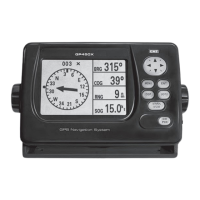
Tip: Bearing and distance