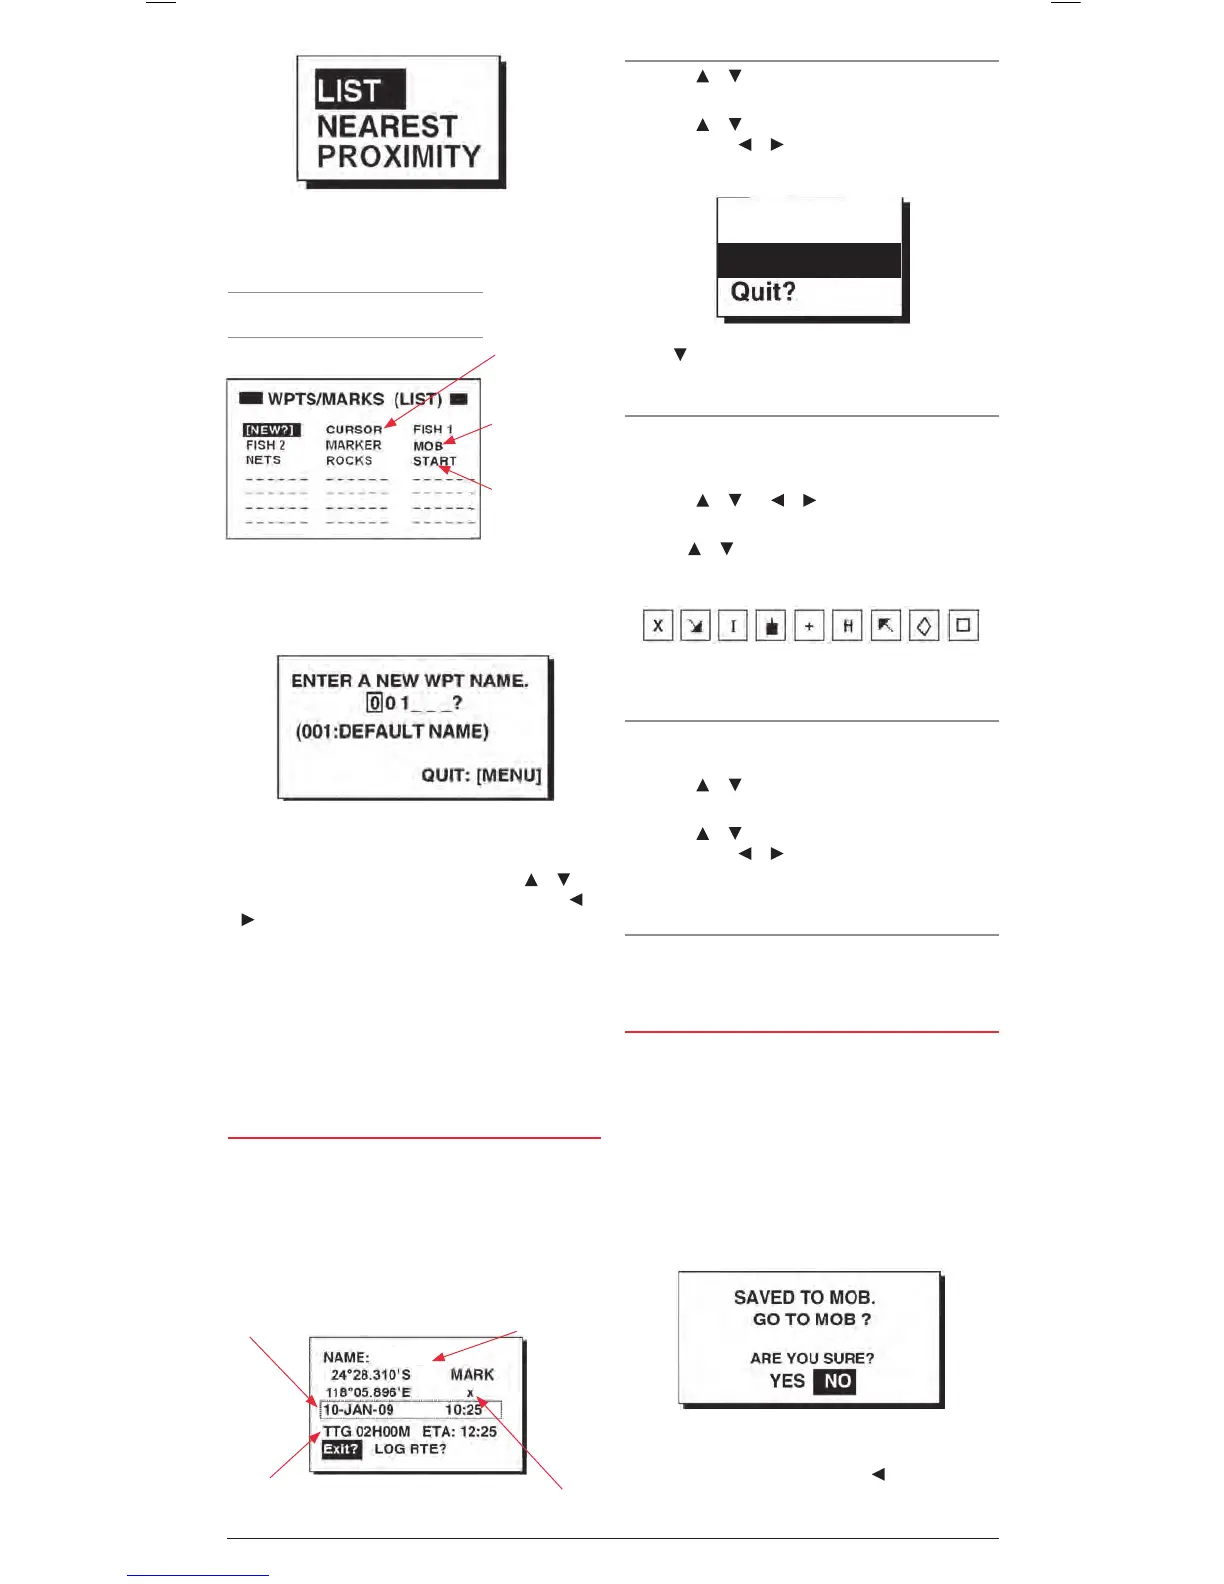
2. Press ENT to select the LIST option. The Waypoints list
page is displayed showing all of your Waypoints listed in
alphabetical order. NEW is highlighted.
3. To create a new Waypoint, press ENT to select the NEW
option. The Waypoint entry window appears and a default
numerical Waypoint name is displayed.
4. To accept the default Waypoint name simply press ENT.
5. To change the default Waypoint name, press the
or keys
to change the character at the cursor position. Press the or
keys to move the cursor position left or right. The Waypoint
name may consist of up to six alphanumerical characters.
When the required name is displayed press the ENT key.
6. The Waypoint attribute window appears showing the position,
Waypoint symbol, time and date and arrival information for
your new Waypoint. To accept the default fields and store the
Waypoint press ENT.
To edit the rest of the Waypoint properties, see section on
‘Editing Waypoint Attributes’ below.
EDITING WAYPOINT ATTRIBUTES
When creating a new Waypoint from the Cursor position, from
your Vessel’s position or from the Waypoint List, the Waypoint
Attribute page is displayed. This page is filled with default
Waypoint information including the position, Waypoint symbol,
time and date and arrival information for your new Waypoint.
To accept the default fields and store the Waypoint press ENT,
otherwise follow the steps below to edit the Waypoint attributes.
Changing the Waypoint Name
1. Press the
or keys to highlight the Waypoint name and
press ENT.
2. Press the
or keys to change the character at the cursor
position and the or keys to move the cursor position left
or right. Press ENT when done. The window below appears.
3. Press
to highlight RENAME then press ENT. The original
Waypoint name will be overwritten with the new name.
Changing the Waypoint Symbol (Mark)
The Waypoint symbol appears on the plotter display to mark the
location of your Waypoint. You can select from nine different
Waypoint symbols to help categorise your Waypoints.
1. Press the
or and or keys to highlight the currently
displayed symbol (the default symbol is X. Press the ENT key.
2. Use the
or keys to scroll through the list of symbols. The
following symbols are available.
3. When the required symbol is displayed press the ENT key
Changing the Comments Field
The Date and Time field can be replaced with a comment if
required. A maximum of 16 characters is available.
1. Press the
or keys to highlight the Date and Time field
and press the ENT key.
2. Press the
or keys to change the character at the cursor
position and the or keys to move the cursor position
left or right. To create a ‘space’, choose the ‘blank’ character.
Press ENT when done.
Setting the Log Route Function
The Log Route function adds the Waypoint to the active route.
For more details on this feature please refer to the
Routes section.
MARKING AN MOB
The MOB mark denotes a ‘Man Overboard’ position. It allows
you to instantly mark your current location in an emergency and
quickly get navigation instructions back to it. The MOB location
is stored in the Waypoint list as MOB. Only one MOB point can
be stored. Each time you save a new MOB point the previous
MOB is overwritten.
1. To save your current location as an MOB point press and
hold the MARK/MOB key. The MOB point is saved and the
following screen appears offering to navigate you back to the
MOB point.
2. To navigate to the MOB point press the
key to select
YES then press ENT. The plotter page will appear with the
CURSOR: The last
destination set
using the cursor
position.
MOB: The last
Man Overboard
position set by the
MOB key
.
START: Your
starting point
when the last
destination was
selected.