FOR
PROFESSIONAL USE ONLY OBSERVE ALL WARNINGS
HIGH PRESSURE SPRAY CAN CAUSE SERIOUS INJURY.
Read and understand all
instruction
manuals
before operating equipment.
FLUID
INJECTION
HAZARD
General Safety
This equipment generates very
high fluid
pressure. Spray
from
the gun, leaks or ruptured components can inject fluid through
yourskinandintoyourbodyandcauseextremelyseriousbodily
splashedintotheeyesorontheskincancauseseriousdamage.
injury, including the need for amputation. Also, fluid injected or
Never point the spray gun at anyone or at any part of the body.
Never put hand or fingers over the spray tip. Nevertry
to
"blow
back" paint;sthis is NOT an air spray system.
Alwayshavethetipguardinplaceonthespraygunwhenspray-
ing.
Always follow the Pressure
Rellef
Procedure, below, before
cleaning or removing the spray
tip
or servicing any system
equipment.
Never try to stop or deflect leaks with your. hand or
body.
each
use.
Besureequipmentsafetydevicesareoperatingproperlybefore
Medical Alert--Airless
Spray
Wounds
If
any fluid appears to penetrate your skin, get EMERGENCY
CUT.
Tell the doctor exactly what fluid was injected.
MEDICAL CARE AT ONCE.
DO
NOT TREAT
AS
A SIMPLE
Important
to treat
the Injury
surglcally
ES
soon
as pOSElble.
Note
to
Physlclam Injection in theskin isatraumaticinjury.
It
Is
Donotdelaytreatmenttoresearchtoxicity.Toxicityisaconcern
withsomeexoticcoatingsinjecteddirectlyintothebloodstream.
Consultation
with
aplasticsurgeon or reconstructive hand sur-
geon may be advisable.
Spray Gun Safety
Devices
each use. Do not remove or
modify
any part of the gun; this can
Be
sure all gun safev devices are operating properly before
cause
a malfunction and resuil in
serious
bodily injury.
Safety
Latch
Wheneveryoustopspraying,evenforamoment,alwayssetthe
gunsafetylatchinthedosedor'safe"position,makingthegun
triggering of the gun.
inoperative.Failuretosetthesafetylatchcanresultinaccidental
Diffuser
Thegundiifuserbreaksupsprayandreducestheriskoffluidin-
jection when the
tip
is
not
installed. Check diffuser operation
regularly. Follow the Pressure
Rellef
Procedure, below, then
remove the spray tip.
Aim
the
gun into a metal pail, holding
the
the gun.
If
the fluid emitted is not dflused into an irregular
gunfirmlytothepail.Usingthelowestpossiblepressure,trigger
stream, replace
me
diffuser immediately.
Tip
Guard
ALWAYS have the tip guard in place on the spray gun while
spraying. The tip guard ale- you
to
the fluid injection hazard
and helps reduce,
but
does not prevent, the risk of accidentally
tip.
placing your fingers or any part of your body close
to
the spray
Trigger
Guard
Aiwayshavethetriggerguardinplaceonthegunwhenspraying
to reduce the risk of accidentally triggering the gun
if
it
is
dropped or bumped.
Spray
Tip
Safety
Useextremecautionwhencleaningorchangingspraytips.1fthe
spray tip clogs while spraying, engagethe gun safety latch
irn-
mediately.ALWAYSfollowthe
Pressure
Rellef
Procedureand
then remove the spray tip
to
clean
it.
fully reliwed and the gun safety latch is engaged.
NEVER wipe
off
build-up around the spray tip until pressure is
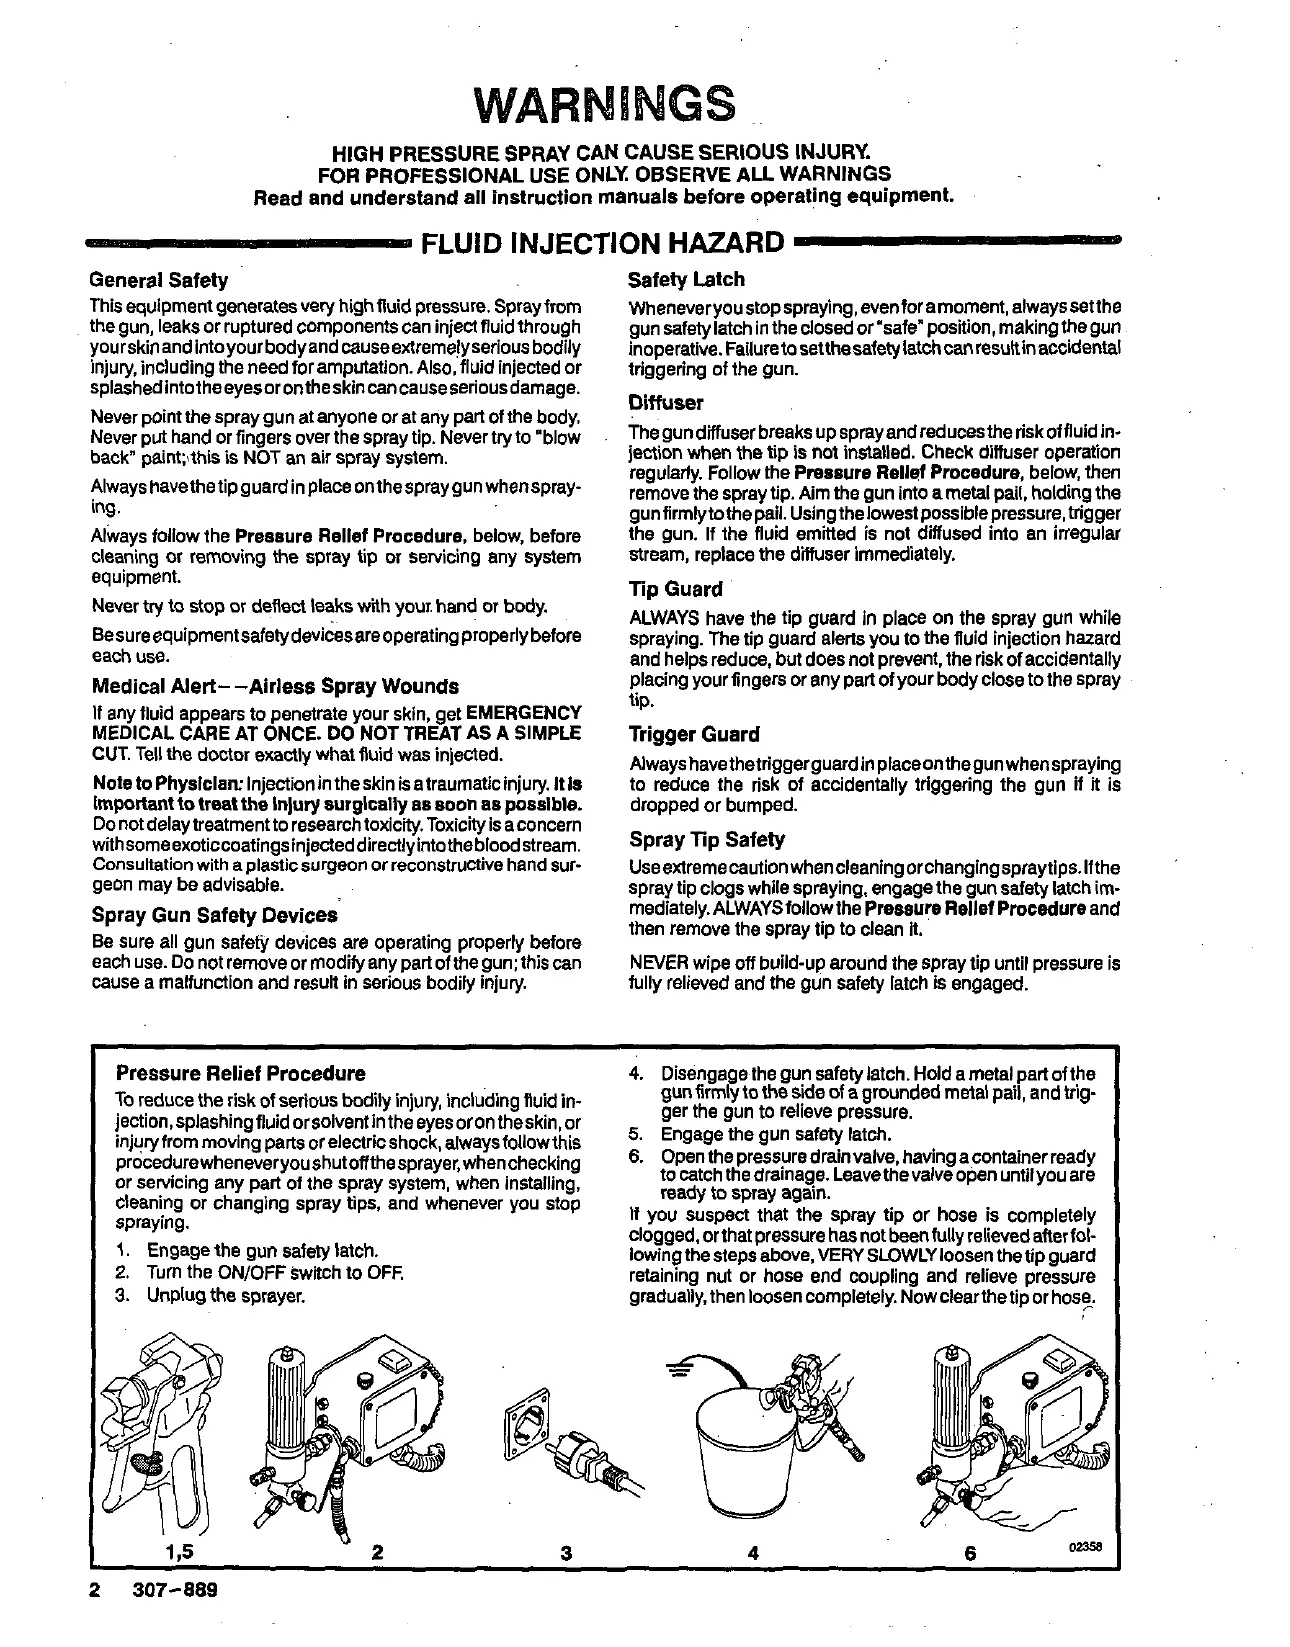
Pressure
Relief
Procedure
To
reduce the risk of serious bodily injury, including
fluid
in-
jection,splashingfluidorsolventintheeyesorontheskin,or
injury from moving parts orelectricshock, alwaysfollowthis
procedurewheneveryoushutoffthesprayer,whenchecking
or servicing any part of the spray system, when installing,
cleaning or changing spray
tips,
and whenever you stop
spraying.
2.
Turn the ON/OFF switch
to OFF.
1.
Engage the gun safety latch.
3.
Unplug the sprayer.
4.
Disengage the gun safely latch. Hold a metal part ofthe
gun
flrmly
to
the
side
of a grounded metal pail, and
trig
ger the gun
to
relieve pressure.
5.
Engage the gun safety latch.
6.
Open the pressuredrainvalve, havingacontainerready
to
catch the drainage. Leavethevalve open until you are
If
you suspect that the spray
tip
or hose is completely
ready to spray again.
clogged,orthatpressurehasnotbeenfullyrelievedafterfol-
lowing the steps above, VERY SLOWLY loosen
the
tip
guard
retaining nut or hose end coupling and relieve pressure
gradually, then loosen completely. Now clearthetip or hose,