Power
Supply
Cord
WARNING
Before doing this procedure, follow the
Pressure
Relief Procedure Warning
on page
2
to reduce
the risk of serious bodily injury, including fluid in-
jection or splashing In the eyes or on the skin, or
injury from moving part.
2
NOTE
Refer to Fig.
11
and
12.
1.
Remove the nut
(337)
from the filter stud
(310).
2.
Remove the three screws
(4)
holding the pressure
control
to
the frame.
3.
Remove the pressure control mounting bracket
(50)
and screws
(51).
4.
Disconnect the power supply cord wires from the
control box terminal strip
(336)
using a screw-
driver.
5.
Install the new power supoly cord
(31 1)
in the re-
verse order of disassembly.
6.
Have
a
licensed electrician install a new plug on
the other end
of
the cord. Be sure
to
follow all
lo-
cal codes regarding the type
of
plug to
use.
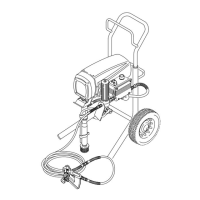
65
Fig.
11
\
31
0
Fig. 12
02362
On/Off
Switch
WARNING
~
'
6.
Reconnect the wires.
Before doing
this
procedure,
follow
the
Pressure
Relief Procedure Warning
on page
2
to reduce
jection or splashing in the eyes or on the skin, or
7.
Reinstall the pressure control cover and screws.
the risk
of
serious bodily injury, including fluid in-
injury
from
moving part.
NOTE
Refer to Fig.
13.
1.
Remove the pressure control cover and screws.
2.
Disconnect the wires from the ON/OFF switch
302
(302).
3.
Pry
off
the retaining clip
(303).
4.
Remove the ON/OFF switch.
5.
Install the new switch
as
shown in Fig.
13. Fig.
13
0"
20
307-889
 Loading...