Do you have a question about the Grizzly T28048 and is the answer not in the manual?
Provides contact details for Grizzly Technical Support and Documentation Manager for assistance.
Explains potential differences between the manual and the machine, advising website checks for updates.
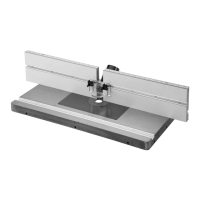
Identifies components of the router table from the front view with labeled letters.
Identifies components of the router table from the rear view with labeled letters.
Details the controls and components of the router table as viewed from the front.
Details the controls and components of the router table as viewed from the rear.
Lists the physical dimensions of the router table, including weight and footprint.
Provides the dimensions and weight of the packaged machine for shipping purposes.
Details the electrical requirements, including connection type, cord length, and switch type.
Lists key operational specifications such as table size, T-slot size, and fence dimensions.
Details the materials used in the construction of the table, fence, guard, T-slot, and stand.
Includes country of origin, warranty period, and assembly time estimates.
Explains the meaning of safety symbols like DANGER, WARNING, CAUTION, and NOTICE used in the manual.
Covers essential safety guidelines like apparel, hearing, tool removal, electrical hazards, and proper operation.
Specific safety advice for router table operations, including avoiding kickback and using guards.
Discusses the need for a suitable power supply circuit and the importance of professional electrical installation.
Specifies the nominal voltage, cycle, phase, and amperage required for the machine's power circuit.
Details the mandatory grounding requirements and proper plug connection for safety and shock prevention.
Explains the function of the ON/OFF paddle switch and the connection of its power cords.
Provides recommendations and requirements for using extension cords with the machine, including gauge and length.
Lists necessary tools and materials not included with the machine for assembly and setup.
Instructions for carefully unpacking the machine, inspecting for damage, and saving packaging materials.
Guide to inventorying shipped items and identifying parts using figures and descriptions.
A visual guide to identify various hardware components for inventory and assembly purposes.
Instructions for removing rust preventative from unpainted surfaces using cleaner/degreaser.
Guidance on workbench load capacity and optimal placement location for the router table.
Step-by-step guide for assembling the router table frame, supports, and connector tubes.
Detailed steps for aligning the mounting plate with the table surface using set screws and a straightedge.
Procedure for securely attaching the router to the universal mounting plate on the table.
Steps for marking and drilling holes on the mounting plate to match the router's base configuration.
Instructions on how to use the adjustable feet to level the router table for stable operation.
Guide for connecting the router power cord to the table's switch and the power supply outlet.
Details on connecting a dust collection system or shop vacuum to the router table's dust ports.
Steps to safely test the assembled router table to ensure all components function correctly.
Provides a step-by-step summary of a typical router table operation process.
Instructions on how to remove the key from the paddle switch to prevent unauthorized operation.
Guidelines for selecting and inspecting wood stock to ensure safe and effective routing operations.
Procedure for ensuring fence boards are parallel to the table T-slot to prevent binding or kickback.
Describes the 3/4" hardened aluminum T-slot for attaching accessories like miter gauges and featherboards.
Details how to move fence boards sideways to adjust the gap between them and the router bit.
Instructions for using spacers to offset the outfeed fence board for edge jointing operations.
Guidance on positioning the clear router bit guard for optimal safety and visibility during operations.
Procedure for installing, locking, and unlocking the table inserts using the provided insert wrench.
Steps for jointing the edge of a board using the router table, including fence setup and bit depth.
Instructions for cutting a profile into a workpiece using the router table, including fence adjustment.
Advice on safely routing small stock, including using a zero-clearance fence for better support.
Guidance on performing free-hand routing, emphasizing safety precautions and the use of starting pins or jigs.
Outlines a daily check schedule for fasteners, switches, and cords to ensure safe operation.
Procedures for vacuuming dust and using compressed air to clean the machine's internal parts.
Lists common electrical and operational symptoms with their possible causes and solutions.
Detailed steps to ensure the mounting plate is perfectly aligned with the table surface to prevent kickback.
Critical safety warnings and guidelines for working with electrical wiring, including shock hazards and modifications.
Provides a key to identify wire colors used in the wiring diagrams for clarity.
Illustrates the electrical connections for the router table's ON/OFF switch and power supply.
A detailed diagram showing the exploded view and numbered parts of the router table.
A comprehensive list of all replacement parts with their corresponding reference numbers and descriptions.
| Brand | Grizzly |
|---|---|
| Model | T28048 |
| Category | Power Tool |
| Language | English |