57
11) If wood with nails is burned, the nails will nd their way through the grates and can be removed with the
ashes. Normal nails should pose no problem. If the nails are “U” shaped, they may loop over the grate and
restrict the auger. Remove these nails from the grate with a magnet.
With proper handling, it is not necessary to let the re go out or the ashes to cool before removing
ashes.
Ash Pan
Principles
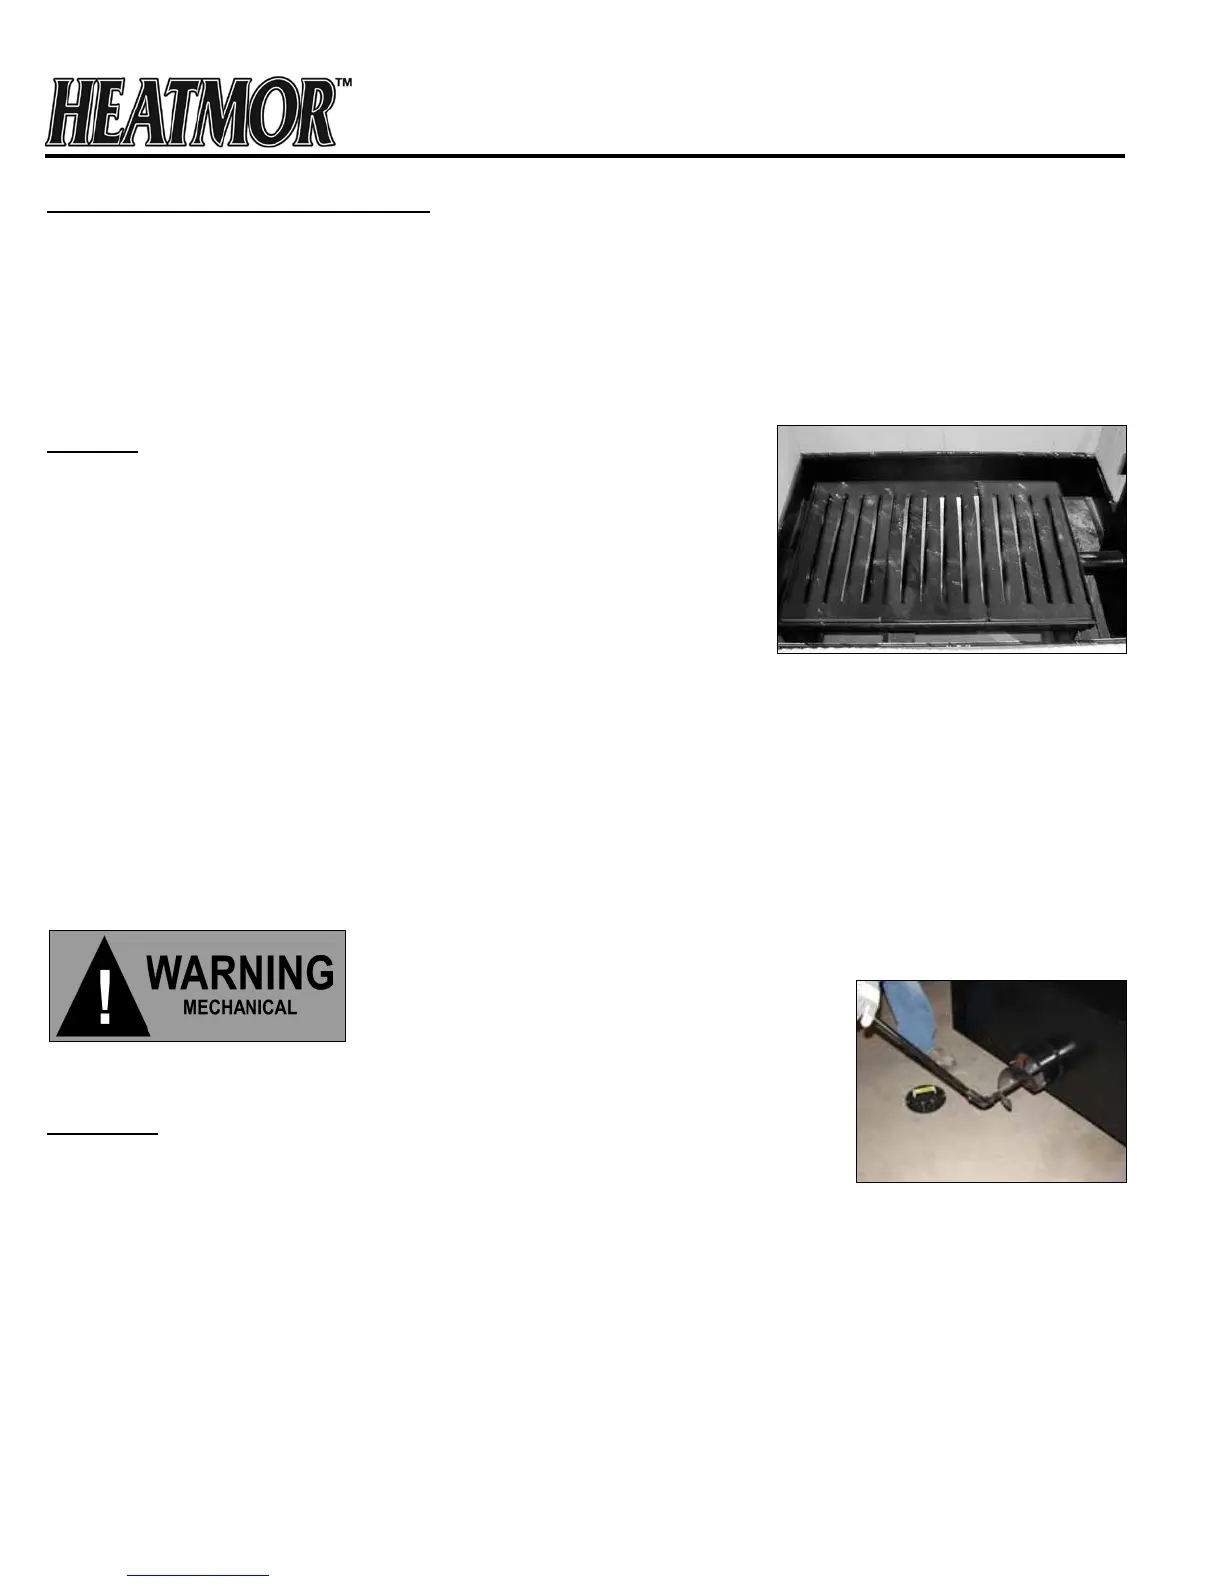
The ash pan is a storage reservoir for completely burned ashes and
provides support for the grates. It is also a distribution area for the
combustion air that ows upwards through the grates. A reasonable
amount of ashes (two to four gallons) should be removed during each
ash removal. The ash pan is replaceable.
Removal and Replacement
1) Remove all sand from base area.
2) Remove small air pipe leading from ash pan to front air box.
3) Slide ash pan approximately three inches towards the front of
the HEATMOR™ base, to free the ash pan from the ash auger
tube at the back of the ash pan.
4) Lift the ash pan straight up and remove through the rebox
door opening.
5) Replace with a new or repaired unit.
6) Replace sand.
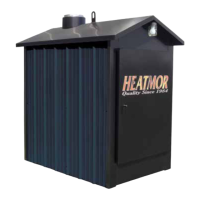
Ash Auger
Principles
The auger provides a convenient and cleaner method of removing ashes from ash pan.
Operation
1) The ash auger should never be left in the ash pan between clean-outs of
ashes. Doing so will interfere with the required
combustion airow beneath the grates, and required combustion
airow up through the grates.
2) Twist the auger into the ashes and either screw or pull the ashes out.
3) A proper method of storing the ash auger is to attach a six inch PVC
pipe, three feet long, to the side of the HEATMOR™. Storing the auger
in the tube will keep it from being frozen into or under snow.
Ash Auger Tube
Principles
The ash auger tube is a six inch diameter tube that extends from the rear of the
ash pan, to approximately four inches past the cladding of the HEATMOR™. This extension allows placing a
container under the tube to catch the ashes. Ash Auger Tube Cover Plate
Principles
The auger tube cover plate is a round plate that is secured onto the end of the ash auger tube, creating an
airtight seal.
Operation
1) When removing ashes, always turn off combustion air blowers.
2) Remove the two thumb nuts.
3) Insert the ash auger and remove the ashes.
4) Replace the ash auger tube cover plate and securely tighten the two thumb nuts.
Ash Pan (below grates)
Ash Auger
Ash Management and Ash Removal (cont.)
11) If wood with nails is burned, the nails will find their way through the grates and can be removed with the
ashes. Normal nails should pose no problem. If the nails are “U” shaped, they may loop over the grate and
restrict the auger. Remove these nails from the grate with a magnet.
With proper handling, it is not necessary to let the fire go out or the ashes to cool before removing
ashes.
Ash Pan
Principles
The ash pan is a storage reservoir for completely burned ashes and
provides support for the grates. It is also a distribution area for the
combustion air that flows upwards through the grates. A reasonable
amount of ashes (two to four gallons) should be removed during each
ash removal. The ash pan is replaceable.
Removal and Replacement
1) Remove all sand from base area.
2) Remove small air pipe leading from ash pan to front air box.
3) Slide ash pan approximately three inches towards the front of
the HEATMOR™ base, to free the ash pan from the ash auger
tube at the back of the ash pan.
4) Lift the ash pan straight up and remove through the firebox
door opening.
5) Replace with a new or repaired unit.
6) Replace sand.
Disconnect power before removing ashes.
Ash Auger
Principles
The auger provides a convenient and cleaner method of removing ashes from
ash pan.
Operation
1) The ash auger should never be left in the ash pan between clean-outs of ashes.
Doing so will interfere with the required combustion airflow beneath the grates, and required
combustion airflow up through the grates.
2) Twist the auger into the ashes and either screw or pull the ashes out.
3) A proper method of storing the ash auger is to attach a six inch PVC
pipe, three feet long, to the side of the HEATMOR™. Storing the auger
in the tube will keep it from being frozen into or under snow.
Ash Pan (below grates)
Ash Auger