or atomizer
Maintenance
lowing procedures.
剧目黯""警句盹掌重哩
Q
宝宝晒
撞
到国画姐随
袭
瓷将
强~
'!i.扁.......如硝烟盹
•
To
prevent problems
which
can be
caused
by
oil
entering the
cylinder
from
the
sump
, keep the outboard
motor
in
the attltude
shown
when
transpo
此
ing
and
storing
It.
If
storing
or
transp
。此
ing
the
outboard
motor
on
its
side
(not
up-
rlght)
,
put
It
on a
cushion
after draining
the
englne
oi
l.
•
00
not
place
the
outboard
motor
on
its
slde before
the
cooling water
has
dralned
from
It
comptetely, otherwlse
water
may
enter the
cylinder
through
the exhaust
port
and cause engine
trou-
ble
.
• Store
the
outboard
motor
in
a
d町,
well
ventilated place,
not
in
direct
sunligh
t.
Procedure
Flushlng
in
a
test
tank
翻
翻
眼镇
建
00
not
run
the
englne
without
supplying
it
wlth
cooling
water. Either the engine
water
pump
will
be damaged
or
the
en-
glne
will
be damaged
from
overheating.
Before
starting the engine,
be
sure
to
supply
water
to
the
cooling
water
passag-
es
.
1. Wash the outboard motor body using
fresh water. For further information, see
page 30.
2. Disconnect the fuel line Irom the motor
or shut off the luel cock,
il
equipped.
3.
Remove the engine top cowling and si-
lencer cover. Remove the propeller
4.
In
stall the outboard motor on the test
tank. Fill the tank with fresh water
10
29
Maintenance
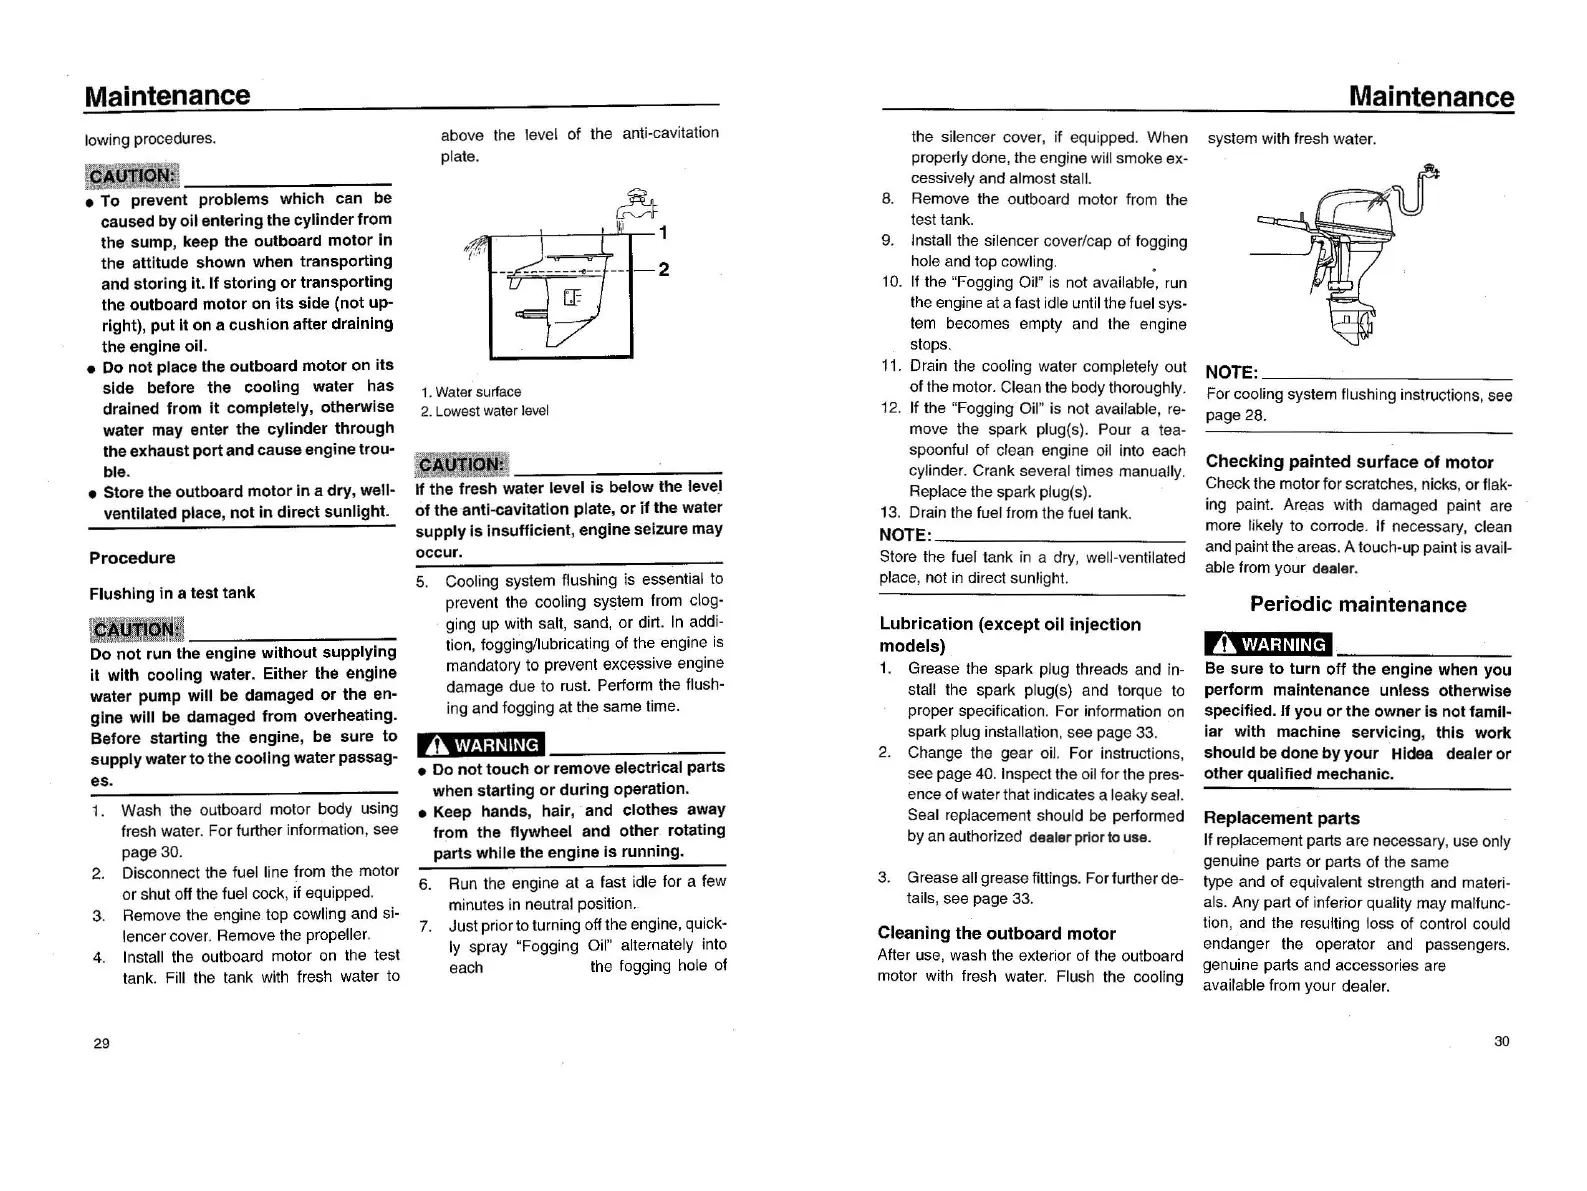
above the level of the anti-cavitation
plate.
system with Iresh water
Ihe silencer cover
,
il
equipped. When
prope
叫y
done, the engine will smoke ex-
cessively and almost stall.
8.
Remove the o
ut
board motor Irom the
aρ
test tank
9.
Install the silencer cover/cap
01
logging
hole and top cow
li
ng.
•
10.
1I
the "Fogging Oil" is not
ava
il
ab
怡,
run
the engine at a fast idle until the fuel sys-
tem
becomes empty and the engine
stops.
11.
Drain the cooling water completely out
of the moto
r.
Clean the body thoroughly
1
2.
1I the "Fogging Oil" is not àvailable,
re
-
move the spark plug(s). Pour a tea-
spoon
fu
l
01
clean eng
in
e
oil
into each
cylinde
r.
Crank seve
ra
l times manually
Replace the spark plug(s).
1
3.
Drain the luel lrom the luel tank
NOTE:
Store the luel tank
in
a dry, well-venlilated
place, not
in
direct sunl
igh
t.
1.
Water
surface
2.
Lowest
wa
t
er
level
翻
翻
翻
意
11
the
Iresh
water
level
is
below
the
level
01
the
anti
心
avitatlon
plate,
or
if
the
water
supply
Is
insufficient
,
engine
seizure may
occur
.
5. Cooling system Ilushing is essential to
prevent the cooling system Irom clog-
ging up with salt
, sand, or dirt.
In
addi-
tion, fogging
/l
ubricating of the engine is
mandalory
10
prevent excesslve englne
damage due 10 rus
t.
Perform the flush-
ing and fogging at the sa
me
time.
Lubrication
(except
oil
injectlon
models)
1.
Grease the spark plug threads and in-
stall the spark plug(s) and torque to
proper specilication. For information
on
spark plug installation, see page 33
2.
Change the gear oi
l.
For instnuctions,
see page 40. Inspect the oil
lo
r the pres-
ence
01
water that indicates a leaky seal.
Seal repiacement should be performed
by an authorized dealer prlor
to
use
.
r
,,
~l
h1
iWI~
[êJ
•
00
not
touch
or
remove electrical
pa
同
S
when
starting
or
during
operation.
• Keep hands
,
hair
, and
clothes
away
from
the
flywheel and
other
. rotating
parts
whlle
the
engine
is
running.
6.
Run
the engine at a last idle
lor
a few
minutes in neutral position.
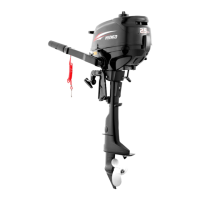
7. Just priorto turning off the engine, quick-
Iy
spray "Fogging Oil"
allern
啤
tely
into
each the logging hole 01
3.
Grease all grease littings. For further de-
lails, see page 33
Cleaning
the
outboard
motor
After use, wash the exterior
01
the outboard
motor with Iresh water. Flu
sh
the cooling
NOTE:
For cooling system flushing instructions, see
page 28.
Checking
painted
surface
of
motor
Check lhe motor for scratches, nicks,
or
flak-
i
ng
pain
t.
Areas with damaged paint are
more li
ke
ly
10
corrode. If necessary, cl
ean
and paint the areas. A touch-up paint is avail-
able from your dealer.
Periodic
maintenance
,帽
Be sure
to
turn
off
the
engine when
you
per
form
maintenance
unless
otherwlse
specified.
If
you
or
the
owner
is
not
famil-
iar
with
machine
servicing
,
this
work
should
be
done
by
your
Hidea dealer
or
other qualified mechanic.
Replacement
parts
If replacement parts
ar
e necessary, use only
genume
pa
川
s
or
parts
01
t
he
same
type and
01
equivalent strength and
mater
卜
als. Any part
01
inferior quality may malfunc-
tion
, and the resulting loss
01
contr
ol
could
endanger
th
e operator and passengers.
genuine parts and accessories are
available fr
om
your dealer.
30