EasyManua.ls Logo

Hitachi DZ-MV730A User Manual

Hitachi DZ-MV730A
190 pages
To Next Page IconTo Next Page
Page #1 background imageLoading...
Page #1 background image
180
English
DZ-GX20A / DZ-MV730A / DZ-MV780A
HITACHI AMERICA, LTD.
HOME ELECTRONICS DIVISION
900 Hitachi Way
Chula Vista, CA 91914-3556
Service Hotline: 1-800-HITACHI
(1-800-448-2244)
HITACHI CANADA LTD.
DIGITAL MEDIA DIVISION
2495 Meadowpine Blvd.
Mississauga, Ontario L5N 6C3
CANADA
Service Direct: 1-800-HITACHI
(1-800-448-2244)
QR35602 ©Hitachi, Ltd. 2005 Printed in Japan OG-H(I)
Instruction Manual
This manual was printed
with soy based ink.
Printed on recycled paper
DVDCAM PC Software Support Center
URL http://dvdcam-pc.support.hitachi.ca/
Thank you for buying a Hitachi product. Please take time to become familiar with the manual and how it
is set up. Keep it handy for future reference.
Be sure to read page 181 before unpacking the provided CD-ROM.
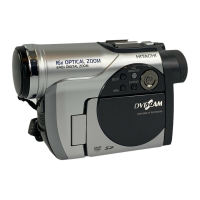
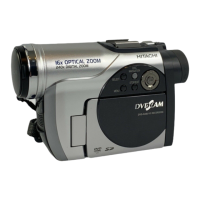
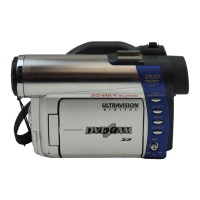
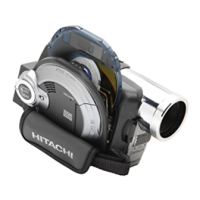
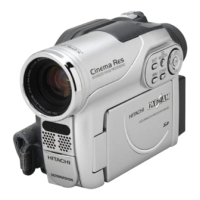
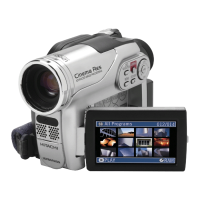
The illustrations of DZ-MV780A and DZ-MV730A are
shown only on the front cover of this instruction manual.
The method for operating the DZ-MV780A and DZ-MV730A
is the same as that for DZ-GX20A.
DZ-GX20A DZ-MV780A
DZ-MV730A
SELECT
STOP/EXIT
DISC
NAVIGATION
MENU
SELECT
STOP/EXIT
DISC
NAVIGATION
MENU
SELECT
STOP/EXIT
DISC
NAVIGATION
MENU

Table of Contents

Questions and Answers:

Hitachi DZ-MV730A Specifications

General IconGeneral
BrandHitachi
ModelDZ-MV730A
CategoryCamcorder
LanguageEnglish

Summary

HITACHI DVDCAM Instruction Manual

Important Information

For Your Safety

Provides essential safety guidelines for operating the device.

Important Safety Instructions

Cautions When Using

Read This First

Checking Provided Accessories

Names of Parts

Try Recording and Playing Back using Disc

Try Recording and Playing Back using Card

Discs and Cards

Setups

Setting Up the DVD Video Camera/Recorder

Physical setup instructions for the camera.

Setting Date and Time

Setting Up the Battery

Charging the Battery

Procedure for charging the device battery using the AC adapter.

Efficient Use of Battery

Using with AC Adapter/Charger

Turning DVD Video Camera/Recorder On and Off

Inserting and Removing Disc

Inserting Disc

Step-by-step guide for inserting a disc into the device.

Removing Disc

Inserting and Removing Card

Basic Techniques

Recording Movie

Detailed instructions on how to record video footage.

Recording Stills

On-Screen Information

Information Display During Recording

Explanation of data shown on screen during recording.

Zooming Operations

Playing Back Content

Basic Playback Operation

How to start, stop, and navigate playback.

Checking Flow of Quick Menu

Disc Navigation Functions

Manually Focusing Subject

Adjusting Image Brightness (Exposure)

Connecting to TV

Viewing on TV Screen

Recording (Dubbing) Images

Advanced Techniques

Camera Functions Setup

Record Functions Setup

Setting Up Camera Functions

Selecting Shooting Mode (Program AE)

Choosing the optimal shooting mode based on the subject.

Adjusting Color (White Balance)

Setting Movie Quality (Video Mode)

Initial Settings Menu

Resetting Menu Settings to Defaults

Disc Navigation

Starting and Terminating Disc Navigation

How to access and exit the Disc Navigation feature.

Disc Navigation Screen Overview

Playing Back from Disc Navigation Screen

Selecting Scenes in Disc Navigation

Functions Available with Disc Navigation

Understanding Disc Navigation Menu Flow

Deleting Scenes (Edit – Delete)

Dividing Movies (Edit – Divide)

Combining Multiple Scenes (Edit – Combine)

Arranging Order of Scenes (Edit – Move)

Directing Scenes Effectively (Effect – Fade)

Playing Back by Skipping Scenes (Effect – Skip)

Copying Stills to Card (Copy)

Locking Scenes on Card (Lock)

Selecting Scenes Using Menu Screen (Select)

Program Management

Play List Creation

Creating New Play List

Step-by-step guide to creating a new play list.

Adding Scenes to Play List

Deleting Scenes from Play List

Arranging Order of Scenes (Move)

Disc or Card Management

Initializing Disc or Card (Format)

Procedure to format discs or cards for use.

Protecting Disc from Writing (Protect Disc)

Verifying Remaining Free Space (Capacity)

Finalizing DVD-R Disc

Connecting to PC

Contents on Provided CD-ROM

Requirements of Available PC

Installing Software

Installing Software Applications

Creating DVD Video from DVD-RAM Disc

Using DVDfunSTUDIO to Create DVD Video

Cautions When Connecting to PC

Cleaning Procedures

Troubleshooting: No DVD Video Camera/Recorder Operation

Check 1: No Movie Recording

Troubleshooting steps for when movie recording fails.

Check 2: No Still Recording

Troubleshooting steps for when still photo recording fails.

Check 4: ACCESS/PC or CARD ACCESS Indicator Issues

Diagnosing issues related to disc/card access indicators.

Check 5: No Camera/Recorder Operation

Check 6: No Image in Viewfinder

Check 7: No Image on LCD Screen

Trouble Messages

Troubleshooting: Power Supplies

Battery Cannot Be Charged

Troubleshooting steps for when the battery is not charging.

Battery Weakens Fast

Addressing rapid battery discharge, possibly due to temperature.

CHARGE Indicator Blinking

Troubleshooting when the battery charging indicator blinks.

Power Turns Off Immediately

Resolving issues where the device powers off immediately.

Power Goes Off Unexpectedly

Troubleshooting sudden power loss.

Power Cannot Be Turned Off

Resolving problems with powering down the device.

Troubleshooting: During Recording

REC/PHOTO Button Not Starting Recording

Resolving issues where recording buttons do not initiate recording.

Recording Starts but Stops Immediately

Troubleshooting recording interruptions.

LCD Screen Hard to See

Adjusting LCD screen visibility for optimal viewing.

Focus Not Correct

Resolving focus issues during recording.

Troubleshooting: During Playback

Disc Recognition Issues

Troubleshooting problems with the device recognizing inserted discs.

Playback Button Issues

Resolving issues with playback control buttons.

No Playback Picture on TV

Troubleshooting steps for lack of video output to TV.

Troubleshooting: PC Connection Issues

No Drive Icon on PC

Resolving PC connection issues where the device is not recognized.

Miscellaneous Troubleshooting

Power Does Not Come On

Troubleshooting steps for when the device fails to power on.

System Reset Procedure

Contact Information for Service and Support

Warranty Limitations

Conditions of Hitachi Limited Warranty

Hitachi Canada Ltd. Warranty Policy

Related product manuals