F. Output Filter Circuitry
The DC output voltage is smoothed
(filtered)
by an L-C filter made up of L1 iron core reactor
(7, Fig.
3)
carrying the output current to the load and the ripple current to the C15, C16, C17 ripple bypass ca-
pacitors
(4, Fig. 3)
in parallel with the load terminals. The R2, R3, R4 bypass resistors
(6, Fig. 3)
pro-
vide both a preload to the SCR devices
(2, Fig. 5)
and a safety discharge circuit for quickly
discharging the filter capacitors whenever the power supply is turned off.
CAUTION: CAPACITOR CHARGE CAN INJURE. BE SURE CAPACITORS ARE DISCHARGED
BEFORE TOUCHING.
The CR7 flyback diode
(6, Fig. 5)
acts to facilitate discharge of the output filter circuitry as well as to
protect the main SCR rectifier assembly from damaging reverse voltage spikes.
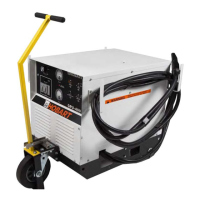
G. Front Panel Control Components (See Fig. 4)
(1) Output Meter
The power supply is typically supplied with a 0 to 2000 Amp scale DC ammeter M1
(21, Fig. 4)
which measures the millivolt drop across the R11 meter shunt
(20, Fig. 3)
that corresponds to the
scale calibration. The scale range is so much more than the rated output because the R13 start-
ing current potentiometer
(8, Fig. 4)
can select any initial or starting current from 250 amperes to
a maximum of 2000 amperes. The M2 output voltmeter
(16, Fig. 4)
measures the DC output volt-
age across the main filter capacitors.
The scale typically has a 50 V DC maximum reading. It should be emphasized that the R12 con-
trol feedback shunt
(21, Fig. 3)
is not to be used for the meter shunt. This separation provides bet-
ter control integrity.
(2) Input Contactor Switch with Light
The S1 input contactor switch
(10, Fig. 4)
controls the 115 V AC contactor pickup voltage sup-
plied by the control transformer via the F8 fuse. The amber input contactor light
(12, Fig. 4)
glows
whenever voltage is applied to the input contactor coil. The input contactor applies the rated input
voltage to main changeover board
(16, Fig. 3).
WARNING: ELECTRIC SHOCK CAN KILL! DISCONNECT THE INPUT POWER
FROM THE POWER SUPPLY BEFORE TOUCHING INTERNAL PARTS. THE IN-
PUT CONTACTOR DOES NOT REMOVE ALL INPUT POWER FROM THE
UNIT. BE SURE ALL CAPACITORS HAVE DISCHARGED BEFORE TOUCHING
THE COMPONENTS.
(3) Output Contactor Switch and Light
The S2 output contactor close on-off switch
(11, Fig. 4)
has a spring loaded up position for the
close mode, a middle position for “on” mode, and a bottom position for the “off” mode. The green
output contactor “on” light
(13, Fig. 4)
glows for all the positions except “off”.
OM-2010
April 10/89 Revised 2-1
Page 9