23
Start-up
Wired devices within your system.
For further information, please
refer to the operating manual of
the Wired Access Point.
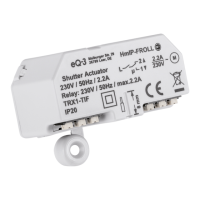
To integrate the blind actuator into your
system and enable it to communicate
with other HomematicIP Wired devices,
you must pair it first.
You can connect the blind actuator to
the Central Control Unit CCU3 for local
configuration via PC.
As an alternative, connect the device to
the HomematicIP cloud for flexible con-
trol via smartphone app.
You can
• control the wired system via smart-
phone app using the HomematicIP
Wired Access Point (HmIPW-DRAP)
or
• combine wired devices with wirel-
ess HomematicIP devices via the
HomematicIP Access Point (HmIP-
HAP).
6.4.1 Connecting to the
HomematicIP Central Control
Unit CCU3
After connecting the HomematicIP
Wired device to the WebUI, it can be
conveniently controlled, configured
and be used in central control unit
programs via the software interface.
To connect the blind actuator to the
Central Control Unit CCU3, proceed as
follows:
• Set up your Central Control Unit
CCU3 as described in the ope-
rating manual and connect the
HomematicIP Wired Access Point.
• Start the user interface “Homema-
tic WebUI” on your computer.
• Click the “Pairing devices” but-
ton on the right-hand side of the
screen.
Figure 7
• To activate pairing mode, click “Pair
HmIP device” in the next window.
The pairing mode of the Central
Control Unit will be activated for
60 seconds. An information box
shows how much pairing time re-
mains.
Figure 8
• After connecting to the bus line,
the pairing mode of the blind ac-
tuator remains activated for 3 mi-
nutes. If the 3 minutes have not yet
expired, the device will be connec-
ted automatically.
You can manually start the pairing
mode for another 3 minutes by
pressing the system button (A)
briefly:
 Loading...