LCD-SLP Product Installation Document — P/N LS10045-000GF-E:E 12/16/2019 5
2.7 LCD-SLP Installed in an E3 Series, Cabinet Configuration
The LCD-SLP touchscreen can be installed in the several E3 Cabinets. To install the LCD-SLP touchscreen to the window space on
the inner door, refer to the following instructions.
2.7.1 LCD-SLP Installed in E3 Series Cabinet A2 and AA
2.7.1.1 LCD-SLP Installed to the CAB A2 Inner Door
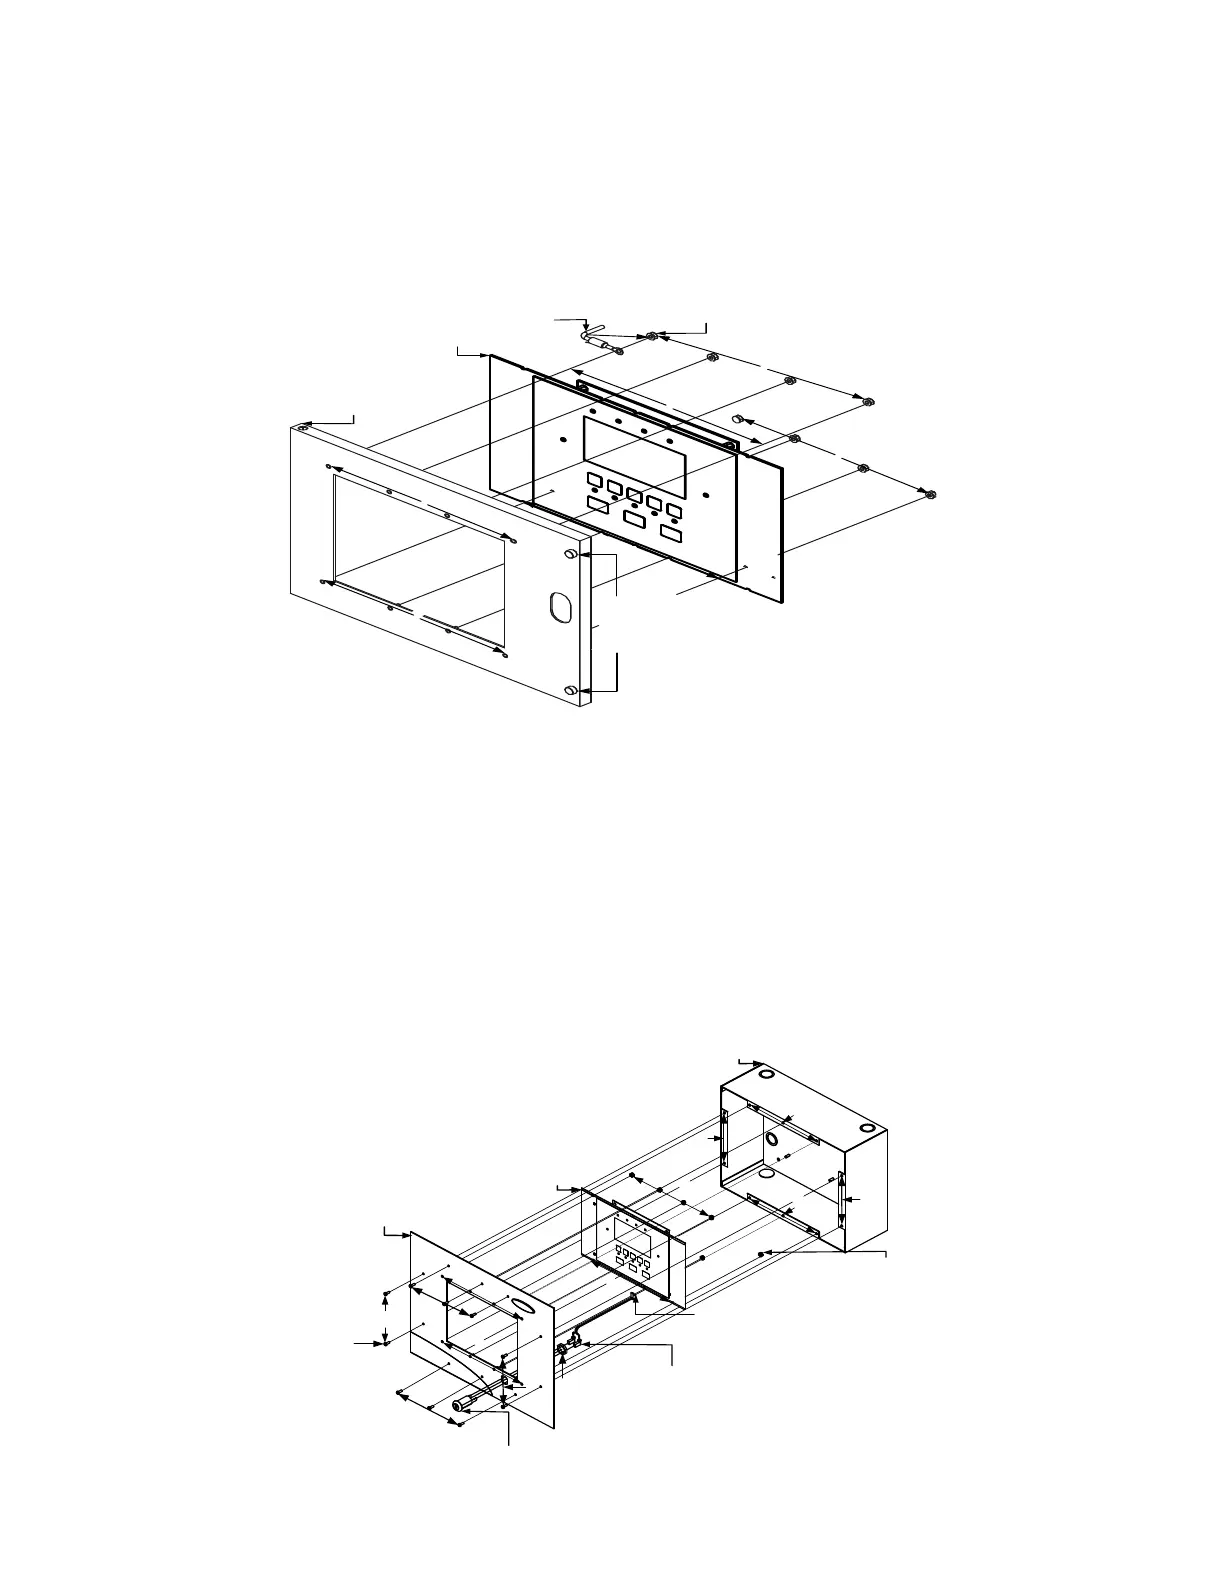
1. Mount the LCD-SLP keypad to the inner door and secure with four, #6-32 nuts in the four-hole mounting pattern as shown in
Location 1 of the figure below.
Figure 2.7.1.1.1 LCD-SLP Installed in an E3 Series Cabinet A2 and AA
2.7.1.2 LCD-SLP Installed to the E3BB-FLUSH-LCD Front Cover
1. Insert the keyswitch to the E3BB-FLUSH-LCD Flush Mount Front Cover. Insert and secure one nut (3/4-24 THD Hex) as
shown in Location 1 of the figure below.
2. Attach the keyswitch cable to the key as shown in Location 2 of the figure below.
3. Mount the LCD-SLP keypad to the E3BB-FLUSH-LCD Flush Mount Front Cover. Insert and secure eight nuts (#6-32, Hex
Kep) into the eight-hole mounting pattern as shown in Location 3 of the figure below.
4. Plug-in the keyswitch cable to the J6 jumper on the LCD-SLP touchscreen as shown in Location 4 of the figure below.
(For information on the location of the J6 jumper on the LCD-SLP touchscreen, refer to Note 1 on the LCD-SLP Wiring
Diagram in Section 3.1).
5. Attach the E3BB-FLUSH-LCD Flush Mount Front Cover to the Backbox. Insert and secure eight screws (#6-32 x 3/8”
PHBHD, BLK) into the eight-hole mounting pattern as shown in Location 5 of the figure below.
Figure 2.7.1.2.1 LCD-SLP Installed in an E3BB-FLUSH-LCD
NUT, HEX
(#6-32)
8 PLACES
1
1
1
1
2
1
1
3
3
C A B IN E T A 2 ,
INNER DOOR
LCD-SLP
KEYPAD
THUMBSCREWS
TO SECURE THE
INNER DOOR TO
THE BACKBOX
BONDING
WIRE
2
LCD-SLP
1
2
4
1
P2, KEYSWITCH
CABLE (2 IN RT.
ANGLE HEADER)
NUT, (#6-32) HEX
KEPS (8 PLACES)
KEYSWITCH
CABLE
BACKBOX
E3BB-FLUSH-LCD
FLUSH MOUNT
FRONT COVER
KEYSWITCH
NUT,
¾”-24
THD HEX
SCREW,
(#6-32 x 3/8")
BHBHD, BLK
(8 PLACES)
5
5
5
5 3
3
3
3
5
5
5
5
 Loading...