4 LCD-SLP Product Installation Document — P/N LS10045-000GF-E:E 12/16/2019
2.6 LCD-SLP Installed in an S3 Series, Cabinet Configuration
The SLP- BB cabinet is shipped with the LCD-SLP touchscreen pre-assembled to the inner door. To install the LCD-SLP
touchscreen to the window space on the outer door or the inner door, refer to the following instructions.
2.6.1 LCD-SLP Installed to the
SLP-BB Cabinet Outer Door
2.6.2 LCD-SLP Installed to the
S3 Series, Cabinet B Inner Door
1. Insert the keyswitch to the outer door and secure with one
nut (3/4” x 24 THD HEX) as shown in Location 1 of the
figure below.
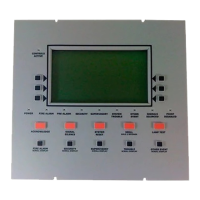
1. Mount the LCD-SLP keypad to the inner door and secure
with eight nuts (#6-32) into the eight-hole mounting pattern
as shown in Location 1 of the figure below.
2. Mount the LCD-SLP to the inside window of the outer door.
Insert and secure four nuts (#6-32 HEX KEPS) into the four-
hole mounting pattern of the window as shown in Location 2
of the figure below.
3. Plug-in the keyswitch cable to the J6 jumper on the LCD-
SLP as shown in Location 3 of the figure below. Refer to
Note 1 on the LCD-SLP Wiring Diagram in Figure 3.2.1.
Figure 2.6.1.1 illustrates the LCD-SLP touchscreen installed to
the outer door.
Figure 2.6.2.1 illustrates the LCD-SLP touchscreen installed to
the inner door.
Figure 2.6.1.1 LCD-SLP to S3 Outer Door Installation Figure 2.6.2.1 LCS-SLP to the Cabinet B Inner Door
Installation
LSD-SLP
O
U
T
E
R
D
O
O
R
NUT, #6-32
HEX KEPS
8 PLACES
NUT,
(¾” x 24 THD HEX)
1 PLACE
KEYSWITCH,
PK625
2
2
2
2
1
3
(KEYLOCK)
CABLE
LCD-SLP
KEYPAD
ASM-16
CABINET B,
INNER DOOR
2
2
2
1
2
NUT, HEX
(#6-32)
12 PLACES
1
1
1
2
BONDING
WIRE
3
3
THUMBSCREWS
TO SECURE THE
INNER DOOR TO
THE BACKBOX
4
4
1
1
 Loading...