34 www.tanksystem.com
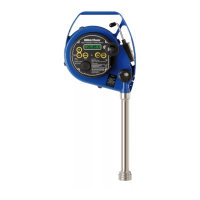
9.9 Installation of the instrument
• This HERMetic equipment must be coupled to a certied
HERMetic valve.
• Before starting please read carefully the chapter
“Recommendation for safe use” and follow your company’s
safety instructions.
• Check that the HERMetic valve is closed.
• Remove the end cap (weather cap / blind cover / security
cover) of the HERMetic valve.
• Clean the seal surfaces of the nipple of the valve and of the
coupler of the instrument from dust or grease.
Note:
Cleaning of the mating surfaces is very important for
earth grounding purpose and for good accuracy on
zero reference level.
• Check whether the tape protection tube is moving freely.
• Install the HERMetic instrument on top of the valve by means
of the quick coupler. Ensure that the equipment is properly
earthed. If not, ground it with the (optional) grounding cable
before operating.
9.10 Purging the equipment
This HERMetic equipment can be tted with a plug to purge it.
This is an option, please contact Tanksystem.
9.11 Ullage / interface measurement
• Install the HERMetic equipment as per 9.9 “Installation of
the instrument”.
• Open the valve by turning the handle.
• Switch on the equipment: a control beep is audible every 2
seconds.
• Put the tape cleaner on the “DOWN” position. Disengage the
knob of the crank handle and lower the sensing probe into
the tank by turning the reel. Make sure that the tape does
not rub on any sharp edge when lowering as its insulation
could be damaged.
• As soon as the sensor comes in contact with the
petroleum product the control beep will change for a
continuous beep. Raise the sensing probe again until the
continuous beep stops and lower the sensing probe again
slowly until the continuous beep is heard again. Now the
ullage level can be read against the ullage reference. If the
zero-ullage reference does not correspond to the reading
index of the instrument, a correction has to be made
accordingly.
• Lower the sensing probe further until the sensor touches
the oil-water interface. As soon as the sensor comes in
contact with water the continuous beep will change for an
intermittent beep. The difference between the ullage reading
and the interface reading represents the thickness of the
product layer.
• When the measurements are completed, switch off the
unit, turn the tape cleaner on “UP” position and wind up
the tape until the sensing probe is in the storage tube.
The reading on the tape shall be less than 420 mm or
1 ft 5 inch.
• Close the valve and disconnect the instrument from the
nipple.
• Put the end cap back on the valve.

 Loading...