– 51 –
USER FUNCTIONS
USER FUNCTIONSUSER FUNCTIONS
USER FUNCTIONS
Scheduling User Interface
✡ ☛ ☞ ✌ ✍ ✎ ✏ ✑ ✒ ✓
❍ ■❏
❑ ▲
▼
◆
❖ P
◗
❘ ❙ ❚ ❯ ❱
✔ ✕ ✕ ✕ ✖ ✗ ✕ ✕ ✖ ✗ ✚ ✘ ✖ ✙ ✕
❲ ❳ ❨ ❩ ❳
❬ ❭ ❪ ❫ ❴ ❵ ❛ ❜ ❫
❝ ❞ ❡ ❢ ❝ ❣ ❤
✐ ❥ ❦
❚
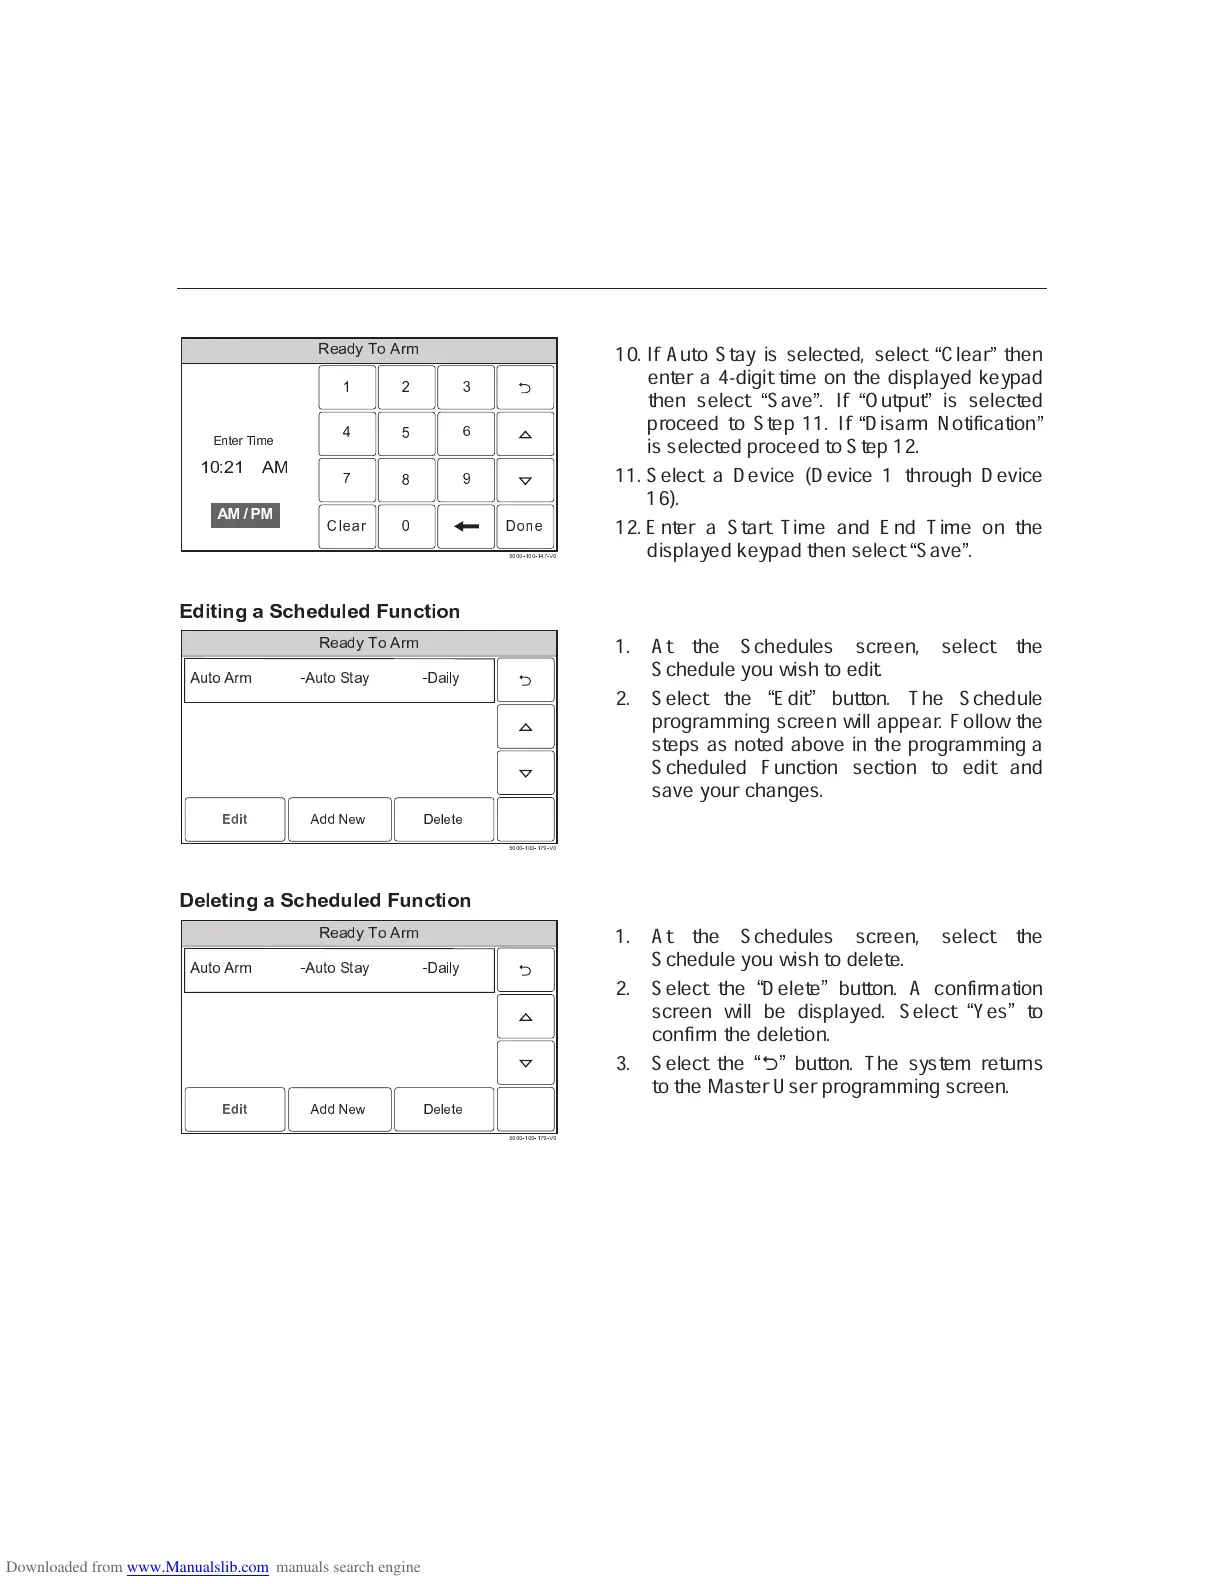
10. If Auto Stay is selected, select
✹
Clear
✺
then
enter a 4-digit time on the displayed keypad
then select
✹
Save
✺
. If
✹
Output
✺
is selected
proceed to Step 11. If
✹
Disarm Notification
✺
is selected proceed to Step 12.
11. Select a Device (Device 1 through Device
16).
12. Enter a Start Time and End Time on the
displayed keypad then select
✹
Save
✺
.
❧
❆ ❁ ❉ ❁ ❂ ✾ ✿
✝
❈
✞
❄ ❆
✟
❅ ❄ ❆ ❃
✟
❂ ❈ ❉ ❁ ✽ ❂
♠ ♥ ♦ ♣ q r s t ✉ ✈
✇ ① ① ① ② ③ ① ① ② ③ ④ ⑤ ② ⑥ ①
✲ ✩ ✸
⑦
✲ ✪
⑧ ⑨
✲ ✩ ✸
⑦ ⑩
✸ ✧ ✫
⑨ ❶
✧ ✴ ✵ ✫
❷ ❸ ❹ ❺ ❻ ❼ ❽ ❼ ❾ ❼❿ ➀ ➀ ➁
❼ ➂
1. At the Schedules screen, select the
Schedule you wish to edit.
2. Select the
✹
Edit
✺
button. The Schedule
programming screen will appear. Follow the
steps as noted above in the programming a
Scheduled Function section to edit and
save your changes.
➃
❄ ❅ ❄ ❉ ❁ ❂ ✾ ✿
✝
❈
✞
❄ ❆
✟
❅ ❄ ❆ ❃
✟
❂ ❈ ❉ ❁ ✽ ❂
♠ ♥ ♦ ♣ q r s t ✉ ✈
✇ ① ① ① ② ③ ① ① ② ③ ④ ⑤ ② ⑥ ①
✲ ✩ ✸
⑦
✲ ✪
⑧ ⑨
✲ ✩ ✸
⑦ ⑩
✸ ✧ ✫
⑨ ❶
✧ ✴ ✵ ✫
❷ ❸ ❹ ❺ ❻ ❼ ❽ ❼ ❾ ❼❿ ➀ ➀ ➁
❼ ➂
1. At the Schedules screen, select the
Schedule you wish to delete.
2. Select the
✹
Delete
✺
button. A confirmation
screen will be displayed. Select
✹
Yes
✺
to
confirm the deletion.
3. Select the
✹
2
✺
button. The system returns
to the Master User programming screen.

 Loading...