33-00133ES—01 8
Installing your thermostat
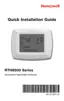
Alternate wiring (heat pump system only)
Use this if your wire labels don’t match the terminal labels.
Note: You must have
a C wire or equivalent.
See page 6.
RC
R
O/B
Y
G
C
L
E/AUX
K
Y2
RC
R
O
Y
G
C
1
2
3
3
47
6
5
Metal Jumper
AUX
Alternate wiring key (heat pump system only)
Leave metal jumper between R and RC terminals in place.
If your old thermostat had both V and VR wires, check wifithermostat.com for help.
If your old thermostat had separate O and B wires, attach the B wire to the C terminal. If
another wire is attached to the C terminal, check wifithermostat.com for help. Attach the O wire
to the O/B terminal. Set System Function 0190 to 0 (see page 22).
If your old thermostat had an O wire and not a B wire, attach the O wire to the O/B terminal.
If your old thermostat had separate Y1, W1 and W2 wires, check wifithermostat.com for help.
This is the system monitor. If the monitor finds a problem, you will see a red light in the upper
right corner of the thermostat (shines through the cover).
If old thermostat has separate wires on AUX and E, place both wires into the E/AUX terminal. If
old thermostat has wire on AUX with a jumper to E, place wire on E/AUX terminal. No jumper is
required.
Do not use K terminal. For future use.
2
3
1
4
5
6
7

 Loading...