oven Door
The
~)ven
door is
rcnlovi~ble,
bu[
it is
he:tvy.
YOLI
m;iy
need
help removing
and
rcplilcing
the
door.
Do not
lift
[hc
oven
door
by
the
htindlc.
This
can
cause
the
I
“
(r]
,
~
LISS
to
break or
dalnagc
t[)
the
door.”
To
remove the
door,
open it
E
‘w
,/
\\
~
9“
:1
few
inches to
the
spe~i:il
K/””
stop position”
that
wi
II hold
the
door
open,
Grtisp
fir-rely
on
c:lch
side
and
lift
the
door
str:light
up
ilnd
off the hinges,
NOTE:
Be
careful not to
pl:lce
h;lnds
between the
hinge
tlnd
the
oven
door
fl-~me
:ls
the hinge
~[)u]d
sn:lp
back
and
pinch finger-s,
To
replace the door,
m:ikc
sure
tht:
hinges
arc
in the
special
stop
position.
Position
the slots in the bottom
of
the
door
squ~u-ely
over”
the hinges. Then lower the
door”
slowly
iuld
evenly over both hinges
at
the same
time.
If
hinges
sntip
btick
:lgainst
the oven
frame,
pull
thcm
b;lck
out.
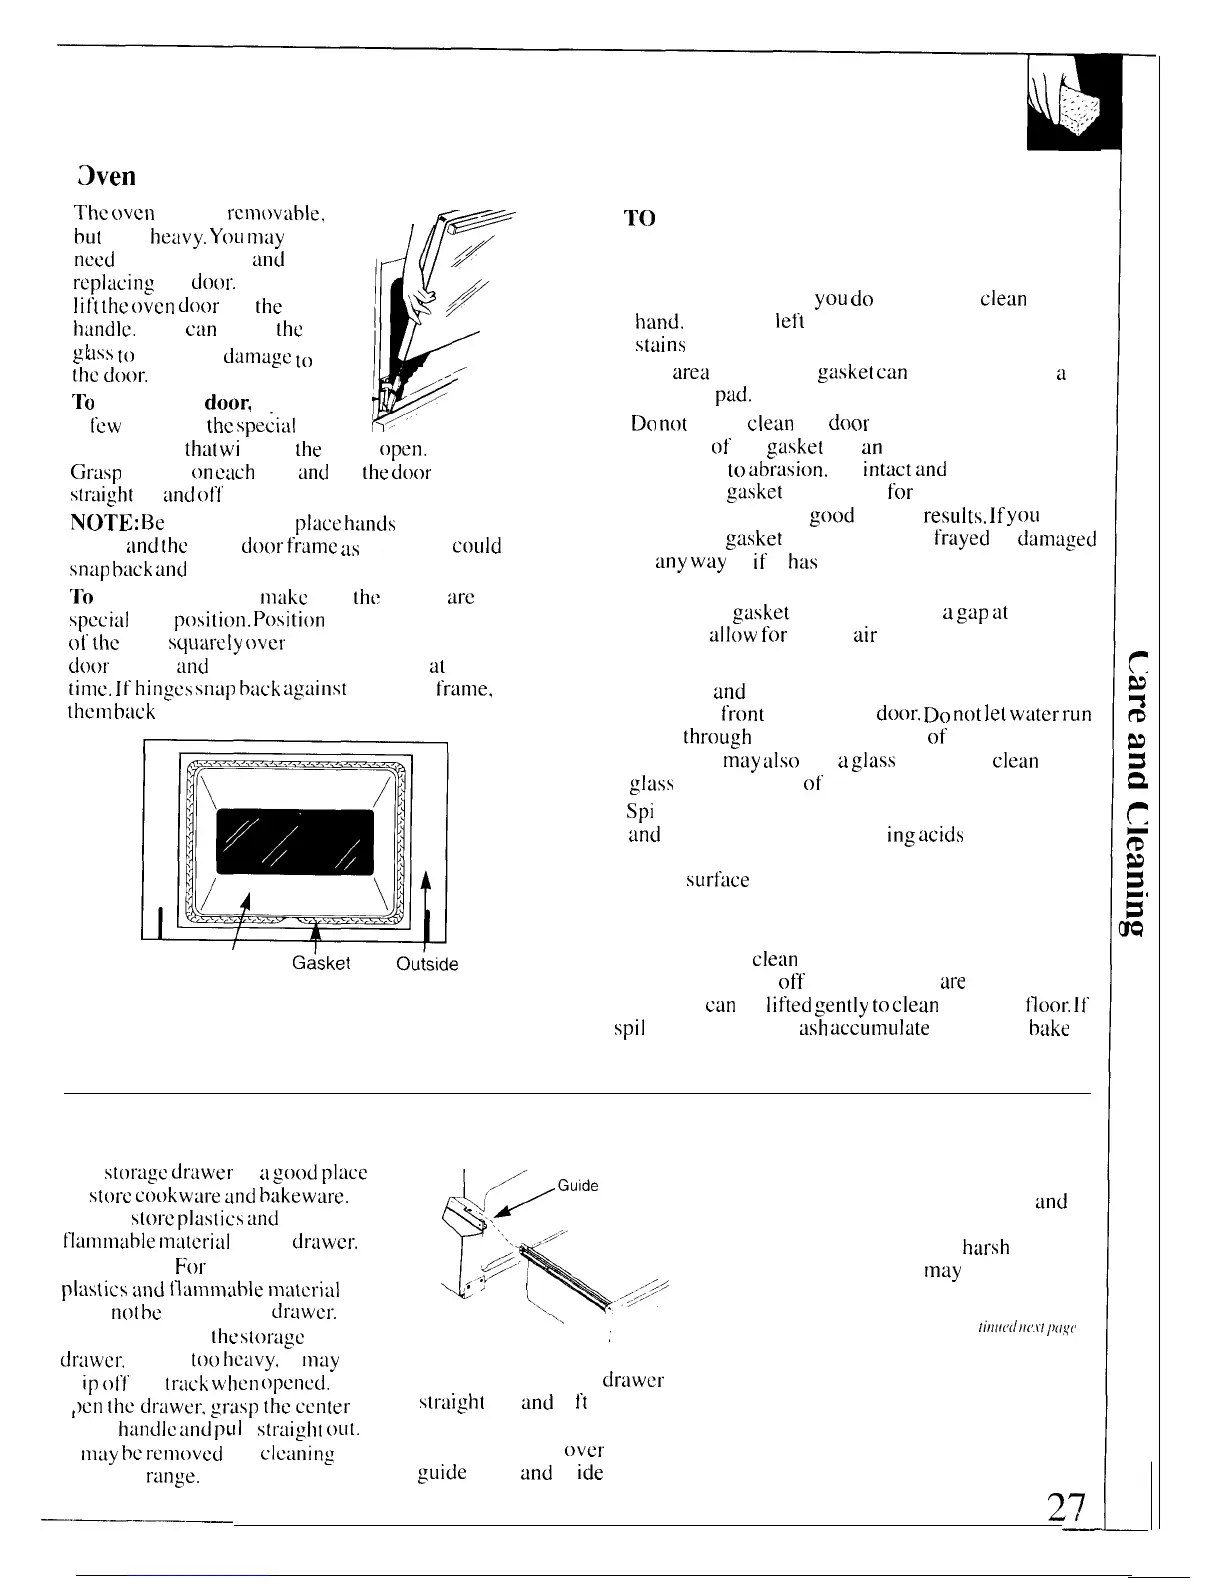
Inside /
G~sket
Ou~side
Gasket’
Gasket
TO
CLEAN THE DOOR:
Inside of the door:
● Because the area inside the gasket is cleaned during
the self clean cycle,
you
do
not need to
clean
this by
hand.
Any soap
left
on the liner causes additional
sttiins
when the oven is heated.
● The
area
outside the
gasket
can
be cleaned with
~
scouring
pad.
●
Do
n(}t
rub or clean the door gasket—the fiberglass
material of the
gasket
has
an
extremely low
resistance
to
tibrasion.
An
intact
and
well-fitting
oven door
g~sket
is essential
for
energy-efficient
oven operation and
good
baking
resutts.
If
yoLI
notice the
gasket
becoming worn,
frayed
or
damoged
in
any
way
or
if
it
has
become displaced on the door,
you should have it replaced,
NOTE: The
gasket
is designed with
a
gtip
at
the
bottom to
allow
for
proper
air
circulation,
Outside of the door:
● Use soap
and
water to thoroughly clean the top,
sides and
front
Of the oven
door.”
Do
not
jet
w:lter
run
down
throu&h
openings in the top of the door. Rinse
well. You
may
iilso
use
a
glass
cleaner to
clean
the
glass
on the outside
of
the door.
●
Spi
I I age of marinades, fruit juices, tomato sauces
and
basting materials contain
ing
acids
may cause
discoloration and should be wiped up immediately.
When
surf~lce
is cool. clean and rinse.
● Do not use oven cleaners, cleansing powders or
harsh abrasives on the outside of the door.
NOTE: Do
not
clean
the bake unit or the broil unit.
Any soil will burn
off when the units
ore
heated. The
bake unit
can
be
lifted
gently
to
clean
the oven
iloor.
If
spil
lover, residue, or
ilsh
ticcumulate
around the
b:lke
unit, gently wipe around the unit with warm water.
Removable Storage Drawer
The
stor~lgc
driiwer
is
a
good
place
to
store
cookw:u-e
:Ind
bakeware.
Do not
stor-c
pltlstics
~lnd
flanlnl~lble
nl~lteri:ll
in the
dr:lwcr.
CAUTION:
For
your safety,
pl:]stics
and
llanlrn~lble
nl~itcri:d
?
To clean both the inside and
\(’>Guide
‘top
the outside: Wipe with soap
tind
,.
‘.
water. Rinse well. Do not use
.,/””’”
,<,;$
~
\,
must
no[
be
kept in this
cir:lwcr.
\
cleaning powders or
harsh
(
abrasives which
may
scratch
,,,;+
..<2,5,,
the surface.
‘\.
“~/””’
\.
Do not over-toad the
s[or~igc
‘\
y
’
~
(( ’()/1
/;/1//<,(/
//(,.\(
/)[l,q(,
)
driiwer-.
If it is
too
hc:lvy.
it
may
‘
ip
off the
tr~ick
when
opened.
To
To remove: Pull
the
dr~lwcr
str:light
out
and
Ii
ft
over the
,)cn
[he
dr-~lwer-.
gr-:isp
the
center
of the
h:tndlc
~u]d
pul
I
str:light
ou[.
guide stops.
It
rn:ly
be
removed
for
clciuling
To replace:
Lift over the
under the
range.
guide
stops
and
s]
ide
the drawer
into place.
27
—.—————
——