180°
4+4=8
4x
8x
EN
JA
ID
ZHCN
ZHTW
KO
Make sure you have used 4 screws ineachleg.
各脚部の固定には、それぞれ必ず4 本のネジを使用し
てくだ さい 。
确保每个支柱都使用了 4 枚螺钉。
請確定每隻腳架上都有 4 顆螺絲。
각 다리마다 나사를 4 개씩 사용합니다.
Pastikan Anda telah menggunakan 4 sekrup pada setiap
kaki.
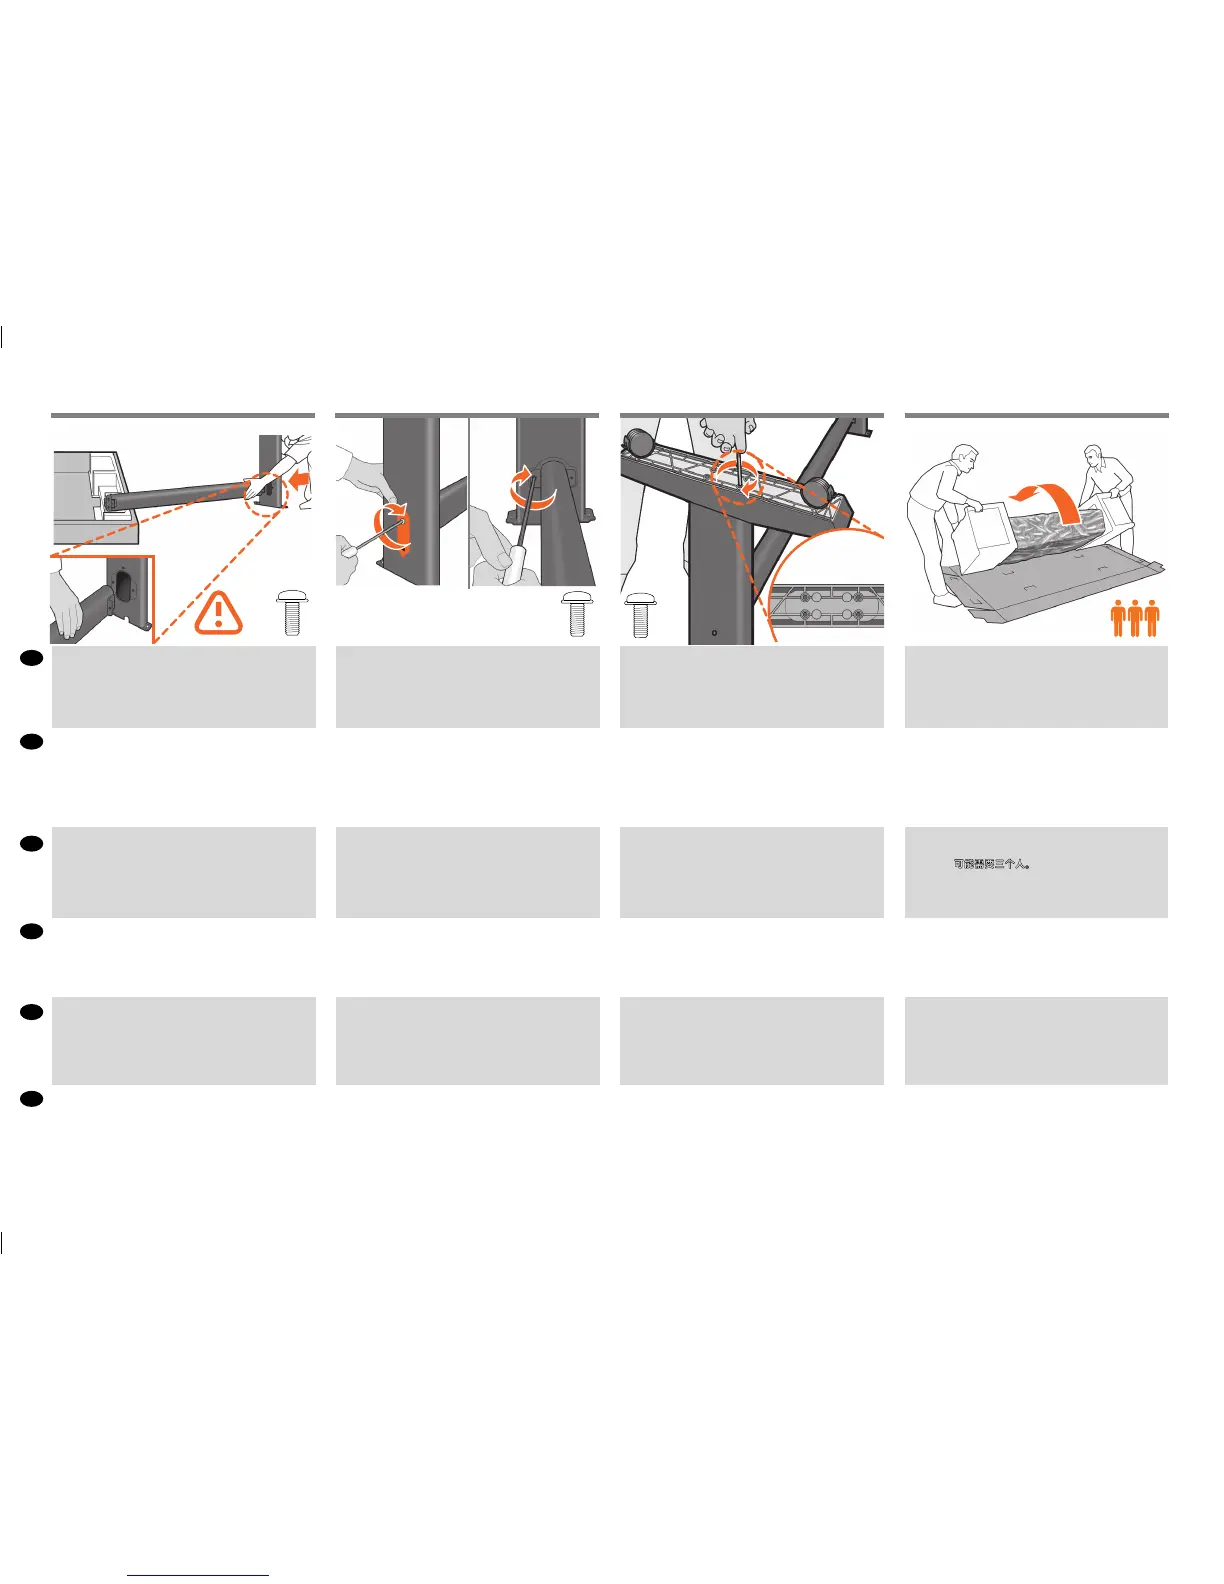
Support one end of the cross-brace on the stand box
and attach a leg to the other end with two screws on the
outside, then two on the inside of the leg. Don’t full tighten
the screws yet. Attach the other leg following the same
process. Now fully tighten the screws on the outside of the
legs, followed by the screws on the inside.
スタンドボックスのクロスブレースの一方の端を支え
て、他方の端に足を留め付けます。最初は足の外側、
次に内側にそれぞれ2個のねじで留め付けます。
まだ、ねじを完全に締めないでください。
同様にして、他の足も据え付けます。次に、足の外
側のねじを完全に締めた後、内側のねじも同様に締
めます。
将十字撑条的一端支撑在支架箱上,先用支脚外侧的
两颗螺丝,再用支脚内侧的两颗螺丝将支脚安装到另
一端。 暂时不要完全拧紧螺丝。按照相同的步骤安装
另一个支脚。 现在完全拧紧支脚外侧的螺丝,随后是
内侧的螺丝。
將橫撐桿的一端置於機架盒上,另一端先與腳柱結合,
腳柱外側鎖入兩顆螺絲,內側再鎖上兩顆螺絲。先不要
將螺絲完全鎖緊。依照相同步驟接上另一支腳柱。現在
鎖緊腳柱外側的螺絲,然後鎖緊內側螺絲。
버팀목의 한 쪽 끝을 스탠드 상자에 지탱시키면서 다른
한 쪽에 다리를 부착하는데, 이때 다리 바깥쪽에 2개의 나
사, 안쪽에 2개의 나사를 사용합니다. 아직 나사를 꽉 조이
지 마십시오. 다른 한 쪽 다리도 동일한 방식으로 부착합
니다. 이제 다리 바깥쪽 나사부터 꽉 조인 다음 안쪽 나사
도 꽉 조입니다.
Tunjang satu ujung batang penahan pada kotak dudukan
dan pasang sebuah kaki ke sisi lain dengan dua sekrup
pada sisi luar, lalu dua pada sisi dalam kaki. Jangan dulu
kencangkan sekrup sepenuhnya. Pasang kaki yang lain
dengan mengikuti proses yang sama. Sekarang kencang-
kan sekrup sepenuhnya pada sisi luar kaki, diikuti oleh
sekrup pada sisi dalam.
IMPORTANT: Make sure there is nothing on top of the
printer before continuing.
Return to the main body of the product, carefully turn the
product upside down in order to attach the legs. You may
need a third person.
重要 :作業を続ける前に、プリンタの上に何も載ってい
な いことを 確 認してください 。
プリンタ本体に戻り、脚部を取り付けるため、プリンタを
慎重に逆さにします。 必 要に 応じ て 3 人で 行ってくだ さ
い。
重要: 继续之前,请确保打印机最上面没有任何东西。
回到打印机主体,小心翻转打印机,使其面朝下以便安
装支柱。
可能需要三个人。
重要:繼續作業之前請確保印表機上方空無一物。
回到印表機的主體,然後從兩頭的泡棉端蓋中取出小擋
板。 您稍後可能需要第三位人員協助。
중요:
프린터 위에 아무것도 없는지 확인하고
진행하십시오.
프린터 본체로 돌아가서 다리를 연결하기 위해 프린터를
조심스럽게 뒤집어 놓습니다.
이때 다른 사람의 도움이
필요할 수 있습니다.
PENTING: Pastikan bahwa tidak ada benda apa pun di atas
printer sebelum melanjutkan.
Kembali ke badan utama printer, balikkan printer dengan
hati-hati untuk memasang kakinya. Anda mungkin
memerlukan orang ketiga.
Attach a foot to each leg, using four screws in each foot.
First t all four screws loosely, then tighten themup.
4本のネジで各足部を各脚部に固定します。
まず4本すべてのネジを緩めに取り付けてから、固く
締めます。
为每个支柱连接底板,每个底板使用四枚螺钉。先松松
地拧上这四枚螺钉,然后再拧紧。
為每隻腳架裝上腳座,每個腳座各用四顆螺絲鎖定。先
將四顆螺絲大致裝上,然後再一一鎖緊。
각 발에 나사 네 개씩 사용하여 각 다리에 발을
연결합니다. 먼저 나사 네 개를 모두 느슨하게
맞춘 후 꽉 조이십시오.
Pasang bagian dasar ke setiap kaki menggunakan 4 sekrup
di setiap bagian dasar. Pertama-tama, pasang 4 sekrup,
kemudian kencangkan.
6
13 14 15 16
 Loading...